
User guide
CML12SDP256 10/10/02
6
It is important to understand the development board's use of Memory and Addressing when
writing source code so you can locate your code at valid addresses. For example, when in
debug mode, you should put your program CODE in External RAM. In assembly language,
you locate the code with ORG statements in your source code. Any lines following an ORG
statement will begin at that ORG location, which is the first number following the word ORG,
for example: ORG $4000. You must start your DATA (or variables) in a RAM location unused
by your program, for example: ORG $1000.
In “debug mode” you’ll be using a debugger utility (Mon12, NoICE, etc) which will handle
initialization, interrupts vectors (reset, timers, etc), and the STACK. When finished debugging,
you must add code to your application to handle the initialization of the CPU, STACK and
possibly the Interrupt vectors. Some initialization is required to set the bus frequency, bus
mode, internal EEprom and Flash memory programming clock rates, and others, see the CML-
INIT.ASM file for a sample. Set the stack at the top of your available internal RAM below the
Ram interrupt vector table, for example $3F80, in assembly this would be LDS #$3F80. Also
install the RESET vector address in the Auto Start area, see the chapter in this manual.
If you are applying a software development tool that also provides a BDM cable interface to the
board, the monitor installed in the flash is not required. The BDM software tools may have the
capability to erase and program the flash memory. If this is the case, you may develop code in
the external ram memory or internal flash without applying the monitor resources. The MON12
S record is provided on the support CD to program into the flash if desired. The BDM will
allow locating programs in memory and applying resources reserved for the monitors.
A look at the example programs on the disk can make all of this clearer. If you're using a
compiler instead of an assembler, consult the compiler documentation for methods used to
locate (MAP) your code, data and stack.
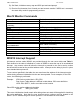
Assembling source code
An example program called “HELLO.ASM” is provided under the \EXAMPLES\CML12
directory of the CD and if you installed AxIDE, under that programs \EXAMPLE directory. You
must use the example for the MCU type installed on the CML12Sxxx board. For example use
the CML12S-DP256 example on the DP256 version board.
You can assemble source code by using the AxIDE "BUILD" button or command line tools
under a DOS prompt by typing:
AS12 HELLO.ASM –L HELLO
Most compilers and assemblers allow many command line options so using a MAKE utility or
batch file is recommended if you use this method. Run AS12 without any arguments to see all
the options, or see the AS12.TXT file on the disk.
The utility software, AxIDE, provided with this board contains a simple interface to this
assembler. Use it by selecting "Build" from its menu. This will prompt you for the file to be
assembled. NOTE: You must select your board from the pull down menu first, or it may not
build correctly.
DO NOT use long path or file names (> 8 characters). The free assembler is an older DOS
based tool that does not recognize them.