VIEW Certified Configuration Guide Motorola RFS6000 Wireless Switch May 2009 Edition 1725-36197-001 Version A
Configuration Guide Trademark Information Notice Polycom® and the logo designs SpectraLink® LinkPlus Link NetLink SVP Are trademarks and registered trademarks of Polycom, Inc. in the United States of America and various countries. All other trademarks used herein are the property of their respective owners. Polycom, Inc. has prepared this document for use by Polycom personnel and customers.
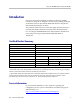
Motorola: RFS6000 Wireless Switch with AP300 Introduction Polycom’s Voice Interoperability for Enterprise Wireless (VIEW) Certification Program is designed to ensure interoperability and high performance between SpectraLink 8020/8030 Wireless Telephones and WLAN infrastructure products. The products listed below have been thoroughly tested in Polycom’s lab using the VIEW Certification Test Plan.
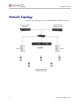
Configuration Guide Network Topology The following topology was used during VIEW Certification testing. 4 PN: 1725-36197-001_A.
Motorola: RFS 6000 Wireless Switch with AP300 Configuration Settings Installing a New Image The VIEW Certified firmware release can be obtained from Motorola’s Developer Zone at http://support.symbol.com/support/product/softwaredownloads.do. Upgrading the RFS6000 Wireless Switch to the new firmware can be done through the Web interface or through the command line interface (CLI). Place the image on the FTP server, TFTP server or through Compact Flash card, depending on the file transfer mechanism chosen.
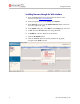
Configuration Guide Installing firmware through the Web interface 1. Open the RFS6000 applet by entering the IP address of the wireless switch: http://192.168.2.103 2. In the navigation pane under Switch, click Firmware. 3. In the Firmware screen, click the Update Firmware button located at the lower right of the page. 4. In the Update dialog box, select TFTP from the Using drop-down list. 5. At File, enter the RFS6000 firmware image filename. 6. At IP Address, enter the TFTP server IP address. 7.
Motorola: RFS 6000 Wireless Switch with AP300 9. In the navigation pane under Switch, click Configurations. 10. Click the Restart button to reboot the switch. PN: 1725-36197-001_A.
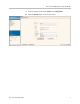
Configuration Guide Installing the AP license through the CLI For the RFS6000 to adopt AP300s, a license has to be installed. Obtain the license key and then install based on the following steps: RFS6000>en RFS6000#conf t RFS6000(config)#license AP Installing the AP license through the Web interface 1. Open the RFS6000 applet by entering the IP address of the wireless switch: http://192.168.2.103 2. In the navigation pane under Switch, click Licenses. 3.
Motorola: RFS 6000 Wireless Switch with AP300 Configuring the Wireless Switch from the Default Configuration Radio Settings Configuring radio settings through the CLI The parameters for default-11bg will be configured on the switch. When an AP is adopted on the switch it will inherit all the default11bg or 11a parameters. To configure radio settings for the wireless switch, use the following commands. When SpectraLink Wireless Telephones are configured for 802.
Configuration Guide When SpectraLink Wireless Telephones are configured for 802.
Motorola: RFS 6000 Wireless Switch with AP300 Configuring radio settings through the Web interface 1. Open the RFS6000 applet by entering the IP address of the wireless switch: http://192.168.2.103 2. In the navigation pane under Network, click Access Port Radios. 3. In the Configuration screen, click the Add button. 4. In the Add Radio dialog box, set the AP MAC Address (same for 802.11a and 802.11bg). 5.
Configuration Guide 7. Once the APs are adopted they should appear in the Access Port Radios screen in the Configuration tab. 8. Select the appropriate radio (Radio1 for 802.11b/g or Radio2 for 802.11a). 9. Click the Edit button. 10. In the Configuration dialog box, select the Placement, Desired Channel, Desired Power and Beacon Interval settings from the drop-down lists. 12 PN: 1725-36197-001_A.
Motorola: RFS 6000 Wireless Switch with AP300 11. Click the Rate Settings button. 12. In the Rate settings dialog box, set the desired Basic and Supported Rates. Click OK. 13. Click the DTIM Periods button. 14. In the DTIM Periods dialog box, set each value to 3. Click OK. PN: 1725-36197-001_A.
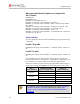
Configuration Guide For configuring power and data rate settings, please consult your facility’s RF site survey, designed for voice traffic, to determine if you have sufficient coverage to support all data rates. SpectraLink Wireless Telephones require the following minimum dBm reading to support the corresponding Basic data rate setting in the access point. 802.11 Radio Standard 802.11b 802.11g 802.
Motorola: RFS 6000 Wireless Switch with AP300 SSID, QoS and Security Settings Configuring SSID, QoS and security settings through the CLI Configure the SSID, QoS and security (WPA-PSK) settings of the wireless switch using the following commands: RFS6000>en RFS6000#conf t RFS6000(config)#wireless RFS6000(config-wireless)#wlan RFS6000(config-wireless)#wlan RFS6000(config-wireless)#wlan RFS6000(config-wireless)#wlan RFS6000(config-wireless)#wlan RFS6000(config-wireless)#wlan 1 1 1 1 1 1 enable ssid spectra
Configuration Guide Configuring SSID, QoS and security settings through the Web interface 1. Open the RFS6000 applet by entering the IP address of the wireless switch: http://192.168.2.103 2. In the navigation pane under Network, click Wireless LANs. 3. In the Configuration tab screen, select WLAN1 and click the Enable button. 4. After enabling WLAN1 click the Edit button. 16 PN: 1725-36197-001_A.
Motorola: RFS 6000 Wireless Switch with AP300 5. To configure SSID, enter spectralink in the ESSID field. 6. To configure QoS, select the Enable SVP checkbox. This will prioritize voice packets as instructed by the SVP protocol. 7. Select Low from the Access Category drop-down list. This will cause all non-voice packets to get lower priority. PN: 1725-36197-001_A.
Configuration Guide 8. To configure security, in the Encryption section select the WPA/WPA2-TKIP check box. 9. Click the Config button. The dialog box shown below will appear. 10. In the Key Settings section, enter 12345678 under ASCII Passphrase. 11. Click OK. 18 PN: 1725-36197-001_A.