
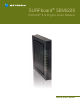
Installation guide


Testing the Connections
To verify that all the components were properly installed, perform the following connectivity test:
Power on your computer and then log on.1.
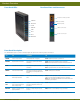
Check that all the LEDs on the SBV6220 front panel are either 2. on or fl ashing, except for TEL 1 and TEL 2. The telephony LEDs will
be on if the SBV6220 is set up for telephone service.
Note: See Front Panel Description on page 2 for status information on the LEDs that are fl ashing.
Open a web browser.3.
Go to any website to check for an Internet connection.4.
Check the telephone for a dial tone. If there is no dial tone, then you may not have a telephone service subscription.5.
Note: Contact your service provider to provision the telephony line(s).
If the connectivity test failed, see Troubleshooting on page 5 for a possible solution.
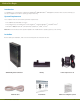
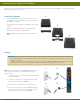
Connect your telephone and computer to the SBV6220
Note: Do not connect the telephone cable from either TEL
port to a traditional telephone service; only connect it to a
telephone.
For a single or two-line telephone:
1. Plug one end of the telephone cable into your telephone.
2. Plug the other end of the telephone cable into TEL 1/2 port
on the back of the SBV6220.
Note: You must use the TEL 1/2 port to connect a two-line
telephone.
For a second single-line telephone, fax machine, or other
device:
3. Plug one end of the device cable into the device.
4. Plug the other end of the device cable into the TEL 2 port on
the back of the SBV6220.
5. To connect your computer, insert one end of the Ethernet
cable into the Ethernet port on your computer.
6. Insert the other end of the Ethernet cable into the Ethernet
port on the back of the SBV6220.
Connecting Your Digital Voice Modem
1
2
34
56
SBV6220 Quick Start Guide 4