IMPORTANT SAFEGUARDS When using electrical appliances, basic safety precautions should always be followed to reduce the risk of fire, electric shock and/or injury to persons, including the following: • Read all instructions before using the Coffeemaker. Decanter Use and Care Follow the instructions below to reduce or eliminate the chance of breaking the decanter: This decanter is designed for use with your MR.
IMPORTANT SAFEGUARDS When using electrical appliances, basic safety precautions should always be followed to reduce the risk of fire, electric shock and/or injury to persons, including the following: • Read all instructions before using the Coffeemaker. Decanter Use and Care Follow the instructions below to reduce or eliminate the chance of breaking the decanter: This decanter is designed for use with your MR.
Table of Contents Important Safeguards . . . . . . . . . . . . . . . . . . . . . . . . . . . . . . . . . . . . . . . . . . . . . . . . . . . 2 Special Cord Instructions . . . . . . . . . . . . . . . . . . . . . . . . . . . . . . . . . . . . . . . . . . . . . . . . 3 Setting Up Your Coffeemaker . . . . . . . . . . . . . . . . . . . . . . . . . . . . . . . . . . . . . . . . . . . . . 5 Setting Up Your Coffeemaker Congratulations on the purchase of your new MR.
Table of Contents Important Safeguards . . . . . . . . . . . . . . . . . . . . . . . . . . . . . . . . . . . . . . . . . . . . . . . . . . . 2 Special Cord Instructions . . . . . . . . . . . . . . . . . . . . . . . . . . . . . . . . . . . . . . . . . . . . . . . . 3 Setting Up Your Coffeemaker . . . . . . . . . . . . . . . . . . . . . . . . . . . . . . . . . . . . . . . . . . . . . 5 Setting Up Your Coffeemaker Congratulations on the purchase of your new MR.
7
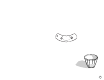
Setting the Clock (Models ECX20, ECX23, ECX30, ECX33) Water Filtration System The clock flashes on the control panel to indicate that it has not been set. (Models ECX30 and EXC33 Only) You must set the clock if you want to use the timer feature. To set the clock: 1) Figure A-1 To insert the water filtration system into your coffeemaker please follow these steps. Press and hold the HOUR button until the clock displays the correct hour.
Setting the Clock (Models ECX20, ECX23, ECX30, ECX33) Water Filtration System The clock flashes on the control panel to indicate that it has not been set. (Models ECX30 and EXC33 Only) You must set the clock if you want to use the timer feature. To set the clock: 1) Figure A-1 To insert the water filtration system into your coffeemaker please follow these steps. Press and hold the HOUR button until the clock displays the correct hour.
6) Place the decanter on the warming plate. For Models ECX20 and ECX23: Press the BREW NOW button. Make sure the decanter is accurately centered on the warming plate or the water and grounds will overflow from the brew basket. An overflow may cause personal injury or damage to property. The ON/OFF indicator will light, indicating that the Coffeemaker is on and the brew cycle will begin. When the coffee stops flowing, the brew cycle is complete.
6) Place the decanter on the warming plate. For Models ECX20 and ECX23: Press the BREW NOW button. Make sure the decanter is accurately centered on the warming plate or the water and grounds will overflow from the brew basket. An overflow may cause personal injury or damage to property. The ON/OFF indicator will light, indicating that the Coffeemaker is on and the brew cycle will begin. When the coffee stops flowing, the brew cycle is complete.
13
12 13
Adjusting the Warming Plate Temperature (Models ECX30 and ECX33) You can adjust the warming plate temperature to five different settings, from warm to very hot. To adjust the warming plate temperature: Press the MIN. button to lower the temperature of the warming plate. Press the MAX. button to raise the temperature of the warming plate. Maintaining Your Coffeemaker Maintaining your Coffeemaker and its parts will help extend the life of the appliance.
Adjusting the Warming Plate Temperature (Models ECX30 and ECX33) You can adjust the warming plate temperature to five different settings, from warm to very hot. To adjust the warming plate temperature: Press the MIN. button to lower the temperature of the warming plate. Press the MAX. button to raise the temperature of the warming plate. Maintaining Your Coffeemaker Maintaining your Coffeemaker and its parts will help extend the life of the appliance.
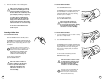
For Models: • EC12 and EC13 a. Place the ON/OFF switch in the ON position to turn the Coffeemaker on. • ECX20 and ECX23 a. Press the BREW NOW button to turn the Coffeemaker on. • ECX30 and ECX33 a. Press the Clean Cycle button. The Clean Cycle indicator will light. b. When three cups of vinegar have flowed into the decanter, turn the Coffeemaker off and let the vinegar stand for 30 minutes. c. Place the decanter on the warming plate and turn the Coffeemaker back on and let all the vinegar flow through.
For Models: • EC12 and EC13 a. Place the ON/OFF switch in the ON position to turn the Coffeemaker on. • ECX20 and ECX23 a. Press the BREW NOW button to turn the Coffeemaker on. • ECX30 and ECX33 a. Press the Clean Cycle button. The Clean Cycle indicator will light. b. When three cups of vinegar have flowed into the decanter, turn the Coffeemaker off and let the vinegar stand for 30 minutes. c. Place the decanter on the warming plate and turn the Coffeemaker back on and let all the vinegar flow through.
TROUBLESHOOTING P OTENTIAL P ROBLEMS P ROBABLE C AUSE “ON” LIGHT DOES NOT ILLUMINATE • Unplugged Service and Maintenance Replacement Parts • Filters For better tasting coffee and tea, we recommend that you use MR. COFFEE® brand 8-12 cup #4 cone style filters or MR. COFFEE® brand permanent filters. These filters are available at most grocery stores. Please call 1-800-672-6333 or 1-800-MR COFFEE in the U.S. or Canada for information on where you can find a store that carries these filters.
TROUBLESHOOTING P OTENTIAL P ROBLEMS P ROBABLE C AUSE “ON” LIGHT DOES NOT ILLUMINATE • Unplugged Service and Maintenance Replacement Parts • Filters For better tasting coffee and tea, we recommend that you use MR. COFFEE® brand 8-12 cup #4 cone style filters or MR. COFFEE® brand permanent filters. These filters are available at most grocery stores. Please call 1-800-672-6333 or 1-800-MR COFFEE in the U.S. or Canada for information on where you can find a store that carries these filters.
One-Year Limited Warranty Notes Sunbeam Products, Inc. (“Sunbeam”) warrants that for a period of one year from the date of purchase, this product will be free from defects in material and workmanship. Sunbeam, at its option, will repair or replace this product or any component of the product found to be defective during the warranty period. Replacement will be made with a new or remanufactured product or component.
One-Year Limited Warranty Notes Sunbeam Products, Inc. (“Sunbeam”) warrants that for a period of one year from the date of purchase, this product will be free from defects in material and workmanship. Sunbeam, at its option, will repair or replace this product or any component of the product found to be defective during the warranty period. Replacement will be made with a new or remanufactured product or component.
Notes/Notas
PRECAUCIONES IMPORTANTES Cuando use algún aparato eléctrico siempre deben de seguirse precauciones básicas de seguridad incluyendo las siguientes para reducir el riesgo de incendio o descargas eléctricas, y /o daños a personas: Cuidado y Uso de la Jarra Siga las siguientes instrucciones para reducir o eliminar el riesgo de romper la jarra: Esta jarra está diseñada para ser utilizada con su cafetera MR.
PRECAUCIONES IMPORTANTES Cuando use algún aparato eléctrico siempre deben de seguirse precauciones básicas de seguridad incluyendo las siguientes para reducir el riesgo de incendio o descargas eléctricas, y /o daños a personas: Cuidado y Uso de la Jarra Siga las siguientes instrucciones para reducir o eliminar el riesgo de romper la jarra: Esta jarra está diseñada para ser utilizada con su cafetera MR.
Preparando Su Cafetera ¡Felicitaciones por la compra de su nueva cafetera MR. COFFEE®! Por favor lea estas instrucciones cuidadosamente antes de usar su nueva cafetera. El uso, cuidado y mantenimiento adecuado asegurarán una operación sin problemas y una larga duración de este aparato. Guarde estas instrucciones para la información de limpieza y si es necesario para la información de partes de repuesto. Características de Su Cafetera Su nueva cafetera MR.
Preparando Su Cafetera ¡Felicitaciones por la compra de su nueva cafetera MR. COFFEE®! Por favor lea estas instrucciones cuidadosamente antes de usar su nueva cafetera. El uso, cuidado y mantenimiento adecuado asegurarán una operación sin problemas y una larga duración de este aparato. Guarde estas instrucciones para la información de limpieza y si es necesario para la información de partes de repuesto. Características de Su Cafetera Su nueva cafetera MR.
m a b c d f g e n i h j k l 2B Modelos ECX30 y ECX33 26 27
m a b c d f g e n i h j k l 2B Modelos ECX30 y ECX33 26 27
Ajustando el Reloj Añadiendo Agua y Café Molido (Modelos ECX20, ECX23, ECX30, ECX33) El reloj se ilumina intermitentemente en el panel de control para indicar que no ha sido ajustada la hora correcta. 1) Gire la canasta de preparación para abrirla y saque la canasta para filtro removible. Usted debe fijar el reloj si usted desea utilizar la función del cronómetro.
Ajustando el Reloj Añadiendo Agua y Café Molido (Modelos ECX20, ECX23, ECX30, ECX33) El reloj se ilumina intermitentemente en el panel de control para indicar que no ha sido ajustada la hora correcta. 1) Gire la canasta de preparación para abrirla y saque la canasta para filtro removible. Usted debe fijar el reloj si usted desea utilizar la función del cronómetro.
Para Modelos ECX20 y ECX23: Presione el botón para preparar ahora BREW NOW. El indicador de encendido/apagado ON/OFF se encenderá, indicando que la cafetera está encendida y el ciclo de preparación comenzará. Cuando el café deje de fluir, el ciclo de preparación ha terminado. Para apagar la cafetera, presione el botón BREW NOW. Si la canasta de preparación derrama café o no vacía el café a la jarra, no abra la canasta de preparación. Apague la cafetera.
Para Modelos ECX20 y ECX23: Presione el botón para preparar ahora BREW NOW. El indicador de encendido/apagado ON/OFF se encenderá, indicando que la cafetera está encendida y el ciclo de preparación comenzará. Cuando el café deje de fluir, el ciclo de preparación ha terminado. Para apagar la cafetera, presione el botón BREW NOW. Si la canasta de preparación derrama café o no vacía el café a la jarra, no abra la canasta de preparación. Apague la cafetera.
Para Modelos ECX30 y ECX33: Usted debe programar la hora en la que le gustaría que su cafetera inicie la preparación del café. 1) Si desea hacer cuatro tazas de café o menos, presione el botón de 1 a 4 tazas. 2) Presione y detenga el botón PRESS HOLD. 3) Mientras aun presiona y detiene el botón PRESS HOLD, presione y detenga el botón de hora HOUR hasta que la pantalla en el reloj muestre la hora que usted desea.
Para Modelos ECX30 y ECX33: Usted debe programar la hora en la que le gustaría que su cafetera inicie la preparación del café. 1) Si desea hacer cuatro tazas de café o menos, presione el botón de 1 a 4 tazas. 2) Presione y detenga el botón PRESS HOLD. 3) Mientras aun presiona y detiene el botón PRESS HOLD, presione y detenga el botón de hora HOUR hasta que la pantalla en el reloj muestre la hora que usted desea.
Mantenimiento de Su Cafetera El cuidar y mantener su cafetera y sus piezas, le ayudarán a extender la vida útil del aparato. Limpieza de la Cafetera Usted debe limpiar su cafetera cuando note cualquiera de las siguientes condiciones: • salida excesiva de vapor • aumento considerable de los tiempos de preparación de café • La acción de bombeo se detiene antes de que toda el agua haya sido extraída del tanque para agua Esto es causado por acumulación de residuos minerales que se encuentran en el agua.
Mantenimiento de Su Cafetera El cuidar y mantener su cafetera y sus piezas, le ayudarán a extender la vida útil del aparato. Limpieza de la Cafetera Usted debe limpiar su cafetera cuando note cualquiera de las siguientes condiciones: • salida excesiva de vapor • aumento considerable de los tiempos de preparación de café • La acción de bombeo se detiene antes de que toda el agua haya sido extraída del tanque para agua Esto es causado por acumulación de residuos minerales que se encuentran en el agua.
Limpieza de la Jarra Para los Modelos: • EC12 y EC13 a. Coloque el interruptor ON/OFF en la posición de encendido ON y así encender la cafetera. • ECX20 y ECX23 a. Presione el botón para preparar ahora BREW NOW y así encender la cafetera. FOR POSITION O N LY El agua dura puede dejar manchas blancas en la jarra. El café y el té pueden tornar estas manchas color café. Para remover las manchas de la jarra: 1) Llene la jarra con una solución que contenga partes iguales de agua y vinagre.
Limpieza de la Jarra Para los Modelos: • EC12 y EC13 a. Coloque el interruptor ON/OFF en la posición de encendido ON y así encender la cafetera. • ECX20 y ECX23 a. Presione el botón para preparar ahora BREW NOW y así encender la cafetera. FOR POSITION O N LY El agua dura puede dejar manchas blancas en la jarra. El café y el té pueden tornar estas manchas color café. Para remover las manchas de la jarra: 1) Llene la jarra con una solución que contenga partes iguales de agua y vinagre.
PROBLEMAS Y SOLUCIONES PROBLEMAS POTENCIALES CAUSAS PROBABLES LA LUZ DE ENCENDIDO “ON” NO SE ILUMINA • Está desconectada Servicio y Mantenimiento Partes de Repuesto • Para un café o te con mejor sabor, recomendamos que utilice los filtros de papel para preparar de 8 a 12 tazas, marca MR. COFFEE® o los filtros permanentes marca MR. COFFEE®. Estos filtros están disponibles en casi todos los supermercados.
PROBLEMAS Y SOLUCIONES PROBLEMAS POTENCIALES CAUSAS PROBABLES LA LUZ DE ENCENDIDO “ON” NO SE ILUMINA • Está desconectada Servicio y Mantenimiento Partes de Repuesto • Para un café o te con mejor sabor, recomendamos que utilice los filtros de papel para preparar de 8 a 12 tazas, marca MR. COFFEE® o los filtros permanentes marca MR. COFFEE®. Estos filtros están disponibles en casi todos los supermercados.
Garantía Limitada de 1 Año Sunbeam Products Inc. (“Sunbeam”) garantiza que, por un período de un año a partir de la fecha de compra, este producto estará libre de defectos en el material y en la mano de obra. Sunbeam a su criterio, reparará o remplazará este producto o cualquiera de los componentes del mismo que estén defectuosos durante el período de garantía. El remplazo será hecho con un producto o componente nuevo o reconstruido.
Notes/Notas 31
Notes/Notas