
Operating instructions


98
Water Filtration System
(Models ECX30 and EXC33 Only)
Congratulations, your coffeemaker includes the
MR. COFFEE
®
water filtration system! This carbon-based
water filtration system improves the taste of your
coffee
by removing 97% of the chlorine from the
water that you use to brew your coffee.
To insert the water filtration system into your
coffeemaker please follow these steps.
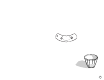
1)
Place water filtration disk in the center of the
permanent filter that was included with your
coffeemaker.
2)
Place permanent filter with the water filtration disk
on top of it into your removable filter basket.
3)
Reattach the removable filter basket on to your
coffeemaker.
4)
Close the brew basket to ensure that the filter has
been properly inserted. If the brew basket does
not close properly then repeat Steps 1 – 3 again.
Note: When you are ready to brew coffee. Simply
remove the water filtration disk and insert the
desired amount of coffee into your permanent
filter. Then place the water filtration disk back
on top of the permanent filter and close the
brew basket. Your water filtration disk will
need to be replaced once every 30 days
(approximately 30 brew cycles). Replacement
water filtration disks can be purchased through
your local retailer or by calling 1-800-MR COFFEE
(1-800-672-6333).
Adding Water and Ground Coffee
1) Swing out the brew basket so that it is extended
out from the coffeemaker.
2) Place a MR. COFFEE
®
brand 8-12 cup #4 cone style
filter or a MR. COFFEE
®
permanent filter in the
removable filter basket.
3) Add the desired amount of ground coffee
to the filter. Gently shake the filter basket
to level the ground coffee.
4) Reinsert the removable filter basket back on
to the Coffeemaker. Be certain that the filter
is centered in the basket and then close
the lid to the brew basket.
5) Fill the water reservoir with the desired amount
of tap water. See Figure C-1 (for Models EC12,
EC13, ECX20 and ECX23 only).
Figure C-1
Brewing Coffee
Cleaning the Coffeemaker Before First Use
Follow the steps under “Adding Water and Ground Coffee” and “Brewing Coffee Now,”
but do not add coffee grounds.
Selecting and Measuring Ground Coffee
For best results, use coffee ground for use with automatic drip Coffeemakers.
The amounts shown below are suggested amounts.
Number of Cups Tablespoons
12 9
10 7.5
86
64.5
43
21.5
One cup = Five ounces brewed coffee
Setting the Clock (Models ECX20, ECX23, ECX30, ECX33)
The clock flashes on the control panel to indicate that it has not been set.
You must set the clock if you want to use the timer feature.
To set the clock:
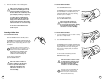
1) Press and hold the HOUR button until the clock
displays the correct hour.
See Figure A-1 (for Models ECX20 and ECX23)
or Figure A-2 (for Models ECX30
and EC
X33).
The PM indicator will light to indicate a PM time;
if the PM indicator is not lit, the time is AM.
2) Press and hold the MIN. button until the clock
displays the correct minute.
See Figure B-1 (for Models ECX20 and ECX23)
or Figure B-2 (for Models ECX30 and ECX33).
The clock is now set.
Figure A-1
Figure B-1
Figure A-2
Figure B-2