
Owner manual

GENERAL INFORMATION
Before you begin the installation of this remote oil filter
system kit, please take a few minutes to read the installa-
tion instructions thoroughly.
Work Safely
Perform this installation on a good clean level surface for
maximum safety and protection.
Installation of remote oil filter system requires working
underneath vehicle. Raise front of vehicle by lifting at
points specified by the vehicle manufacturer. Place blocks
or wedges in front of and behind both rear wheels to pre-
vent movement in either direction. Support the vehicle
with approved automotive support stands or wheel
ramps. Do not use a bumper jack for supporting vehicle.
IMPORTANT!
To avoid any possibility of bodily injury, do not get under-
neath vehicle until you ar confident that it is safely sup-
ported and will not move or fall from its raised position.
Make sure engine is cool to the
touch and oil has cooled sufficiently before
beginning installation.
Tools Required
7/8” Open End Wrench Hammer
3/8” Drill Bit Ratchet
*3/8” Hex Key Wrench Center-Punch
1/2” Open End Wrench Utility Knife
1/2” Socket Electric Hand Drill
Thread Sealing Tape
(*) Required for Remote Dual Oil Filter System Kits.
Oil Filter By-Pass and Remote
Filter Bracket Mounting
1. Place drain pan underneath oil filter and remove
filter from engine block.
Note: A complete oil change is not necessary for this
installation but is recommended if oil has not been
changed within 2,000 miles.
2. Check by-pass adapter and remote filter mounting
bracket to be sure they are clean and free of any metal
chips or burrs.
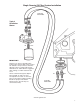
3. Insert o-ring into the groove located in oil filter
by-pass adapter. Lubricate top of o-ring using a light
film of oil. Spin by-pass adapter onto engine block until
snug, then tighten an additional 3/4
to 1 full turn same as the stock oil filter (Refer
to illustration).
4. Select the best location for remote oil filter
mounting bracket. The firewall, fenderwell, or frame rail
are convenient locations. Be sure oil filter has sufficient
ground clearance and mark location for remote bracket
with a grease pen or scribe.
Note: Remote oil filter bracket can be mounted verti-
cally or horizontally whichever is most
convenient for your application.
5. Before starting, measure distance between by-pass
adapter on engine block and remote oil filter bracket.
One length (60”) of high temperature hose is supplied
to complete the connections. This hose must be cut in
two (2) individual lengths. Before cutting, make sure
remote oil filter mounting
bracket is located close enough to the by-pass adapter.
For installations that require more hose length,
Mr. Gasket has available a 96” length of hose
part no. 7697, this will allow using two (2) lengths of
hose up to 48” each for these applications.
6. Use the remote oil filter mounting bracket as a tem-
plate and mark mounting holes with a grease pen or
scribe. Center-punch hole locations and make sure
underside is free and clear from any obstructions. Drill
three (3) 3/8” holes through
surface and debur holes.
7. Place remote oil filter bracket onto mounting
location and attach using 5/16” hex head bolts,
flat washers, and lock-nuts supplied. Tighten all nuts
and bolts securely.
Note: The dual remote oil filter mounting bracket
requires installing hex head bolts through bracket from
the back side.
Oil Hose Assembly and Fitting Installation
IMPORTANT!
Keep hose as short as possible when routing. Hose must
not kink, crimp, contact hot exhaust or sharp surfaces, oth-
REMOTE OIL FILTER SYSTEM
SINGLE OR DUAL OIL FILTER APPLICATIONS
INSTALLATION INSTRUCTIONS
NOT RECOMMENDED FOR MARINE OR DIESEL APPLICATIONS
1
FORM 97140111 (Rev B) 01/12
www.mr-gasket.com