
Owner manual

erwise damage to hose or engine will result. A minimum
3-1/2” radius bend is suggested when routing, or oil flow
restriction will occur. Most installations can be completed
using two (2) 30” hose lengths. Measure length needed
and cut carefully using a utility knife. Hose must be cut
straight and evenly.
1. After hose is cut to the correct length, install brass fit-
tings (push-loc type) into hose. Lubricate each fitting
and inner liner of hose with soapy water or light oil.
Insert fittings (male on one end and female flare on
opposite end) into each hose until first barb is com-
pletely covered. Place end of fitting against a flat sur-
face (bench or wall), grasp hose approximately one inch
from end and push
straight forward turning side to side until end of hose is
covered by yellow cap on fitting. No
external clamps are required with push-loc type brass
fittings.
2. Using thread sealing tape, wrap the 1/2” NPT end
of male flare fittings and screw into remote oil filter
mounting bracket. Carefully tighten both fittings
securely using a 7/8” open end wrench or deep
well socket and torque wrench,
do not exceed 20 ft. lbs.
CAUTION! DO NOT OVERTIGHTEN.
ALUMINUM CASTING MAY CRACK OR BREAK.
3. Wrap thread sealing tape around external threads
of male fittings inserted into hoses. Screw into
threaded holes of the by-pass adapter marked “in”
and “out”. Using a 7/8” open end wrench
carefully tighten brass fittings securely.
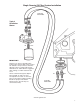
IMPORTANT!
Hoses connected to by-pass adapter ports marked “in”
and “out” must correspond to the same “in” and “out”
ports on the remote oil filter mounting bracket for proper
oil circulation. Check hoses to be sure they are connected
correctly. (Refer to illustration).
Note: The dual remote oil filter mounting bracket
requires installing two (2) 1/2” hex socket pipe plugs
(supplied) into threaded holes on remote bracket
opposite hoses, use sealing tape on threads. Using a
3/8” hex key wrench tighten pipe plugs securely.
Oil Filter Installation
1. Screw end of nipple(s) (short end with less threads) into
remote oil filter mounting bracket and tighten securely.
Mr. Gasket single and dual remote oil
filter mounting brackets require using oil filters
with 3/4”-16 threads and 2-1/2” I.D. x 2-3/4” O.D. o-ring
seal dimensions. Oil filter recommendation are listed
below:
2. Lubricate o-ring on oil filter using a light film of oil. Spin
oil filter(s) onto remote mounting bracket until snug,
then tighten an additional 3/4 to 1 full turn. Caution -
do not overtighten.
Note: If remote oil filter mounting bracket is mounted
so that filter(s) are in a vertical position, fill oil filter(s)
with proper engine oil required and install onto
remote bracket. This will produce oil pressure quickly.
3. If a complete oil change was necessary, add new oil
to engine. Refer to the vehicle manufacturer’s service
manual for type of oil, quantity, and oil pressure speci-
fications.
4. Start engine and check oil pressure warning light or oil
pressure gauge if equipped.
Warning! If oil pressure light stays on past five seconds
or gauge indicates low oil pressure, turn engine “off”
immediately.
Check hoses, make sure they are connected to the cor-
rect “inlet” and “outlet” ports on by-pass adapter and
remote oil filter mounting bracket. Check for excessive
bends in hose smaller than the minimum 3-1/2” radius
bend allowed.
Note: If vehicle is not equipped with a mechanical or
electrical oil pressure gauge, it is recommended that
one be installed to monitor engine oil
pressure.
5. Start engine and let idle for five minutes, check all con-
nections for oil leakage while engine is running. Turn
engine “off” and check oil level on dipstick. Oil level
may indicate “low” because of oil required to fill new
hoses. Add additional oil to “full” line on dipstick.
Note: If remote oil filter bracket is mounted higher
than oil pan, oil level may indicate above “full” line on
dipstick. This is due to oil draining back into the oil pan
from hoses.
2
www.mr-gasket.com
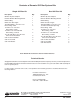
OIL FILTER RECOMMENDATIONS
AC FRAM MOPAR MOTORCRAFT NAPA PUROLATOR
PF20 PH43 L19 FL300 1068 PER81
*PF2 *PH8A *L138 *FL1A *1515 *PER100
(*) Designates long oil filter design.