
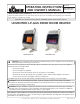
Use and Care Manual

6
Installation Instructions and Owner’s Manual
Unvented Liquid Propane Fired Room Heater
WARNING: A qualifi ed service person must install
heater. Follow all local codes.
CHECK GAS TYPE
Use only LP-gas. If your gas supply is not LP-gas, do
not install heater. Call dealer where you bought heater
for proper type heater.
THIS INSTALLATION REQUIRES:
Before installing heater, make sure you have the items
listed below:
• Piping (check local codes)
• Sealant (resistant to LP_Gas)
• Equipment shutoff valve*
• Ground joint union
• Test gauge connection*
• Sediment trap
• Tee joint
• Pipe wrench
*A CSA/AGA certifi ed equipment shutoff valve with 1/8”
NPT tap is an acceptable alternative to test gauge con-
nection. Purchase a CSA/AGA certifi ed equipment shutoff
valve from your dealer.
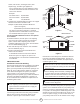
LOCATING HEATER
This heater is designed to be mounted on the wall. The
heater can also be located on a non-combustible fl oor,
away from a wall by using the fl oor mounting stands in-
cluded with the heater. If installed on combustible fl oor-
ing such as carpeting, tile or other combustible material
other than wood fl ooring, the heater must be placed on
a wood panel the full width and depth of the appliance.
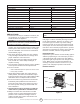
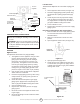
Figure 4
For convenience and effi ciency, install the heater:
• Where there is easy access for operation,
inspection, and service.
• In the coldest part of the room.
CAUTION: If you install the heater in a home garage:
• Heater pilot and burner must be at least 18
inches above fl oor .
• Locate heater where moving vehicle will not hit it.
CAUTION: This heater creates warm air currents. These
currents move heat to wall surfaces next to heater. Install-
ing heater next to vinyl or cloth wall covering or operat-
ing heater where impurities (such as tobacco smoke,
aromatic candles, cleaning fl uids, oil or kerosene lamps,
etc.) are present in the air may discolor walls.
WARNING: Never install the heater:
• In a recreational vehicle .
• Where curtains, furniture, clothing, or other
fl ammable objects are less than 36 inches from
the front, top, or sides of the heater.
• As a fi replace insert
• In high-traffi c areas
• In windy or drafty areas
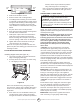
WARNING: Heater must be mounted to maintain
the minimum clearances shown in Figure 4. If pos-
sible, provide greater clearances from the fl oor, ceil-
ing, and joining walls.
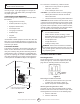
FASTENING HEATER TO WALL
Mounting Bracket
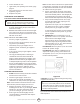
The mounting bracket in located on the back panel of
heater (see fi gure 5). It has been taped there for ship-
ping. Remove mounting bracket from back panel.
Figure 5
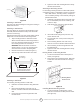
Removing Front Panel of Heater
1. Remove (4) screws total there are (2) screws
on either side of the heater .(Figure 6)
2. Pull the front panel and back panel apart.
Attaching Mounting Bracket to Wall
Use holes on each end of mounting bracket to attach
bracket to wall. These holes are 16 inches apart. Attach
mounting bracket to wall in one of two following ways.
1. Attach to wall studs
2. Attach to wall anchor
Mounting
Bracket
Left
Side
Right
Side
36”(915cm)
min. from ceiling
10” (254cm)
from sides
3” min. to top surface of carpet, tile
or other combustible material
Floor