
Installation Manual


Refrigerant Line Connections
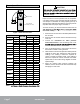
Line Sizes
The refrigerant line sets should be sized according to the
recommendations given in the condensing unit installation
instructions. Use Table 1 to determine correct braze
to match line set connections.
Model Number Suction Liquid
18/24
24
30
30/36
36
3/4 Inch
3/8 Inch
48
49
50/60
60
7/8 Inch
Table 1. Refrigerant Line Connections
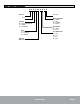
Replacement Parts
If replacement parts are necessary, order kit 69J46. The
kit includes:
• 10 – Brass nuts for liquid line assemblies
•
•
• 10 Liquid line assemblies
TEFLON RINGS (20)
BRASS NUTS (10)
LIQUID LINE ASSEMBLIES
(INCLUDES STRAINER) (10)
LIQUID LINE ORIFICE HOUSINGS (10)
LIQUID LINE
ASSEMBLY
COPPER
TUBE
PISTON
RETAINER
STRAINER
Figure 1. 69J46 Kit Components
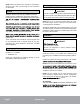
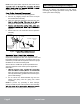
Brazing Guidelines
Use a silver alloy brazing rod (5 or 6 percent silver alloy for
copper-to-copper connections or 45 percent silver alloy for
copper-to-brass or copper-to-steel connections).
heat shield, such as a wet rag, against the unit cabinet
bulb. The heat shield must be in place to prevent heat
damage during brazing. See Figure 2.
WATER-
SATURATED
RAGS
PLACE A WET RAG AGAINST
COIL CABINET AND AROUND
THE SUCTION LINE
CONNECTION.
BRAZE CONNECTION. ALLOW
PIPE TO COOL BEFORE
REMOVING WET RAG.
1
2
Figure 2. Braze Refrigerant Lines
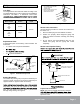
Suction Line Connection
Use the following procedure to connect the suction line to
the indoor coil:
1. Remove rubber plug from the stubbed connection.
2. Position the properly sized refrigerant piping and
make the brazed connection following the brazing
guidelines.
3. Do not remove the water-saturated rags from the
cabinet and piping until the piping has cooled
completely.
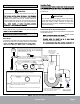
Suction Line Equalizer Fitting
IMPORTANT
SUCTION LINE
FLARE NUT
REMOVE AND DISCARD FLARE
SEAL BONNET IF PRESENT
MALE BRASS EQUALIZER LINE
FITTING
FLARE
SEAL CAP
OR
Figure 3. Suction Line Male Equalizer Line
Liquid Line Connection
NOTE:
system matches with this coil require use of a check/
expansion valve.
The coils are shipped with a factory-installed
Page 4
mrcool.com