
Installation Guide
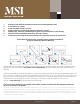


Begin the next row with the cut off piece from the previous row to create the necessary stagger pattern. This
piece should be a minimum of 8” (20cm) long and the joint offset from the previous row should be at least 10”
(26cm) apart. To attach, tilt the plank you are installing slightly upwards (about 15-25º), insert its tongue into the
previous row’s groove and lower it into place. The plank will click into place with light pressure (Figure E).
Install the second plank in the second row by inserting the short end tongue into the previously installed plank’s
groove. Align the plank so that the long side tongue tip is positioned just over the groove lip of the plank in the
rst row (Figure F). Working from the end seam, at a low angle, insert the long tongue into the groove of the
adjoining plank. Very little force is required to t the tongue into the groove. You should be able to feel the tongue
lock into the groove (Figure G). Continue locking each piece into place, short side rst and then long side.
To t the last row, lay a plank on top of the previous row. With the plank against the wall, mark a line down the
length of the plank and cut the planks accordingly (Figure H).
Door Frames and heating vents also require expansion room. Cut the planks to the correct length. Place the
cut plank next to its actual position, use a ruler to measure the areas to be cut out and mark them. Cut out the
marked points allowing the necessary expansion distance on each side. T-molding is suggested in all doorways.
You can trim doorframes by turning a panel upside down to use as a height guide. Using a handsaw, cut door
frames to the necessary height so that planks slide easily under them.
To nish the perimeter of the room, install quarter round molding using nishing nails. Nail quarter round directly
into the baseboard not the ooring.
Maintenance,Tips,andWarnings
MAINTENANCE:
Dust-mop or broom can be used for daily maintenance. When necessary, clean with a MOIST cloth or mop and a
neutral PH cleaner – heavy use of detergent cleaners will leave a residue and, over time, lead to a cloudy lm.
NEVERUSE oor polish or oor cleaning wax, oil soaps, etc. These products can damage and/or leave a lm on
the ooring. This is not a defect in the oor.
TIPS:
• Always use felt tip protectors on all furniture legs/feet
• Entryway/walk off mats are recommended; Warning: Never use rubber protective mats.
Area rugs are recommended
• Keep pet nails trimmed
• Sharp shoe-heels (e.g. high-heels) may dent the oors
• Never slide furniture across a oor without pads
• Keep oors clean
msisurfaces.com
Page 4