
Use and Care Manual

1. Remove the cutting deck from beneath the tractor as
instructed in your tractor’s Operator’s Manual.
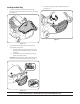
2. Gently flip the deck over to expose its underside.
3. Stabilize one of the cutting blades with a blade lock tool or
a block of wood. See Figure 1-2.
Figure 1-2
4. Remove the hex flange nut that secures the blade to the
spindle.
IMPORTANT: The hex flange nuts have a right-handed
(normal) thread pattern. Do NOT attempt to force the nuts in the
opposite direction. Doing so may damage the nuts.
5. Repeat steps 3 and 4 on the other cutting blade.
6. Replace the blades with the blades included in the kit. Be
sure to install each blade with the side marked ‘‘Bottom’’
(or with a part number stamped in it) facing the ground
when the mower is in the operating position.
IMPORTANT: Use a torque wrench to tighten each blade
spindle’s hex flange nut to between 90 ft-lb and 110 ft-lb.
Model 19A70041OEM mulch kit is designed for use with select 42-
inch two-blade cutting decks. Refer to your tractor’s Operator’s
Manual to assure compatibility.
Carton Contents
Before beginning installation, remove all parts from the carton to
make sure everything is present. Carton contents are listed below
and shown in Figure 1-1. Part numbers are shown in parentheses.
• Two Mulching Blades (742-0616A)
• One Deck Mulch Plug Assembly (631-05195A)
• One Wing Knob (720-04122)
Figure 1-1
Blade Installation
WARNING: Before beginning installation, place
the tractor on a firm and level surface, set the
parking brake, place the PTO in the disengaged
(OFF) position, stop the tractor’s motor and remove
the ignition key to prevent unintended starting.
WARNING: Cutting blades are sharp. Always
protect hands by wearing heavy leather work gloves
to grasp blades.
Form No. 769-10115
August 8, 2014
Printed In USA
InstallatIon Manual
42-inch Mulch Kit — 19A70041OEM
MTD LLC, P.O. BOX 361131 CLEVELAND, OHIO 44136-0019