
Owner Manual
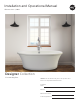


Table Of Contents

Installation and Operational Manual
°
Designer Collection
°
Acrylic Freestanding Tubs
mtibaths.com / 6
1. Determine the location of rough-in
Use measurements provided on pages 4-5, the product specification sheet, or by the actual tub.
IMPORTANT: note the design of the tub model for the drain type and rough-in location required. Tubs with an integral overflow and
those including a direct connect tee will have P-trap location directly below the tub drain. A PVC drain fitting is provided with these
tub models.
2. Install drain assembly onto tub (dry fit, as needed, to properly size pipe).
Use clear silicone under waste flange and on both sides of the rubber gasket on underside of the tub.
For tubs without an access panel behind the waste & overflow, carefully turn the tub onto its side to gain access to the bottom for
drain assembly installation. Be sure to protect the edges, corners, and exterior finsh of the tub, throughout.
Tubs with Integrated Overflow require only waste installation
Thread the PVC drain fitting onto the waste flange. MTI recommends using a small amount of clear silicone on the threads of the
PVC drain fitting to act as a thread sealant. Tighten until it seats, plus one quarter turn.
The Clawfoot Tub must be perfectly level to drain properly.
Adjust legs to level tub and check level prior to installing the the tub drain.
Installation Instructions – Drain Installation
MTI Designer Series Freestanding tubs are designed to install on top of the finished floor. Many models come with an
access panel behind the waste and overflow for ease of installation, however access from below tub is recommended for
installation. If there is no access from below, the installation can be more difficult on some tub models.
MTI Recommends using clear 100% silicone sealant. Do Not use plumber’s putty.
With Access From Below (Recommended)
Without Access From Below
Completing Drain Install
Beginning Drain Install
1. Set the tub
Apply a 1/2” bead of construction adhesive or clear silicone to the bottom of the tub to adhere it to the floor and carefully lower the
tub to the floor with drain fitting aligned with opening in the floor. The size of the cutout in the floor must allow for the entire drain to
clear.
2. Immediately wipe any excess adhesive from tub shell and surrounding areas with a soft, damp cloth.
3. Connect the drain to the P-trap from below.
1. Trim waste pipe to the proper height. NOTICE: DO NOT LET THE TUB REST ON THE DRAIN PLUMBING.
Take into account the distance from the bottom of the tub drain to the floor and height of the waste fitting or assembly, including
the gasket. See page 5 illustrations.
2. Set the tub and connect the drain.
Apply a 1/2” bead of construction adhesive or clear silicone to the bottom of the tub and prepare the waste pipe and drain fitting
with PVC cement.
Carefully lower the tub to the floor with drain fitting aligned with waste pipe. The use of 2x4s may be helpful in lowering the tub to
the finished floor.
3. Immediately wipe any excess silicone from the tub shell and surrounding areas with a soft, damp cloth.
1. Water Test. Allow silicone to dry. Fill tub to overflow, allowing water to stand for 30 minutes. Check carefully for any leaks.
2. Allow 24 hours before use.