FaxFinder® V.34 Fax Servers FF Model Series Client User Guide Multi-Tech Systems, Inc.
FaxFinder® Client User Guide Fax Client Software for FaxFinder Series PN S000406E, Version E Copyright This publication may not be reproduced, in whole or in part, without prior expressed written permission from Multi-Tech Systems, Inc. All rights reserved. Copyright © 2008, by Multi-Tech Systems, Inc. Multi-Tech Systems, Inc. makes no representations or warranties with respect to the contents hereof and specifically disclaims any implied warranties of merchantability or fitness for any particular purpose.
TABLE OF CONTENTS CHAPTER 1 – INTRODUCTION .................................................................................................................. 4 ACCESSING THE FAXFINDER CLIENT SOFTWARE ........................................................................................... 4 SENDING FAXES .......................................................................................................................................... 5 RECEIVING FAXES................................................
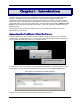
Chapter 1 – Introduction The FaxFinder Fax Client Software lets you deal with faxes in a new and convenient way. You can now send faxes simply by printing files from application programs (word processors, graphics programs, Notepad – essentially any program that can print). You receive fax messages as graphics file attachments to email messages from the FaxFinder Administrator or Attendant. You will view these graphics files (PDF or TIF) using either a PDF viewer or a TIFF viewer.
Chapter 1: Introduction Sending Faxes To send a fax from an application program, you must change that application program’s target printer to “Multi-Tech FaxFinder” (this option becomes available as soon as the FaxFinder client software is installed on your PC). Then, when you invoke the Print command from your application software, the document will be effectively scanned or “captured” electronically in preparation for going out as a fax -instead of being printed on paper.
Chapter 1: Introduction Receiving Faxes To receive a fax from the FaxFinder system, you simply open the email message received from the FaxFinder Administrator or forwarded from a party who serves as a “FaxFinder Attendant” for your network. The way you receive fax emails (either directly from the Administrator or as forwarded from the Attendant) depends on the kind of phone service you have (whether through a PBX or not and depending also on PBX features).
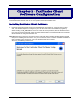
Chapter 2 – FaxFinder Client Software Configuration To configure the FaxFinder Client Software, you must first install the software on a PC and then associate that installed client software with one or more specific FaxFinder hardware units. Installing FaxFinder Client Software A. Insert the FaxFinder Product CD into the CD-ROM drive of the client PC. If the CD does not auto start, use Windows Explorer to navigate to your CD drive and launch the installation program by double-clicking on cd_start.
Chapter 2: FaxFinder Client Software Configuration B. At the Welcome screen, click Next. C. At the Select Installation Folder screen, browse to the desired file location for the FaxFinder client software. In most cases, the default file location is recommended. Clicking on the Disk Cost button will show you the size of the software being installed as well as the available disk space of the target drive. When the destination location is correct, click Next. Multi-Tech Systems, Inc.
Chapter 2: FaxFinder Client Software Configuration D. At the Confirm Installation screen, click Next to begin the installation.. E. A transient screen will appear while files are being copied. F. You will be asked whether or not you want to associate .tif and .cpg files with the Multi-Tech Tiff Viewer. Click Yes (unless you prefer to use a different viewer program). If a Question screen appears asking "Warning - the extension .tif is already registered, Overwrite?,” you must respond.
Chapter 2: FaxFinder Client Software Configuration G. You will be asked if you want the Client software to automatically launch when the installation is complete. Select your preference. H. Then the Installation Complete screen will appear. Click Close. Multi-Tech Systems, Inc.
Chapter 2: FaxFinder Client Software Configuration The FaxFinder Fax Client Software starts automatically when the installation is complete. Icons for the FaxFinder software applications will appear in the Windows Start menu. After installation, the Client Software starts up whenever the computer is booted. A FaxFinder icon appears in the tray area at the lower-right corner of the screen. The FaxFinder Fax Client Software screen can be opened from either the Start menu icon or the tray icon.
Chapter 2: FaxFinder Client Software Configuration Establishing Client User’s ID in System When the FaxFinder Fax Client Software starts, you will be prompted to enter your own client user information in the Options | Identification screen. You will not be able to access or use the FaxFinder client until this step has been done.
Chapter 2: FaxFinder Client Software Configuration Associating Client with Specific FaxFinder Unit(s) Sometimes more than one FaxFinder unit is connected to an Ethernet network. In some cases, certain client users might be assigned to some FaxFinder units and not assigned to others. After the FaxFinder client software is installed, you must associate it with one or more FaxFinder units.
Chapter 2: FaxFinder Client Software Configuration the sake of simplicity and convenience) to use the same Username and Password for all FaxFinder units. NOTE: The Username entered here must match the entry used in the “User ID” field of the Phone Book screen in the FaxFinder Server Software. The password entered here must match the password entered for this client in the Password Administration screen in the FaxFinder Server software. Click OK. 4.
Chapter 2: FaxFinder Client Software Configuration Disassociating the Client from a Specific FaxFinder Unit In this procedure, you will un-do the procedure “Associating Client with a Specific FaxFinder Unit.” This situation might occur when changes are being made in the network faxing system. In any event, this procedure severs the tie between your PC and a specific FaxFinder unit so that you will no longer be connected to it for sending fax messages.
Chapter 2: FaxFinder Client Software Configuration Disabling and Re-Enabling a Client’s FaxFinder Service Disabling a FaxFinder’s service to a specific client is simply a temporary version of disassociating the client from that FaxFinder. When a client has disabled the FaxFinder’s service to that client, the client/user cannot send faxes through the FaxFinder.
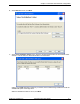
Chapter 2: FaxFinder Client Software Configuration FaxFinder Fax Client Software Menu Command Definitions FaxFinder Fax Client Software Menu Command Definitions Command Name Values File menu commands Send Fax -Pause Scheduler Multi-Tech Systems, Inc. -- Description Brings up the FaxFinder Send Fax screen, the first step in transmitting a fax message via the FaxFinder system.
Chapter 2: FaxFinder Client Software Configuration The FaxFinder Send Fax Screen The FaxFinder Send Fax screen appears (a) when you ‘print to FaxFinder’ from any application program, or (b) when you select the Send Fax command from the File menu of the FaxFinder Fax Client Software screen. FaxFinder Send Fax Screen Definitions Command/Field Name Values Recipients pane Name (column) alphanumeric Fax Number (column) Multi-Tech Systems, Inc. numeric Description Party to whom the fax will be sent.
Chapter 2: FaxFinder Client Software Configuration FaxFinder Send Fax Screen Definitions (cont’d) Command/Field Name Values Description Recipients pane + (button) Brings up the Enter a Fax Recipient window. At this window, you enter the name and fax number of the party to whom the fax will be sent. After you click OK in this window, the FaxFinder-Add Recipient window will appear and prompt you as to whether or not you want to add this recipient to the Address Book.
Chapter 2: FaxFinder Client Software Configuration FaxFinder Send Fax Screen Definitions (cont’d) Command/Field Name Values Cover Page pane Use Cover Page Cover Page Style View/Edit (button) Y/N BoldComplete, BoldComplete2, FaxComplete, LongComment, PlainComplete, PlainShort -- Subject alphanumeric Cover Page Notes alphanumeric Send Fax (button) Preview Fax (button) --- Cancel (button) -- Multi-Tech Systems, Inc. Description Check this checkbox to include a cover page with your fax.
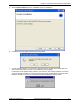
Chapter 2: FaxFinder Client Software Configuration FaxFinder Fax Client Software Menu Command Definitions Option tab Description Identification tab. The Fax Header Local ID can be used to set the ID of the Sending Modem when Sending a Fax using the FaxFinder Client. The Modem ID string is displayed in the header information of a sent fax. For many Fax machines, it is the phone number of the sending fax machine.
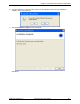
Chapter 2: FaxFinder Client Software Configuration FaxFinder Fax Client Software Menu Command Definitions (cont’d) Command Name Values Description Edit menu commands Add Fax Server -Brings up the Add Device Address screen so that a FaxFinder or HylaFax server on the network can be associated with the client. A client can be served by more than one FaxFinder unit. See the procedure “Associating Client with Specific FaxFinder Unit(s)” earlier in this chapter.
Chapter 2: FaxFinder Client Software Configuration FaxFinder Fax Client Software Menu Command Definitions (cont’d) Field Name Values Description Device Status tab Device (column) alphanumeric Shows status of FaxFinder or HylaFAX server units with which the client is associated. Also shows status of the “Print Capture” function and the “Outlook Synchronizer” function.
Chapter 2: FaxFinder Client Software Configuration FaxFinder Fax Client Software Menu Command Definitions (cont’d) Command Name Description Device Status tab (cont’d) Commands accessed by Right-Clicking on a selected FaxFinder delete Dis-associates the client from the selected FaxFinder or HylaFAX unit so that the client can no longer send faxes through that FaxFinder unit. (The FaxFinder Server’s IP address is removed from the Device Status list of the FaxFinder Client Software.
Chapter 2: FaxFinder Client Software Configuration FaxFinder Fax Client Software Menu Command Definitions (cont’d) Field Name Values Description Fax Ports tab Device (column) alphanumeric Shows FaxFinder units with which the client is associated. Port (column) ttys0 for FF120, The fax modem (within) the FaxFinder server ttys0, ttys1 unit, the status of which is being tracked.
Chapter 2: FaxFinder Client Software Configuration FaxFinder Fax Client Software Menu Command Definitions (cont’d) Field/Command Name Values Description Fax Log tab Recipient (column) Identifies recipient of each outgoing fax. Time/Date Sent (column) day, date, time, zone Indicates when each outgoing fax was sent. in the form ddd mmm nn hh:mm:ss zzzzzz Pages (column) Status (column) integer Shows the number of pages in each fax.
Chapter 2: FaxFinder Client Software Configuration FaxFinder Fax Client Software Menu Command Definitions (cont’d) Field/Command Name Values Description Address Book tab Name (column) alphanumeric Shows the name of the the selected Address Book entry. alphanumeric Organization (column) Shows the organizational affiliation of the the selected Address Book entry. Fax Number (column) integers Shows the fax number of the selected Address Book entry.
Chapter 2: FaxFinder Client Software Configuration FaxFinder Fax Client Software Menu Command Definitions Command Name Values Description Address Book menu commands Brings up the New Contact screen for adding entries -Add Contact to client-user’s personal address book. These entries are for parties to whom the client-user may want to send faxes. The contact info includes the party’s name, their organizational affiliation, phone numbers, fax numbers, and land address information.
Chapter 3: FaxFinder Client Software Operation Introduction This chapter describes the things that a client user can do with the FaxFinder system. Three software programs are involved: the FaxFinder Client Software, the Multi-Tech Tiff Viewer (or designated PDF viewer), and the Multi-Tech Cover Page Generator. The programs work together with the FaxFinder Client Software acting as the hub of activity.
Chapter 3: FaxFinder Client Software Operation Sending a Fax To send a fax by printing from an application program on a client PC, follow the steps listed below. 1. The FaxFinder client software must be installed on the PC. (See the section “Installing FaxFinder Client Software” earlier in this manual.) 2. The client PC and the FaxFinder server must both be connected to the same Ethernet LAN system. 3. The association must be made between the client PC and the FaxFinder Server.
Chapter 3: FaxFinder Client Software Operation 5. At the application program (for example, a word processing program or drawing program), print to the FaxFinder. Setting the destination of the printing job varies from program to program. For the common Notepad text editor program, for example, you must set the destination printer in the Page Setup screen. In most cases, however, the destination printer can be set in a Print menu that appears when each printing job is initiated.
Chapter 3: FaxFinder Client Software Operation 6. After the printing has been initiated by the application program, the FaxFinder Send Fax screen will appear. Click on Address Book. When the Address Book screen appears, click “New.” At the New Contact screen, enter the recipient’s name, fax number, and any other contact information you want to retain. The recipient’s fax number should be entered as you would dial it from a phone on the public phone network (as from a residential phone). Click OK.
Chapter 3: FaxFinder Client Software Operation You can also access the Address Book directly to add and edit entries. At the FaxFinder Fax Client Software screen, go to Edit | Add Contact. 7. If you want to include a cover page with your fax, click in the “Use Cover Page” checkbox. Enter information as needed in the “Subject” and “Cover Page Notes” fields. Automated fields, like sender information (individual name, company name, street address, phone number, fax number, etc.
Chapter 3: FaxFinder Client Software Operation The “Cover Page Style” chosen will determine how this information will appear on the fax cover page. You can select a standard style from the “Cover Page Style” drop-down menu or create a style of your own in the Template Editor. To access the Template Editor software, click on the “View/Edit” button. (For more information, see the section “Creating or Modifying Cover Page Styles” later in this chapter.
Chapter 3: FaxFinder Client Software Operation Scheduling Fax Transmissions The FaxFinder allows you to send a fax immediately or delay its transmission until a later time. Perhaps the most common motivations for delayed faxing are to enjoy the lower phone rates that may apply at night and on weekends or to broadcast faxes after business hours to avoid tying up fax transmission resources during the busiest weekday hours. In any case, it is easy to schedule faxing for a later time. 1.
Chapter 3: FaxFinder Client Software Operation 7. The fax will be sent at the scheduled time. You can view the event as it happens in the FaxFinder client software Device Status screen or after the fact in the Fax Log screen. Re-Sending a Failed Fax Locate the failed fax in the Fax Log tab of the FaxFinder Fax Client Software. Select the failed fax and right-click on it. In the menu that appears, select Resend. Multi-Tech Systems, Inc.
Chapter 3: FaxFinder Client Software Operation Putting Pending Faxes on Hold and Removing the Hold Suppose you have sent a fax to 10 recipients and, shortly after clicking on Send Fax, you realize that there is something incorrect in the content of your fax (it may be something you want to add, delete, or change). You can prevent any pending faxes from being sent by selecting “Pause Scheduler” in the File menu of the FaxFinder Fax Client screen.
Chapter 3: FaxFinder Client Software Operation 2. While the fax is being sent to the second party, the client user realizes that there is something wrong with the fax. She brings up the FaxFinder Fax Client Software screen, opens the File menu, and selects “Pause Scheduler.” At that point, the FaxFinder will complete the fax in progress that is being sent to the second recipient.
Chapter 3: FaxFinder Client Software Operation She could view the details of the fax and, at her option, view the fax again. She could re-schedule the fax for a later time. Multi-Tech Systems, Inc.
Chapter 3: FaxFinder Client Software Operation She could “delete” the fax, which means that that fax transmission would never be completed. Pause is canceled on reboot. If she shuts down her computer for the day while leaving this fax in a “pending” state, that fax will be sent shortly after booting up her computer again, that is shortly after the FaxFinder client software is functioning again.
Chapter 3: FaxFinder Client Software Operation Sending One Fax Containing Multiple Documents The FaxFinder allows you to include multiple documents in a single fax transmission. Those multiple documents could come from the same or different application programs. 1. Consider the example below where a text file and a drawing file are included in the same fax with a single cover letter. Here’s how this multiple-document fax was sent. a.
Chapter 3: FaxFinder Client Software Operation 3. You can also add to the list of files to be faxed out by including items that you have stored. In the “Documents” pane of the FaxFinder Send Fax screen, click +. You could then browse to find, for example, a fax that you had received earlier, had stored as a TIF file, and now want to forward to another party. (Faxes received as PDF files cannot be added to the list.) 4.
Chapter 3: FaxFinder Client Software Operation Forwarding a Fax Suppose you receive a fax using the FaxFinder system. Suppose that fax message is something you want to pass along to another party in fax form at a later date (for example, Rocky Mountain Construction Company receives tax information about lots on which it intends to build houses). In this case, you should note the name of the TIF file in question. You can then browse to that TIF file and re-send it as a fax message.
Chapter 3: FaxFinder Client Software Operation 4. In the FaxFinder Send Fax screen, specify a recipient for the fax. The recipient could either come from your Address Book or be entered by clicking “+” in the “Recipients” pane and then typing the Name and Fax Number in the Enter a Fax Recipient dialog box. Then click OK. Finally, you would click Send Fax. The TIF file will be reconverted into a fax message that can be received by a fax machine. Multi-Tech Systems, Inc.
Chapter 3: FaxFinder Client Software Operation Receiving a Fax The FaxFinder Server delivers incoming faxes to client PCs in their email inboxes. Since faxes received through the FaxFinder are transformed into email attachments, they can be directed anywhere email goes. The final recipient can be inside the office or across the ocean. Fax reception works differently when the FaxFinder is operating in Automated Routing Mode than in Manual Routing Mode.
Chapter 3: FaxFinder Client Software Operation 4. The incoming fax arrives in the client’s email inbox as a message with an attachment. The email message is marked as being from the FaxFinder Administrator. The sender’s “Remote ID” and the client’s name appear in the “Subject” line of the email message. (The Remote ID comes from the sending fax machine and is typically the sender’s fax number or name.) Multi-Tech Systems, Inc.
Chapter 3: FaxFinder Client Software Operation 5. The FaxFinder client opens the email message. The incoming fax message takes the form of a graphic file attachment. The FaxFinder Server has assigned the file an automatic file name. 6. The FaxFinder client can open the file or save the file. a. Opening the fax message graphic file. Incoming fax messages are PDF or TIFF files. These graphics files are automatically associated with a PDF or TIFF viewer program that has already been chosen.
Chapter 3: FaxFinder Client Software Operation 4. The incoming fax arrives in the recipient’s email inbox as a message with an attachment. The email message is marked as being from the FaxFinder Administrator. The sender’s “Remote ID” and the recipient’s name appear in the “Subject” line of the email message. (The Remote ID comes from the sending fax machine and is typically the sender’s fax number or name.) 5. The fax recipient (a client of the FaxFinder Server) opens the email message.
Chapter 3: FaxFinder Client Software Operation Using the Multi-Tech Tiff Viewer The Multi-Tech Tiff Viewer program has a variety of features that enhance the viewing of fax messages in graphic file form (thumbnails, zooming, spot magnification, scrolling, rotating, etc.). The program can also manipulate and permanently alter the graphic files. Frequently Used Commands – Toolbar Icons The most commonly used functions are available as icons on the toolbar.
Chapter 3: FaxFinder Client Software Operation Multi-Tech Systems, Inc.
Chapter 3: FaxFinder Client Software Operation While most of these features are common to many graphical programs, some warrant a bit of explanation. Copy. The Copy function allows you to copy the fax file and insert it into a different application program. See “Importing Fax Images into Other Application Programs” below. Panning (Omni-Directional Scroll). The “hand” icon allows you to bring any desired portion of the image into view. Zoom to Selection.
Chapter 3: FaxFinder Client Software Operation Spot Magnifying Glass. In this viewing mode, a magnifying glass icon (cursor) appears. It can be used in one of three ways to magnify any portion of the image: (a) Click over Area, (b) Click-andHold Over Area, (c) Scan the Graphic. Click over Area. A secondary window will appear that shows the ‘clicked-on’ area magnified. You can adjust the size of the secondary window by dragging on its borders.
Chapter 3: FaxFinder Client Software Operation Click-and-Hold over Area. Two additional windows will appear. The cursor itself becomes a small secondary window of fixed size. The same image also appears on a third window. You can adjust the size of the secondary window by dragging on its borders. You can re-locate the secondary window by putting the cursor inside the window, clicking and dragging. Scan the Graphic. If you click, hold, and drag, you can scan the image in a magnified view.
Chapter 3: FaxFinder Client Software Operation Importing Fax Images into Other Application Programs The Copy command in the Multi-Tech Tiff viewer program allows you to import the fax image into other application programs. In the illustration below, a fax has been Copied from the Multi-Tech Tiff viewer program and Pasted into a Microsoft Word document. Multi-Tech Systems, Inc.
Chapter 3: FaxFinder Client Software Operation Setting up Your Address Book Manually The Address Book in the FaxFinder Client Software adds significant convenience to the system. When recipient contact information has been entered in the Address Book, this information will appear automatically in the corresponding fields of the fax cover page. 1. In the FaxFinder Fax Client Software screen, click on the “Address Book” tab. 2. In the Edit menu, select “Add Contact.” 3.
Chapter 3: FaxFinder Client Software Operation 5. A Contact – Recipient screen will appear presenting the contact info for this particular recipient. 6. When you click on “Address Book” at the FaxFinder Send Fax screen, this same contact list will appear. Multi-Tech Systems, Inc.
Chapter 3: FaxFinder Client Software Operation 7. When you select an item from this list and select Use Cover Page, contact info will be added automatically to the appropriate fields of the cover page. 8. To delete an entry from your Address Book, select the entry and right-click on it. In the menu that appears, select delete. In order to complete the deletion command, you must click “Yes” in the confirmation screen. Multi-Tech Systems, Inc.
Chapter 3: FaxFinder Client Software Operation Setting Up Your Address Book by Synchronizing with Outlook What Synchronization Means During synchronization, entries from the FaxFinder Client Address Book and from the specified folder of MS Outlook are merged into one list saved in both applications. When “Synchronize With Outlook” command is invoked in the FaxFinder Client software, each list is updated with changes from the other. Synchronization Procedure 1.
Chapter 3: FaxFinder Client Software Operation 4. In the FaxFinder Fax Client Software, go to the Device Status tab and select Outlook Synchronizer in the “Device” list. 5. Right-click on Outlook Synchronizer and select Synchronize with Outlook. The attempt to synchronize the FaxFinder Address Book with MS Outlook will cause Outlook to present a security screen at which you must click the “Allow access for” checkbox and choose a
Chapter 3: FaxFinder Client Software Operation Setting Up Address Books with CSV Files Files in CSV format (comma separated values) consist of spread-sheet data presented in ASCII (plain text) form. As such, the data can be transferred between different application programs. Many common programs (like MS Excel and MS Outlook) can do both importing and exporting of CSV files. The FaxFinder Client software can also do both importing and exporting of CSV files.
Chapter 3: FaxFinder Client Software Operation To map the fields from the CSV file to the FaxFinder Address Book format, you create a custom template file using the FaxFinder’s Template Mapping screen. Multi-Tech Systems, Inc.
Chapter 3: FaxFinder Client Software Operation Exporting a FaxFinder Address Book to CSV File Format 1. At the FaxFinder Client software, go to Address Book | Export. The Address Book Export screen will appear. 2. Use the “Delimiter” drop-down list to choose the kind of character that will be used to separate the fields of information in the Address Book entries. 3. Click Export. 4. The Save Delimited Address Book screen will appear. Save the CSV file with an appropriate filename.
Chapter 3: FaxFinder Client Software Operation Importing CSV Files into FaxFinder Address Book with Fitted Template 1. In the FaxFinder Fax Client software, go to Address Book | Import. The Address Book Import screen will appear. 2. Under “CSV Import file,” click Browse. A list of CSV files will appear. Select the CSV file that you want to import. (The CSV file will likely be a file outputted from MS Outlook or a file containing contacts from another client-user of the FaxFinder system.) 3.
Chapter 3: FaxFinder Client Software Operation 6. To find out whether or not the new entries are being properly placed into the Address Book format, click Preview Import. The Template Mapping screen will appear. Use the Next Record and Previous Record buttons to page through the entries as they would appear if you proceed with importing. If the entries are to your liking, click OK. If the entries are not properly organized, will may need to adjust your Delimiter and/or First Line Heading settings.
Chapter 3: FaxFinder Client Software Operation For example, if the first record has a literal value of “Name” in the Name field, a literal value of “Organization” in the Organization field, etc., then your import CSV file did indeed have First Line Headings and you may have failed to check the “First Line Heading” check box. To clean up your file import, you must correct this by checking the First Line Heading checkbox. Using Preview Import to Correct Import Problems Corrected File.
Chapter 3: FaxFinder Client Software Operation Importing CSV Files into FaxFinder Address Book with a Customized Template CSV contact lists can be created in many applications (MS Outlook, MS Excel, Notepad, etc.). In general, those contact lists may contain information that does not fit directly into the format of the FaxFinder’s New Contact screen. Suppose a useful CSV file exists but its contents (data fields) are not in the same order as data in the New Contact screen.
Chapter 3: FaxFinder Client Software Operation 2. In the FaxFinder Client software, go to Address Book | Import. The Address Book Import screen will appear. Browse to find the CSV file that you want to import. 3. Click Define Template. The Template Mapping screen will appear. The Imported Fields drop-down box presents a list of all of the fields present in the CSV file. 4.
Chapter 3: FaxFinder Client Software Operation 6. When one field name from the drop-down list has been added (with the + button), the next CSV field name in the drop-down list will appear. Click + on the next line to associate that CSV field with the next New Contact screen field (if the association makes sense). Sometimes the field names will differ but it will be appropriate to map the CSV field to the New Contact screen field anyway.
Chapter 3: FaxFinder Client Software Operation Finish mapping all appropriate CSV fields to New Contact screen fields. 11. When the mapping is complete, click OK. You will then be prompted to name the template file that you have just created to accommodate this CSV file. Multi-Tech Systems, Inc.
Chapter 3: FaxFinder Client Software Operation 12. The Address Book Import screen will return. It will list both the CSV import file and the template file you have just created. 13. To confirm that the field mapping is appropriate, click on Preview Import. At this screen, you can view each entry before importing. If the entries are correct, click OK to return to the Address Book Import screen. 14. If the entries are not right, you can use the Modify Template command to revise the template as needed. 15.
Chapter 3: FaxFinder Client Software Operation 16. The new entries from the CSV file will now appear in your Address Book. Multi-Tech Systems, Inc.
Chapter 3: FaxFinder Client Software Operation Transferring an Established Standard FaxFinder Address Book to a New ClientUser A FaxFinder Address Book can be created in any of several ways: new contacts can be added manually, they can be added when faxes are being sent, they can be added by synchronizing with Outlook, and they can be added by importing CSV files.
Chapter 3: FaxFinder Client Software Operation 4. At the FaxFinder Client software, the new client-user should go to Address Book | Import. At the Address Book Import screen, the client-user should browse to the established CSV import file at the top of the screen and browse to the standard client-to-client import template file in the lower part of the screen (the file name will be FaxFinder Client Import_template.
Chapter 3: FaxFinder Client Software Operation Using Stock Cover Pages Faxes are often accompanied by a cover page that specifies from whom it was sent, to whom it was sent, the date, and other details about the sending and receiving parties. The FaxFinder system offers several ready-made (stock) cover pages that can be used for this purpose. These stock cover pages can also be modified or customized to meet individual needs (see “Creating or Modifying Cover Page Styles” later in this chapter).
Chapter 3: FaxFinder Client Software Operation 3. When the FaxFinder Send Fax screen appears, it will list the document we want to fax in its “Documents” pane. Next we must specify a recipient. The recipient could either be chosen from the Address Book (by clicking on the Address Book button) or specified directly by clicking on + in the Recipients pane and completing the Name and Fax Number fields.
Chapter 3: FaxFinder Client Software Operation 4. The FaxFinder Send Fax screen appears again but this time our recipient has been entered. Multi-Tech Systems, Inc.
Chapter 3: FaxFinder Client Software Operation 5. Since we intend to use a cover page, we click “Use Cover Page” and then select a stock cover page from the “Cover Page Style” drop-down list. We can then type a subject for the fax message and type a cover page note, each in the appropriate fields. Suppose we choose the style called “BoldComplete.” We can view it by clicking “View/Edit” on the FaxFinder Send Fax screen. The requested file will appear in the Template Editor screen. Multi-Tech Systems, Inc.
Chapter 3: FaxFinder Client Software Operation 6. To see how the cover page appears after the sender and recipient information has been automatically inserted, click Preview Fax. This is how the fax cover page will be sent. 7. To send the fax, simply click Send Fax in the FaxFinder Send Fax screen. Multi-Tech Systems, Inc.
Chapter 3: FaxFinder Client Software Operation Creating or Modifying Cover Page Styles The Multi-Tech Cover Page Generator program allows you either to produce custom cover pages or to use existing style templates. In this section, we will describe both processes, making a new template and customizing an existing stock cover page style template. Creating New Cover Page Templates 1. Open the Cover Page Generator program. Go to Start | Programs | FaxFinder Client Software | Cover Page Generator.
Chapter 3: FaxFinder Client Software Operation 3. Several types of objects can be added to a cover page file. These are listed in the Insert dropdown menu. The commands to create these objects can be invoked either here or from buttons on the Tool Bar. We will invoke various commands from these toolbar buttons throughout this procedure. 4. Decide on the categories for which you want automated fields on the fax cover page.
Chapter 3: FaxFinder Client Software Operation The FaxFinder supports the automated field types listed in the table below.
Chapter 3: FaxFinder Client Software Operation 6. Enter the field label in the Static Text box. Be sure to allow enough room for the size of font you have chosen. If the box is too small for the font size, the text will be cut off. To select font, the font style, and font size, use the cursor. You can also access font settings from the Settings dropdown menu. To align the text to the left edge, right edge, or center of the box, use the cursor.
Chapter 3: FaxFinder Client Software Operation You might want the automated field value to be placed on a line or in a rectangle. If so, you could use the line cursor to put a line beneath the edit box or use the rectangle cursor to place a rectangle around the edit box. You can place lines, rectangles, and ellipses on the page for any purpose. Rectangles and ellipses can have a solid fill or a shading (called “hilight”). These graphic functions are described in the table below.
Chapter 3: FaxFinder Client Software Operation 8. To add a graphic file to the cover page template, click on the Image icon. Then browse to the directory that contains the desired graphic file. Files of type bmp and tif can be inserted into cover pages. Insert graphics files into your cover page template as needed. 9. Save the file to the Cover Pages directory in your operating system. The .cpg file must be saved in this location in order for it to be accessible to the FaxFinder client software.
Chapter 3: FaxFinder Client Software Operation Modifying Existing Cover Page Templates Note: While all five stock cover page styles can be readily customized, the styles “PlainComplete” and “PlainShort” are especially well suited to customization. In most cases, one can start with these files and simply add one’s own company name in text or insert one’s graphical company logo. 1. Open the Cover Page Generator program. Go to Start | Programs | FaxFinder Client Software | Cover Page Generator.
Chapter 3: FaxFinder Client Software Operation For our example, we will rename the file rmc1.cpg, for the purposes of our fictitious company, Rocky Mountain Construction, Inc. 4. You can use the Tab key to skip from field to field in the template. Note, however, that any values added to template fields will be overwritten by values specified in the Address Book (in “New Contact” screens launched from Edit | Add Contact in the FaxFinder Fax Client Software program). Multi-Tech Systems, Inc.
Chapter 3: FaxFinder Client Software Operation 5. Add company logo at top of cover page. For our example, we will add the graphic file “ff-rocky-mtn-logo1.bmp” to the cover page. In the Insert menu of the Template Editor, select “Image.” Browse to the location of the graphics file to be used. Click Open. Move the + cursor to the desired location of the graphic. Then click and drag to size the graphic.
Chapter 3: FaxFinder Client Software Operation 6. Add company slogan to bottom of template. For the purposes of our fictitious company, Rocky Mountain Construction, Inc., we will use the slogan “Building on New Horizons.” Select the “Static Text” cursor labeled and drag N to open a text box at the bottom of the template page. Enter the slogan. Multi-Tech Systems, Inc.
Chapter 3: FaxFinder Client Software Operation 7. In the File menu, select “Save As” and overwrite the file using the same filename used in step 3, saving it in the ‘Application Data’ directory for the FaxFinder client software. (For Windows NT4/2000, this will be C:\Winnt \ Profiles \ \ Application Data\ FaxFinder Client Software \ Cover Pages. For Windows XP, this will be C:\Documents and Settings\\Application Data\Fax Finder Client\Cover Pages.
Chapter 3: FaxFinder Client Software Operation 9. When the fax is sent, the ‘automated’ fields on the cover page template will be filled in with information from the Address Book (if the recipient is listed there). Click on “Preview Fax” in the FaxFinder Send Fax screen to examine the fax with cover page. Multi-Tech Systems, Inc.
Chapter 3: FaxFinder Client Software Operation Cover Page Generator Menu/Icon Command Descriptions File Menu FaxFinder Cover Page Generator Software Menu Command Definitions (cont’d) Shortcut Command Name Icon Description File Menu commands New Ctrl + N Open Ctrl + O Save Ctrl + S Save As -- -- Print Ctrl + P Exit -- Multi-Tech Systems, Inc. Creates new cover page template file. Opens an existing cover page template file for viewing or editing. Saves cover page cpg file at current path.
Chapter 3: FaxFinder Client Software Operation Edit Menu The Undo command (also accessible using the keyboard shortcut Ctrl + Z). The undo button. Undo reverses the effect of the last command. Insert Menu FaxFinder Cover Page Generator Software Menu Command Definitions (cont’d) Command Name Icon Description Insert menu commands Image Use to insert a bmp or tif image into the cover page template. Field Text or Edit Box Multi-Tech Systems, Inc.
Chapter 3: FaxFinder Client Software Operation FaxFinder Cover Page Generator Software Menu Command Definitions (cont’d) Command Name Icon Description Insert menu commands Static Text Use to insert text objects needed in the cover page template. These uses include labels for automated fields (TO, FROM, DATE, etc.) and plain text like a company name or slogan. Use icons to align text to left, center, or right. Use “Font” icon or command in Settings menu to alter font, font size, and font style.
Chapter 3: FaxFinder Client Software Operation Settings Menu FaxFinder Cover Page Generator Software Menu Command Definitions (cont’d) Command Name Icon Description Settings Menu commands Font Brings up Font dialog box in which font, font size, and font style can be set. Grid Use to turn grid on and off. If grid is off, objects can be positioned in cover page in a continuous fashion. If grid is on, objects can only be positioned at discrete grid coordinates.
Chapter 4 – Warranty, Service, & Repair Multi-Tech Warranty Statement Multi-Tech Systems, Inc., (hereafter “MTS”) warrants that its products will be free from defects in material or workmanship for a period of two, five, or ten years (depending on model) from date of purchase, or if proof of purchase is not provided, two, five, or ten years (depending on model) from date of shipment.
Chapter 4: Warranty, Service, & Repair Repair Procedures for International Customers (Outside U.S.A. and Canada) Your original point-of-purchase Reseller may offer the quickest and most economical repair option for your Multi-Tech product. You may also contact any Multi-Tech sales office for information about the nearest distributor or other repair service for your Multi-Tech product. The Multi-Tech sales office directory is available at www.multitech.