Using FaxFinder® with ShoreTel® Application Notes
Using FaxFinder® with ShoreTel® Application Notes ShoreTel Part Number IN-14045, Document Version 0.08 Copyright This publication may not be reproduced, in whole or in part, without prior expressed written permission from Multi-Tech Systems, Inc. All rights reserved. Copyright © 2014 by Multi-Tech Systems, Inc. Multi-Tech Systems, Inc.
Abstract Integrating the FaxFinder fax server with ShoreTel Voice Switches provides a complete voice and fax telephony solution. This document describes how to integrate the ShoreTel Voice Switch with the FaxFinder fax server (FF240-IP or FFx40). It provides product specifics, interoperability test results, typical setup configurations, troubleshooting steps and other important product-related information. Table of Contents Abstract ................................................................
Overview The FaxFinder fax server is a network-attached device that replaces legacy paper-based fax machines and allows users to send and receive faxes electronically.
Architecture Overview Using FF240-IP Call Flow When Receiving Faxes When the ShoreTel system detects that an inbound call from the PSTN is a fax, ShoreTel routes the call to the SIP trunk that exists between ShoreTel and FaxFinder. FaxFinder answers the call and receives the fax. After the fax transmission completes, FaxFinder delivers the received fax document to the defined destination or destinations. Delivery Destinations are defined within the FaxFinder fax server on a per DID (extension) number basis.
Call Flow When Sending Faxes FaxFinder users schedule outbound faxes electronically by submitting PDF or TIFF documents via FaxFinder Client Software, email, or web browser. Windows users can use FaxFinder Client software to fax Microsoft Office documents (a print to fax process that converts the document and allows the user to schedule the outbound fax, define fax to contact details, select a cover page, and set other scheduling options).
Certification and Limitations Version Support Table 1 - Supported Software Versions ShoreTel Version FF240-IP FFx40 14.2 Build 19.43.1700.0 3.2.7 3.2.7 Special considerations When using the FF240-IP, use the T.38 protocol when possible. If the ShoreTel switch does not support T.38, then use the G.711 Pass Through configuration. The following ShoreTel switches do not support T.
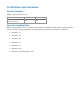
Certification Testing Results Summary FaxFinder IP (FF240-IP) and T.38 Test Cases Table 2 – Basic feature test cases using T.38 trunk configuration ID Name Description 1.1.1 Sending faxes from FaxFinder to fax machine ShoreTel Certification Lab uses the FaxFinder Client to fax Pass to a fax machine using FF240-IP and the ShoreGear SIP Proxy switch. Results 1.1.
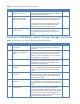
Table 4 – Voice/Fax Redirect using T.38 trunk configuration ID Name Description Results 1.3.1 Send fax from FF240-IP configured as a SIP server ShoreTel Certification Lab uses the FaxFinder Client to fax to a fax machine using FF240-IP configured as a SIP Server and the ShoreGear SIP Proxy switch. Pass 1.3.
FaxFinder IP (FF240-IP) with ShoreTel Virtual Switch Test Cases Table 6 – ShoreTel Virtual Switch ID Name Description Results 4.1.1 Send T.38 fax ShoreTel Certification Lab uses the FaxFinder Client to fax to a fax machine using FF240-IP and the ShoreTel Virtual Trunk Switch. Verify that T.38 protocol was used. Pass 4.1.2 Receive T.38 fax ShoreTel Certification Lab sends a Fax from a fax machine via the ShoreTel Virtual Trunk Switch to the FF240-IP.
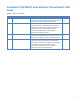
FaxFinder Analog (FF840) and ShoreGear SIP Proxy Switch Test Cases Table 7 – Basic feature test cases ID Name Description 3.1.1 Sending faxes from FF840 to fax ShoreTel Certification Lab uses the FaxFinder Client to fax to a fax machine using FF840 and the ShoreGear SIP Proxy machine switch. Pass 3.1.2 Receiving faxes from fax machine to FaxFinder and fax delivery Pass 3.1.3 Sending multi-page documents.
Multi-Tech Overview and Contact Information Multi-Tech Systems manufactures award-winning external and embedded modems and Unified Communications products that allow users to connect data over cellular and analog networks from anywhere in the world.
FaxFinder IP (FF240-IP) Fax Applications Application 1 – One Main Number for Both Voice and Fax – Fax Redirect In this application, one main number receives all fax and voice communications. The ShoreTel system manages all incoming fax communications, routing them via SIP Redirect Method to the FaxFinder 240-IP. The FaxFinder then routes the fax according to the FaxFinder’s inbound routing configuration.
4. Save changes. Note: Do not disable the default SIP Profiles. Disabling the system profiles may keep ShoreTel from adding FaxFinder to the system. Refer to the ShoreTel Administration Guide for more information. SIP Profile Details Field Description Name Label the Director uses to refer to the profile User Agent The name ShoreWare uses to identify devices covered by the profile. SIP servers do not use this. Required, you can’t save the profile without a value in this field.
2. Click New. New SIP Server displays. 3. Enter the SIP Server information for the new server as described SIP Server table. 4. Click Save to store your changes SIP Server Information Field Description Name: Enter an appropriate descriptive server name Site: Select the appropriate site location Protocol: Select UDP Host (Name/Address/Domain): Enter the IP address of the FaxFinder IP server Override Default Port: Enter 5060 Allow Ext.
Enabling SIP Proxy Ports on ShoreGear Switch To allocate proxy ports for SIP extensions: 1. Go to Administration > Platform Hardware > Voice Switches / Service Appliances > Primary. 2. Click a switch name to configure that switch. Edit Switch displays. In the image, the ShoreGear 30 switch was selected. 3. Change one Available Port Types to 100 SIP Proxy. 4. Click Save.
Modifying Individual Users for Fax – Creating a SIP Extension To redirect a user’s fax calls to the FaxFinder server: 1. Go to Administration > Users > Individual Users. 2. To redirect fax calls to FaxFinder for an existing user, click that user’s First Name. For a new user, click any existing user name and then click New. 3. For Fax Support, select User – Redirect from the drop down list. 4. Click Save. 5. Repeat these steps for each user whose calls you want redirected to FaxFinder.
Modifying the Site Settings To administer the sites: 1. Go to Administration > Sites. 2. To configure an existing site, click the site name where users will use the fax service. In the example, Headquarters is the site where users are located. To create a new site, select the site location in the Add new site drop down and click Go. Enter a name for the site.
3. In the Fax Redirect Extension field, click Search and select the FaxFinder server created earlier. In the example, the fax redirection number is the SIP UM server extension created earlier, 165: FaxFinder IP. 4. For Proxy Switch 1, select the ShoreTel SIP Proxy Switch. 5. Click Save. Note: Bandwidth of 1544 is just an example. Please refer to the ShoreTel Planning and Installation Guide for additional information on setting Admission Control Bandwidth.
Application 2 – User with a Unique Voice Extension and a Unique Fax Extension ShoreTel requires that the user or voicemail answer the call in order to redirect the fax call to the proper fax extension. Rather than receiving a call with fax tones, you may prefer to have fax calls go to a separate fax number (DNIS/DID) that routes fax calls directly to FaxFinder. FaxFinder then delivers the fax to the user’s email.
3. Select the number of SIP trunks from the ports available. Each port designated as a SIP trunk port type enables the support for five individual SIP trunks. Note: ShoreTel trunk groups only support Static IP Address SIP endpoint Individual Trunks. Changing Trunk Group Settings 1. Go to Administration > Trunks > Trunk Groups. Trunk Groups displays. 2. Select a site to configure from the Add new trunk group at site drop down list. 3. Select SIP from the of type drop down list. 4. Click Go.
8. Set the Number of Digits from CO to match what the ShoreGear SIP trunk switch receives from this public network. This is usually configured to match the systems extension length. 9. Verify that Extension and Tandem Trunking are checked. For additional information on these parameters refer to ShoreTel´s Planning and Installation Guide. 10. Check Outbound. 11. Enter the trunk Access Code and Local Area Code. 12. Check Caller ID not blocked by default.
Granting User Groups Access to New Trunk Group The Off System Extension range can be any extension not currently in use on the ShoreTel system. To define an Off System Extension range, scroll to the Trunk Digit Manipulation section and to the following: 1. Click Edit for Off System Extensions field.
2. Click New to open the New Range page. 3. Define a single extension range that is within your ShoreTel PBX extensions. This range must match the extension range of the users defined on the FaxFinder IP server. 4. Click OK. Note: Each individual Off System Extension will be an individual user’s fax destination. Be certain to add a sufficient OSE range to cover all the individual users that require faxing capabilities.
Configure Individual Trunks To configure the individual trunks: 1. Go to Administration > Trunks > Individual Trunks. 2. Select the site where you want to add the trunk from the Add new trunk at site drop down list. 3. Select the trunk group from the drop down list. 4. Click Go to display the Edit Trunk window. 5. Enter a trunk Name. We recommend that you give individual trunks the same name as the trunk group so you can easily track the trunk type. 6.
After setting up the trunk groups and individual trunks, refer to the ShoreTel Planning and Installation Guide to make the appropriate changes for the User Group settings. Configure Codecs for T.38 or G.711 Pass Through Configure the ShoreTel system for either T.38 or G.711 Pass Through. T.38 is recommended, but in cases using full-width switches, please consider using G.711 Pass Through Configuration, as T.38 is not supported on legacy fullwidth switches. For more information, please refer to ShoreTel T.
You can only increase the disk size before you power on the virtual machine. If you need to have more disk space for conference recording, you must change it before you power on the virtual machine. 10. Power on the virtual machine. 11. Open the console on the virtual switch you want to configure and log in with the following credentials: User ID: root Password: ShoreTel 12. Enter DHCP and server IP information that the server uses to download firmware updates. 13. Restart the virtual switch.
5. Enter a unique name and a description for the ShoreGear vTrunk Switch. 6. Set the IP Address and Ethernet Address to the values that you set while installing the Virtual Device. To do this, click Find Switches and select the Virtual Device. 7. Make sure the Site and Server to Manage Switch fields are set to your site. 8. Click Save. Configure Trunk Group for ShoreGear vTrunk Switch To add a new Trunk Group for ShoreGear vTrunk Switch: 1. Go to Administration > Trunks > Trunk Groups. 2.
4. Click Go. 5. Enter a trunk group Name. 6. Verify that Enable SIP Info for G.711 DTMF Signaling is not checked. This is only used with SIP tie trunks between ShoreTel systems. 7. Leave the Profile field at Default Tie Trunk and the Digest Authentication at . 8. Set the Number of Digits from CO to match what the ShoreGear SIP trunk switch receives from this public network. This is usually configured to match the systems extension length. 9. Verify that Extension and Tandem Trunking are checked.
11. Enter the trunk Access Code and Local Area Code. 12. Check Caller ID not blocked by default. This determines if the call is sent out as or with caller information (Caller ID). 13. Click Save, so that you can define an Off System Extension. You will be prompted to give all user groups access to this newly created trunk group. 14. Click Cancel; you do not need to grant access as connectivity is through Off System Extensions.
1. Click Edit for Off System Extensions field. 2. Click New to open the New Range page. 3. Define a single extension range that is within your ShoreTel PBX extensions. This range must match the extension range of the users defined on the FaxFinder IP server. 4. Click OK.
Note: Each individual Off System Extension will be an individual user’s fax destination. Be certain to add a sufficient OSE range to cover all the individual users that require faxing capabilities. Configure Individual Trunks To configure the individual trunks: 1. Go to Administration > Trunks > Individual Trunks. 2. Select the site where you want to add the trunk from the Add new trunk at site drop down list. 3. Select the trunk group from the drop down list. 4. Click Go to display the Edit Trunk window.
7. Enter the FaxFinder’s IP Address. 8. Click Save to commit the changes. After setting up the trunk groups and individual trunks, refer to the ShoreTel Planning and Installation Guide to make the appropriate changes for the User Group settings. Configure Codecs for T.38 or G.711 Pass Through Configure the ShoreTel system for either T.38 or G.711 Pass Through. T.38 is recommended, but in cases using full-width switches, please consider using G.711 Pass Through Configuration, as T.
ShoreTel T.38 Configuration This section describes how to setup ShoreTel for T.38 faxing. T.38 is the recommended codec for faxing; use it if the ShoreTel Switch supports it. When configuring for T.38 faxing, the Codec Lists should include T.38. Create Custom Codec List 1. Login to ShoreWare Director and go to Administration > Call Control > Codec Lists. 2. Click New to create a new codec list. 3. Enter a custom Codec List Name. 4. Select T.
Configuring the Site Bandwidth Options 1. Login to ShoreWare Director and go to Administration > Sites. 2. Click the name of an existing site where users will use the fax service. In the example, Headquarters is the site where the users are located. 3. Set Intra-Site Calls and Inter-Site Calls to the custom Codec List you create. In the example, it is FaxCodecs – Custom. 4. Set Fax and Modem Calls to FaxCodecs – Highbandwidth. 5. Click Save. Note: T.
G.711 Pass Through Configuration This section describes how to setup the ShoreTel for G.711 Pass Through faxing. Use this only if T.38 isn’t supported on the ShoreTel Switch. Make sure that T.38 is not listed in the Codec Lists used on the Site. Create Custom Codec List 1. Login to ShoreWare Director and go to Administration > Call Control > Codec Lists. 2. Click the site name where the users will use the fax service. In the image, this is Headquarters . 3. Enter a Name for the custom Codec List 4.
Configuring the Site Bandwidth Options 1. Login to ShoreWare Director and go to Administration > Sites. 2. Click the site name where the users will use the fax service. 3. Set Intra-Site Calls and Inter-Site Calls to the custom Codec List you created. In the image, this is FaxCodecs – Custom. 4. Set Fax and Modem Calls to FaxCodecs – Highbandwidth Pass Through. 5. Click Save. Note: T.
FaxFinder IP (FF240-IP) Configuration This section provides a brief overview of FF240-IP needed to work with ShoreTel. For configuration details and help with other options, details, refer to the FaxFinder Fax Server FF240-IP Administrator Guide. To download this, go to www.multitech.com/support and select FaxFinder IP from the drop down list. Install the FF240-IP on an IP network with the ShoreTel Switch. Basic configuration is detailed in the Administrator Guide.
4. If the FF240-IP will not use all the digits ShoreTel sends to it for fax routing, adjust the Extension Digits and Extension Length. Otherwise, leave these fields at the default settings. 5. If using T.38 to fax, set the Fax Method to T.38 Re-Invite. If using G.711 Pass Through, set the Fax Method to T.30 Pass Through. 6. Configure Inbound Routing to match the extension numbers that the ShoreTel Switch is faxing to.
FaxFinder IP Troubleshooting To troubleshoot FF240-IP, login it’s web interface and go to System Configuration->Debug. Set the log level to INFO. Save and restart the system. Click on logs and save the file in the local computer. You can then contact the MultiTech support as described below and provide them the debug information.
FFx40 Fax Application For an analog FaxFinder, create a user in ShoreWare Director for each modem on the fax server. Then configure that user to use the correct extension and set the Fax Method. Modify Individual Users for FaxFinder 1. Go to Administration > Users > Individual Users. 2. If creating a new user, select the site from the Add new user at site drop down list and click Go. For an existing user, click that user’s first name. 3. For a new user, enter the user’s First Name and Last Name. 4.
5. Select Ports for Primary Phone Port and select the port to use on the ShoreTel Switch. 6. For Fax Support Field, select Fax Server from the drop down list. This sets the ShoreTel Switch to output the extension’s digits after the FaxFinder answers the call. 7. Enter the Client Username. 8. Click Save. 9. Repeat these steps for each FFx40 modem.
FaxFinder Analog (FFx40) Configuration This section provides a brief overview of FFx40 configuration needed to work with ShoreTel. For configuration details and help with other options, refer to the FaxFinder Fax Server FF240, FF440, FF840 Administrator Guide. To download this, go to www.multitech.com/support and select FaxFinder Analog from the drop down list. Configure FaxFinder Modems 1. Login to FaxFinder and go to Fax Configuration > Modem. 2.
Configure Inbound Routing 1. Login to FaxFinder and click Fax Configuration > Inbound Routing. 2. Under Recipients, click Add. 3. For Extension, enter the ShoreTel extension for this Recipient. 4. Enter a unique Name for this Recipient. 5. Click Save. Edit Recipients opens. 6. Under Destinations, click Add.
7. Select how you want the fax delivered from the Destination Type drop down list. Options are: Email Fax to User Email Notification to User Email Fax Email Notification Share SFTP Print Trash For details on these settings, refer to the FaxFinder FF240, FF440, FF840 Administrator Guide. 8. Depending on your Destination Type, you’ll be prompted to enter a user, email address, share, server, or printer. 9. Click Save. 10.
Application Note Feedback Send any feedback for this document to TPPfeedback@shoretel.com. Include the TPP app note number and the document data when providing feedback.