ISDN ProxyServer Model MTPSR1-202ST Quick Start Guide
Quick Start Guide 82076802 Revision C ISDN ProxyServer (Model No MTPSR1-202ST) This publication may not be reproduced, in whole or in part, without prior expressed written permission from Multi-Tech Systems, Inc. All rights reserved. Copyright © 1999, by Multi-Tech Systems, Inc. Multi-Tech Systems, Inc. makes no representations or warranties with respect to the contents hereof and specifically disclaims any implied warranties of merchantability or fitness for any particular purpose.
Contents Introduction ........................................................................... 4 Related Documentation .........................................................5 Get the Adobe Acrobat Reader ....................................... 5 Get the User Guide .........................................................5 Save or Print the User Guide .......................................... 5 Safety Warnings ....................................................................
ISDN ProxyServer Quick Start Guide Introduction Welcome to Multi-Tech's new ISDN ProxyServer model number MTPSR1-202ST, a single, secure gateway that provides multiple LAN users with high performance Internet access. The ISDN ProxyServer functions as a TCP/IP proxyserver that resides on the outer edge of your firewall and provides Basic Rate ISDN Service using its internal 2B+D terminal adapter.
Introduction Related Documentation This ISDN ProxyServer Quick Start Guide is intended to be used by qualified systems administrators and network managers. This guide provides the necessary information for a qualified person to unpack, cable, load software, and configure the ProxyServer for proper operation. A detailed ProxyServer User Guide is also provided with your unit. This user guide provides in-depth information on the features and functionality of your ProxyServer.
ISDN ProxyServer Quick Start Guide Safety Warnings 1. Never install telephone wiring during a lightning storm. 2. Never install telephone jacks in wet locations unless the jack is specifically designed for wet locations. 3. This product is to be used with UL and cUL listed computers. 4. Never touch uninsulated telephone wires or terminals unless the telephone line has been disconnected at the network interface. 5. Use caution when installing or modifying telephone lines. 6.
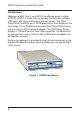
Safety Unpacking your ProxyServer www.multitech.com Remove all items from the box. MAD E IN U.S.A MADE IN U.S.A Figure 2.
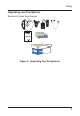
ISDN ProxyServer Quick Start Guide Cabling your ProxyServer Cabling your ProxyServer involves making the proper Power, Command Port, Ethernet, and WAN connections. Figure 3 shows the back panel connectors and the associated cable connections. The following procedure details the connecting of the cables to your ProxyServer. ISDN PHONE 10BASE T COMMAND PORT ON POWER OFF Power Connection Telco Connection PC Connection Ethernet Connection Figure 3. Cable Connections 1.
Cabling 3 To make the network connection, connect one end of an RJ-45 (UTP) cable to the 10 BASE-T connector on the back of the ProxyServer as shown in Figure 3. Connect the other end of the cable to your LAN. 4 Connect one end of an RJ-45 cable to the ISDN connector on the back of the unit and connect the other end to the ISDN Telephone Network (Telco wall jack) as shown in Figure 3. 5 If desired, connect an analog phone set to the PHONE jack on the back panel of the ProxyServer.
ISDN ProxyServer Quick Start Guide Before You Start Loading your Software Consider the following choices before you configure your ProxyServer and record your selections on the following pages; then refer to them while loading your software. Network Configuration ü Network Switch Type_______________________________ Select the network switch type your ISDN service provider uses at its local central office. You can set the ProxyServer to NET3 (EuroISDN) or 1TR6 (German), AT&T 5ESS, DMS-100, or NI-1.
Software Note: For DMS-100 switches, any ASCII character except the underline (_) character is valid. For NI-1 and AT&T switches, only the digits 0-9 are valid. ü Voice SPID________________________________________ The voice SPID is assigned by the local phone company and is for the specific BRI line to which the ProxyServer will be attached. The voice SPID string can have up to 20 characters. Note: For DMS-100 switches, any ASCII character except the underline (_) character is valid.
ISDN ProxyServer Quick Start Guide Note: For DMS-100 switches, any ASCII character except the underline (_) character is valid. For NI-1 and AT&T switches, only the digits 0-9 are valid. ü Data Sub Address______________________________ The data Sub Address is a phone number that is assigned to the ProxyServer at subscription time by the ISDN service provider. The DN is a string of up to 24 characters; valid characters are 0-9, the * character, and the # character.
Software Loading Your ProxyServer Software The ProxyServer Install Software and User Guide are provided on the ProxyServer CD-ROM. The CD-ROM is auto-detectable and should start automatically when inserted into your CD-ROM drive. After you have configured your ProxyServer, you can install the User Guide on your hard drive (for later viewing or printing) by clicking the Install Manuals icon on the Installation CD screen and selecting MTPSR1-202ST. 1.
ISDN ProxyServer Quick Start Guide If the Multi-Tech Installation CD Screen does not appear automatically, click My Computer, then rightclick the CD-ROM drive icon and click Autorun. 3. When the Multi-Tech Installation CD Screen appears, click the Install Software icon. 4. The ProxyServer Setup welcome screen is displayed. Press Enter or click Next> to continue. 5. Follow the on-screen instructions to install your ProxyServer software.
Software ProxyServer software or select the default destination by clicking Next>. If you click Browse, you can select a different destination folder for your ProxyServer software; however, it is recommended that you accept the default folder, C:\Proxy.210. 6. The next dialog box enables you to name the Program Folder for the ProxyServer files. You can select the default name, Proxy Server 2.10, or name it anything you like; when done, click Next> to continue. 7.
ISDN ProxyServer Quick Start Guide If you need to configure your ProxyServer through the Command port, follow the instructions in the dialog box for selecting the COM Port, then click OK to continue. 8. The Setup Complete dialog box is displayed. Click Finish to continue.
Software Wizard Setup The Wizard Setup screens enable you to input basic configuration information needed to configure your ProxyServer. These screens guide you through the process of entering your LAN address, net mask information and your WAN, DHCP Server, and Domain Name Server entries. All these entries will also be displayed in their respective dialog boxes when accessed later from the Main menu. 9. Click Yes to download the wizard setup.
ISDN ProxyServer Quick Start Guide In the top window, select the ProxyServer you want to configure (if several ProxyServers are listed), then check the IP address in the lower window. The IP Address is only a proposed address, and you must verify that this address does not conflict with the IP address of any other device currently on your network. If an address conflict exists, change the contents of this field to assign a unique address to your ProxyServer. Click OK when you are ready to continue.
Software IP Wizard Setup The IP Wizard Setup dialog box guides you through the process of assigning LAN and WAN IP ports address information, and provides an option to use the ProxyServer’s built-in DHCP Server if your LAN is not already running a DHCP Server which assigns (automatically) client IP addresses. If you choose to enable the built-in DHCP server, you are given the option of also enabling the Domain Name Server. 11.
ISDN ProxyServer Quick Start Guide Follow the on-screen instructions to configure the WAN port. If you want the WAN port configured for Remote Access, click the Remote Access to be enabled? check box, then enter the remote IP address in the Remote Address field. Click OK when you are satisfied with the IP Wizard Setup and proceed to the ISDN Configuration Default Parameters screen.
Software 13. Click the Default Configuration supplied by your local Internet service provider. Refer to your entry in Network Switch Type in Before You Start Loading Your Software in this chapter. 14. Click the ISDN Dial Number field and enter the telephone number supplied by your Internet service provider. The telephone number can be a standard local number or it can include a long distance prefix. Note: Some Internet service providers require only that you enter the phone number you call for ISDN service.
ISDN ProxyServer Quick Start Guide 18. If your ISP or Remote Access Server (RAS) uses Point-to-Point Protocol (ppp), click the User Name field in the Authentication group and enter your user name. If SLIP protocol is used by your ISP or RAS, authentication is provided in script form. 19. If your ISP or RAS uses Point-to-Point Protocol (ppp), click the Password field in the Authentication group and enter your password. If SLIP protocol is used by your ISP or RAS, authentication is provided in script form.
Software 23. The following dialog box is displayed as the configuration information is written (downloaded) to the ProxyServer. 24. During the reboot, the Fail LED will be on. Wait for the Fail LED to go off (nearly two minutes). 25. You are returned to the Multi-Tech Installation CD screen where you can now install (on your PC’s hard drive) either Acrobat Reader (by clicking the Acrobat Reader icon) or the User Guide.
ISDN ProxyServer Quick Start Guide 26. At this time your ProxyServer is operational. Now verify that each client PC has an IP stack loaded, workstation IP address assigned, gateway pointed to the ProxyServer, and the DNS name(s) supplied by ISP are entered. Refer to Windows Client Setup in the ProxyServer User Guide.
Warranty and Service Limited Warranty Multi-Tech Systems, Inc. (“MTS”) warrants that its products will be free from defects in material or workmanship for a period of two years from the date of purchase, or if proof of purchase is not provided, two years from date of shipment. MTS MAKES NO OTHER WARRANTY, EXPRESSED OR IMPLIED, AND ALL IMPLIED WARRANTIES OF MERCHANTABILITY AND FITNESS FOR A PARTICULAR PURPOSE ARE HEREBY DISCLAIMED.
82076802