
Installation Guide

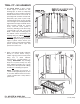

4. Apply a 1/8” diameter bead of adhesive
directly to Corner Panels using a
random “zig-zag” pattern. Install panels
being sure to follow adhesive
manufacturer’s recommendation on
‘venting.’ IMPORTANT: Any molding/
body oils on panel overlap area may
affect adhesive bond. Be sure to clean
overlap area of both panels with rubbing
alcohol prior to installing ‘flat’ panels.
NOTE: If installing tub enclosure or
curtain rod through wall panels, be sure
to use extra adhesive where enclosure/
curtain rod will mount to help reinforce
panel offset.
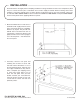
3. Set Corner Panels in place, resting
bottom edges on bathtub rim. Use
masking tape as shown to temporarily
hold panels in place. Position previously
marked Center Panel so that mark on
panel aligns with centerline on back wall.
Temporarily tape panel in place. Tape
remaining Side Panels in place making
sure front edges are vertically plumb and
aligned with front edge of bathtub. Check
panel overlaps (should not exceed
4-1/4”) and trim corner panels if
necessary. (Trimming can be done using
a jigsaw/saber saw with a fine tooth
blade — wide strips of masking tape on
the finished surface will minimize any
chipping along cut.) NOTE: Do not trim
flat panels. With all (5) panels in place,
draw a light guide line along top and side
edges of panels. These will be your
reference lines for permanently installing
panels. Carefully remove tape and
panels from alcove area.
TRIAL FIT • NO ADHESIVE
E.L. MUSTEE & SONS, INC.
5431 West 164th Street • Cleveland, Ohio 44142
SI-193 (12
•
04)