
Manual


CALIBRATION/FIELD CALIBRATION
CONDUCTIVITY STANDARD SOLUTIONS: A Standard Solution
has a known conductivity value. Your meter was calibrated at the
factory using Myron LCompany 442-3000 Standard Solution. You
can keep your meter accurate by using the same Standard Solution.
How often you calibrate your meter depends on how much you
use it. For once a day use, recalibrate it every three months.
CHECKING CONDUCTIVITY CALIBRATION
1. Test a sample of Myron L 442-3000 Standard Solution.
CAUTION: Throw away the Standard Solution as you use it. Don't
put the used samples back in the bottle.
2. If the Agri-Meter does not indicate 3.9 millimhos (equivalent to
3900 micromhos), first clean the cell. For directions on how to do
this see CELL CUP inside. Rinse the cell thoroughly and test the
Standard Solution again. If the Agri-Meter still does not indicate
the correct value, recalibrate it as described below.
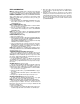
TO RECALIBRATE CONDUCTIVITY
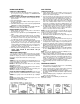
1. Remove the bottom cover using fingernails or a small screwdriver
to loosen the front or rear edge. Identify the Conductivity
Calibration Control so you can find it by touch while calibrating.
Model AG6/pH also has two pH Calibration Controls. See photo
below for details.
2. Test another sample of the 442-3000 Standard Solution (be
careful to not splash solution inside the meter).
3. Adjust the Conductivity Calibration Control until the meter
indicates 3.9 millimhos (3900 micromhos).
NOTE: Agri-Meters may not be calibrated to read parts per million.
4. (AG-5 ONLY) Press the red button.
5. (AG-5 ONLY) Compare the meter reading to the INTERNAL
STANDARD value on the meter's bottom label. If they are
noticeably different, mark the new value in place of the old one.
MAINTENANCE/ACCESSORIES
BATTERY CHECK (AG-5): Press the red "S" button. Adjust the
Calibration Control to maximum (see FIELD CALIBRATION). If the
pointer reads less than full scale (5 millimhos) the battery should be
replaced.
BATTERY CHECK (AG6/pH): The AG6/pH has a battery indicator
glow light visible through the small hole on the lower right-hand corner
of the meter face plate. If this light fails to glow when the black button
is pressed, replace both batteries.
BATTERY REPLACEMENT: To replace each battery detach the
battery connector. Pull on the plastic strap to remove the battery.
Replace with fresh zinc carbon or alkaline 9 volt battery. Reinsert
the plastic strap to secure battery.
CELL CUP: Self-conditioning of the built-in electrodes occurs each
time the button is pressed with a sample in the cell cup. This ensures
consistent results each time. With some samples a small downward
swing of the pointer is a result of this conditioning action. This action
is powerful and removes normal films of oil and dirt. However, if very
dirty samples - particularly scaling types - are allowed to dry in the
cell cup, a film will build up. This film reduces accuracy. When there
are visible films of oil, dirt, or scale in the cell cup or on the electrodes,
scrub them lightly with a small brush and household cleanser. Rinse
out the cleanser and the meter is ready for accurate measurements.
pH SENSOR: The unique pH electrode in your AG6/pH is a non-
refillable combination type which features a porous liquid
junction (covered by U.S. Patent No. 4128468). It should not be
allowed to dry out (see pH MEASUREMENT). If it does, the sensor
can sometimes be renewed by soaking in a saturated potassium
chloride (KCI) solution for several days.
"Drifting" can be caused by a film on the sensor bulb. Use a liquid
cleaner such as Windex
™
or Fantastic
™
to clean it. The sensor bulb
is very thin and delicate. Excessive pressure during cleaning may
break it.
Leaving high pH (alkaline) solutions, such as 10 buffer, in contact
with the pH sensor for long periods of time can damage it. Rinsing
such liquids from the pH compartment and moistening it with 4 buffer
or tap water will extend its useful life.
Samples containing chlorine, sulphur, or ammonia can "poison"
any pH electrode. If it is necessary to measure the pH of any such
sample, thoroughly rinse the pH sensor with clean water immediately
after taking the measurement. Any sample element which will reduce
(add an electron to) silver, such as cyanide, will attack the reference
electrode.
Replacement sensors are available only from the Myron L
Company or our authorized distributors (see ACCESSORIES).
WATER INSIDE THE METER
Your Myron L meter is a rugged instrument and will withstand
water exposure around its cell, meter movement, and switches.
However, care shouId be taken to keep water from leaking in around
the bottom cover. It is not sealed (to prevent condensation from
forming).
If the water is relatively clean (i.e., tap water or better), and there
are only a few drops inside the meter, dry it as described below.
Large amounts of water, or corrosive or very dirty solutions will almost
certainly damage meter movement or electronics. Such meters
should be returned to the Myron L Company for repair.
To dry your meter:
1. Shake excess water out of the inside of the meter.
2. Dab the exposed surfaces dry with an absorbent cloth or tissue.
Avoid pushing any water into the Calibration Controls or the
switches.
3. Air dry the meter in a warm area with the bottom cover off. Allow
several hours for thorough drying.
If the water entered through a leak in the case or cell, or if the
instrument shows erratic readings or other unusual behavior, return
it to the Myron L Company for servicing.