
Manual

FIELD CALIBRATION
NOTE: The feature described below is on the AG-5
only.
It is intended
as a quick field calibration check, or for using the range doubling
technique. It is not replacement for calibration with Standard Solution.
INTERNAL STANDARD: Your AG-5 has an INTERNAL STANDARD
value on the bottom cover of each meter. Use it between normal
calibrations as a field check of your meter's accuracy. To verify your
meter's calibration:
1. Press the red button.
2. If the reading matches the lNTERNAL STANDARD value on the
bottom label, yourAG-5 is in calibration. If not, see FIELD
CALIBRATION next.
FIELD CALIBRATION (AG-5 only)
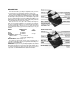
1. Remove the bottom cover using fingernails or a small screwdriver
to loosen the front or rear edge.
2. Press the red button and adjust the Conductivity Calibration
Control until the meter reading is the same as the INTERNAL
STANDARD value.
NOTE: If the meter will not adjust to the INTERNAL STANDARD
value the battery should be replaced. See MAINTENANCE below.
3. Replace the bottom cover.
RANGE DOUBLING (AG-5 only)
1. Remove the bottom cover.
2. While pressing the red button, adjust the Conductivity Calibration
Control until the meter reads one-half the INTERNAL STANDARD
value shown on the bottom label. For example:
If the INTERNAL STANDARD value is 4.2. adjust the Conductivity
Calibration Control until the reading is 2.1.
3. Test your sample (take care to keep the inside of the meter dry).
Multiply by two the reading of the sample tested. For example:
If the indicated conductivity is 3.2 millimhos, the actual value of
the sample tested is 6.4 millimhos (3.2 x 2).
NOTE: After completing tests requiring range doubling reset the
Conductivity Calibration Control to its INTERNAL STANDARD value
and replace bottom cover.
STANDARD BUFFER SOLUTIONS (AG6/pH only)
All pH sensors "drift" and decrease in strength as they age. pH
meters have two Calibration Controls to compensate for those effects.
ZERO adjust corrects for "drift" of the pH sensor's response to neutral
pH solutions. GAIN adjust amplifies the signal from the pH sensor
for accurate readings of other pH values.
Use pH standard buffer solutions to calibrate the pH function
onyourAG6/pH. The recommended values are 4, 7, and 10. For
greatest accuracy, adjust with the buffer closest in pH to the samples
to be tested.
pH ZERO ADJUST (Frequency: weekly)
Test by rinsing and refilling the AG6/pH cell cup with 7 buffer and
pressing the red button. The meter should indicate 7 on the red
scale. If it is necessary to calibrate Zero, perform the following steps:
1. Remove the bottom cover using fingernails or a small screwdriver
to loosen the front or rear edge.
2. Refill cell cup with 7 buffer (see pH MEASUREMENT for proper
procedure).
3. Press the red button and turn the pH Zero control until the needle
indicates 7.
4. Recap the pH compartment and replace the bottom cover.
pH GAIN (SLOPE) ADJUST (Frequency: bi-monthly)
The Gain should be calibrated approximately once every eight
weeks. The Gain control is used with 4 and 10 buffers.
NOTE: Never adjust the Gain control without first adjusting Zero
Test by rinsing and refilling the AG6/pH cell cup with 4 or 10 buffer
and pressing the red button. The meter should indicate the
buffer value on the red scale. If it is necessary to calibrate the Gain,
perform the following steps:
1. Remove the bottom cover.
2. Rinse and fill the pH compartment with 4 buffer and press the
red button. Adjust the Gain control until the needle indicates 4.
3. Rinse three times and test with 10 buffer. If adjustment is
necessary, adjust to only half way between the initial 10 buffer
reading and 10.
4. Retest the 4 and 10 buffers. If, after this, the 4 and 10 buffer
readings are not less than one division from 4 and 10, the sensor
is deteriorating and should be replaced. The sensor should also
be replaced if the Gain control cannot make the pointer reach
either 4 or 10. DO NOT store the meter with 10 buffer still in it
(see MAINTENANCE).