
Operation Manual
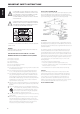
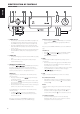
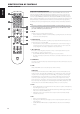

6 REMOTE SENSOR
Point the VR3 remote control at the remote sensor and press the
buttons. Do not expose the remote sensor of the VISO THREE to a strong
light source such as direct sunlight or illumination. If you do so, you may
not be able to operate the VISO THREE with the remote control.
Distance: About 23ft (7m) from the front of the remote sensor.
Angle: About 30° in each direction of the front of the remote sensor.
7 VACUUM FLUORESCENT DISPLAY (VFD)
Provide visual information about the current settings like displaying the
active Source, volume level, playback information, applicable RDS/DAB
display information and other related indicators.
8 SOURCE
Toggle these buttons to select through the following SOURCE modes
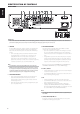
– CD, iPod, Tuner (AM, FM or DAB as applicable), USB, Audio 1, Audio 2
and Front.
9 VOLUME
The VOLUME control adjusts the overall loudness of the signal being fed
to the loudspeakers or headphones.
· Turn clockwise to increase the volume level; counter clockwise to
lower it.
· The VOLUME knob is also used to increment/decrement the Bass
and Treble levels as well as in shifting BALANCE levels.
10 PHONES
• Accepts stereo headphone using a standard 1/4-inch stereo phone
plug (use a suitable adaptor for headphones equipped with a
smaller plug).
• Plugging in headphones automatically mutes output from the
speakers.
11 FRONT INPUT
Use these convenience jacks for occasional sources such as tape player
or any analog audio sources.
• If your source has a single audio out jack only or is marked “mono
output”, plug this into the VISO THREE’s Front Input “R (Mono)”.
• On the other hand, if your source has two output jacks indicative of
stereo output, insert both jacks into the VISO THREE’s corresponding
Front Input “L” and Front Input “R (Mono)” to achieve stereo output as well.
USB
Connect a USB memory stick to this input. Refer also to the item about USB
MODE at the USING THE VISO THREE section of the OPERATION page.
12 DISC TRAY
• With the disc tray open, insert a CD or other compatible media disc
face down onto the tray. Place the disc in the drawer, centered in
the smaller circular recess, with its label facing UP.
• “No Disc” appears on the VISO THREE’s VFD if the drawer is closed
with a disc placed upside down or no disc loaded.
13 OPEN/CLOSE
• Press this button to open and close the disc drawer and
simultaneously select the internal CD player.
• Pressing the [OPEN/CLOSE] button will also automatically switch
ON the VISO THREE from standby mode and at the same time draw
open the disc tray.
• If the current Source is not CD mode (i.e., FM mode) and [OPEN/
CLOSE] is pressed, the VISO THREE will immediately switch to CD
mode as the disc tray draws open.
14 PLAY/PAUSE
• Press this button to toggle between Play and Pause of a CD or other
compatible media disc.
• Press to start play or resume play after Pause. The icon “ ” is
illuminated in the VFD indicating the VISO THREE is in playback
mode.
• If the disc tray is open, press this button to automatically close the
tray and start playback if a disc is loaded.
• During playback, press this button to stop playback temporarily,
keeping the optical pickup at its current position on the disc. The
icon “ ” is illuminated in the VFD indicating the VISO THREE is
in pause mode. To resume playback at the exact point where it
stopped, press [PLAY/PAUSE] again.
• Pressing the [PLAY/PAUSE] button will also automatically switch ON
the VISO THREE from standby mode and start playback if a disc is
loaded.
15 STOP
• During disc playback, press this button to STOP disc or le playback.
The display reverts to showing the number of tracks and total
playing time on the disc; for WMA/MP3 les, the display will revert
to the total number of les.
• Pressing [STOP] button will result to full stop of current track/le
playback. Pressing [PLAY/PAUSE] after stop mode will start playback
of the rst track/le/program.
• If the VISO THREE was programmed to play a selection of tracks/les,
the program will be retained in the player’s memory. Pressing the
[STOP] button twice during program playback will delete the whole
program list.
IDENTIFICATI ON OF CONTROLS
FRONT PANEL
7
ENGLISHPORTUGUÊS FRANÇAISESPAÑOLITALIANODEUTSCHNEDERLANDSSVENSKAРУССКИЙ