® ™ Operators Manual IT IS THE RESPONSIBILITY OF THE OPERATOR TO MAINTAIN CUSTOMER SAFETY AT ALL TIMES , AND IT IS IMPERATIVE THAT THE DETAILS SET OUT IN THIS MANUAL ARE FOLLOWED PRECISELY. Part No.
© 1995 all rights reserved. No part of this publication may be reproduced by any mechanical, photographic or electronic process, or in the form of phonographic recording, nor may it be stored in a retrieval system, transmitted or otherwise copied for public or private use, without permission from NAMCO EUROPE LTD. While the information contained in this manual is given in good faith and was accurate at the time of publication, NAMCO EUROPE LTD.
SAFETY WARNING In order to use this machine safely, be sure to read this Operators Manual carefully before installation, adjustment or use of this machine. Whenever the owner of this machine entrusts disassembly, installation, adjustment, routine maintenance or trouble shooting to another person, the owner should ensure that that person read the appropriate precautions and relevant sections of this manual before starting work.
Contents Operators Manual ...................................................................................1 SAFETY WARNING .................................................................................3 1. SPECIFICATIONS .............................................................................5 2. PRECAUTIONS ................................................................................6 2-1 Cautions When Installing. ...............................................................
1. SPECIFICATIONS POWER SUPPLY :- 220/240volts AC COIN ACCEPTOR:- Mars CashFlow - 1 Channel MONITOR :- Hantarex 28" Polo Colour Monitor with auto degauss. DIMENSIONS :- 790(w) x 1200(d) x 2080(h) WEIGHT :- 175kg. ACCESSORIES :- Keys: (Cash Door) ..................... 2 (Coin Door) ...................... 2 (Back Door) ..................... 2 IEC Mains Lead ...................................... 1 Operators Manual ................................... 1 Monitor Manual ..............................
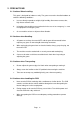
2. PRECAUTIONS 2-1 Cautions When Installing. This game is designed for indoor use only. The game must not be installed outdoors or under the following conditions:a. In areas directly exposed to sunlight, high humidity, direct water contact, dust, high heat or extreme cold. b. In locations that would present an obstacle in the case of an emergency, i.e. near fire equipment or emergency exits. c. On an unstable surface or subject to floor vibration. 2-2 Cautions when Handling. a.
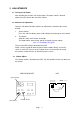
3. ADJUSTMENTS 3-1 Turning on the Power After installing the machine, turn on the power. The power switch is located above the mains inlet on the rear of the cabinet. 3-2 Switches for Adjustment Open the coin door to find the switches for adjustments, located on the service bracket. 1. Service Switch Press this switch to obtain game credits without incrementing the coin counter. 2. Test Switch Slide this switch "ON" to enter test mode. Test mode allows game testing and the changing of game settings.
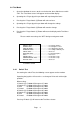
3-4 Test Mode 1. Open the coin door for access to the service bracket, then slide the test switch "ON". The "Test Menu Screen" will appear on the monitor display. 2. Operating the 1 Player joystick up or down will step through the items. 3. Pressing the 1 Player Attack (H) Button will select an item. 4. Operating the 1 Player joystick up or down will change the settings. 5. Pressing the 1 Player Attack (H) Button will store the change. 6.
1P 0000 2P 0000 + + + + X + + + + + + + + X + + + + 3P 0000 4P 0000 + + + + X + + + + + + + + X + + + + SERVICE SWITCH TEST SWITCH DIP 1 DIP 2 COIN 1 COIN 2 COIN 3 COIN 4 + X + + + + + + PRESS ATTACK (V) TO EXIT 3-4-2 Sound Test On entering the Sound Test, the following display will appear on the monitor. Pushing the 1 player joystick to the right will make the number step up and pushing the joystick to the left will make the number step down.
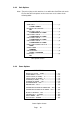
3-4-3 Coin Options Note:- The price of play on this machine is set within the CashFlow coin mech. Ensure that the coin options on the screen are set as shown in the following table.
3-4-5 Factory Settings ITEM CONTENTS FACTORY SET 1 GAME COST COIN PULSES REQUIRED FOR CREDIT ----- settable 1 - 9 2 DISCOUNT 50% DISCOUNT FOR CONTINUE ----- YES / NO 3 COIN 1 MECH VALUE NUMBER OF PULSES ON METER ----- settable 1 - 9 1 4 COIN 2 MECH VALUE NUMBER OF PULSES ON METER ----- settable 1 - 9 1 5&6 1 NO NOT USED 7 BONUS COIN EXTRA COIN PULSE AT SPECIFIED COINS IN NONE 8 CREDIT MODE COMMON (Credit common to player 1 & 2) / EACH ONE (Player 1 & 2 seperate) 9 COIN COUNTER
3-5 PC Board Connectors JAMMA 56way Edge Connector Solder Side Terminal No 48w Extended Edge Connector Part Side Solder Side Speaker R (-) GND A 1 GND GND B 2 +5v C +5v Terminal No Part Side A1 B1 GND A2 B2 3 +5v A3 B3 D 4 +5v A4 B4 E 5 A5 B5 F 6 A6 B6 Polarizing Key H 7 Polarizing Key A7 B7 Coin Counter 2 j 8 Coin Counter 1 A8 B8 K 9 Coin Lockout A9 B9 GND Speaker (-) L 10 Speaker (+) A10 B10 GND Audio (GND) M 11 Audio (+) A11 B11 Video
4. PARTS Decals & Plastics DESCRIPTION PART No. Cabinet Decal LHS - Upper 40000290 Cabinet Decal LHS - Lower 40000291 Cabinet Decal RHS - Upper 40000292 Cabinet Decal RHS - Lower 40000293 Cabinet Decal Front - LHS 40000294 Cabinet Decal Front - RHS 40000295 Cabinet Decal "NAMCO" LHS/RHS/Front 40000061 Character Plexi 30000225 Play Panel Overlay 33000120 Header Box Vac-Form 45000728 Top Flash Acrylic 30000226 Cabinet DESCRIPTION PART No.
5.
Page 15