SERIAL / SÉRIE#______________________ GOURMET GRILLS LE GRILS DU GOURMET (PG 2-10) (PG 11-19) CSS610RB MANUFACTURED FOR / MANUFACTURE POUR: NAPOLEONAPPLIANCE CORP., 214 BAYVIEW DR., BARRIE, ONTARIO, CANADA L4N 4Y8 PHONE: (705)726-4278 FAX: (705)725-2564 EMAIL: care@nac.on.ca WEB SITE: www.napoleongrills.
R GOURMET GRILLS NAPOLEON gas grills are manufactured under the strict Standard of the world recognized ISO 9001-2000 Quality Assurance Certificate. NAPOLEON products are designed with superior components and materials, and are assembled by trained craftsmen who take great pride in their work.
WARNING Do not try to light this appliance without reading "LIGHTING" instructions section of this manual. • • • • FOR YOUR SAFETY DO NOT STORE OR USE GASOLINE OR OTHER FLAMMABLE VAPOURS AND LIQUIDS IN THE VICINITY OF THIS OR ANY OTHER APPLIANCE. AN LP CYLINDER NOT CONNECTED FOR USE MUST NOT BE STORED IN THE VICINITY OF THIS OR ANY OTHER APPLIANCE. IF THE INFORMATION IN THESE INSTRUCTIONS IS NOT FOLLOWED EXACTLY, A FIRE OR EXPLOSION MAY RESULT, CAUSING PROPERTY DAMAGE, PERSONAL INJURY OR DEATH.
IMPORTANT DO’S AND DON’TS DON'TS DO'S • Read the entire instruction manual before operating the gas grill. • Do not attempt to use a cylinder which is not equipped with a QCC1 type connection. • Maintain proper clearance to combustibles (10" to rear and sides). Additional clearance is recommended near vinyl siding or large panes of glass. • Do not route hose underneath drip pan - proper hose clearance to bottom of unit must be maintained.
GAS HOOK-UP INSTRUCTIONS CYLINDER CONNECTION: Ensure that the gas regulator hose is kink free. Inspect the valve connections, port and regulator assembly for debris or damage. Never attempt to use damaged or obstructed equipment, see your dealer to purchase a replacement or repairs. Remove the cap or plug from the cylinder fuel valve. Insert the black QCC1 regulator nipple onto the QCC1 fuel valve. Hand tighten clockwise. Do not use tools.
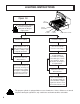
LIGHTING INSTRUCTIONS Open lid. LEFT BURNER Ensuring all burner controls are in the off position, slowly turn on the gas supply valve. CENTRE BURNER REAR BURNER RIGHT BURNER REAR BURNER IGNITER Main Burner Lighting Rear Burner Lighting Push in on any main burner knob and turn to “HI”. A click should be heard from the valve, sending a spark to light the pilot flame. Remove warming rack. (the excess heat will cause the rack to warp.) If ignition is not immediate, turn burner control off.
COOKING INSTRUCTIONS When lit for the first time, the gas grill will emit a slight odour. This is a normal temporary condition caused by the "burn-in" of the lubricants used in the manufacturing process and will not occur again. Simply run the main burners on high for approximately ½ hour with the lid closed. MAIN BURNER USE: When searing foods, preheating is recommended by operating all main burners in the high position with the lid closed for approximately 10 minutes.
MAINTENANCE INSTRUCTIONS Turn off the gas at the source and disconnect unit before servicing. Maintenance should only be done when the grill is cool, to avoid the possibility of burns. A leak test must be performed annually, and whenever any component of the gas train is replaced. COMBUSTION AIR ADJUSTMENT - (This must be done by a qualified gas installer.) The air shutter is factory set and should not have to be adjusted under normal conditions.
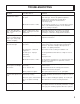
TROUBLESHOOTING Problem Grill will not light when the control knob is rotated. Possible Causes Solution Lack of gas. Check to see if tank is empty. No spark. Turn off the gas. Remove the grill and searplate to visually check for spark at the electrode when rotating knob. Ensure the electrode wire is connected properly. Obstruction in burner or orifice. Do other burners operate? If so, check the burner and gas orifice on the malfunctioning burner for an obstruction. Refer to cleaning instructions.
ORDERING REPLACEMENT PARTS Before contacting the customer service department, check the NAC web site for more extensive cleaning, maintenance, troubleshooting and part replacement instructions at www.napoleongrills.com. Contact the factory directly for replacement parts and warranty claims. The customer service department is available between 9 AM and 5 PM (Eastern standard time) at 1-866-820-8686 or fax at 1-705-727-4282. In order to process a claim, we must be provided with the following information: 1.
R LE GRILS DU GOURMET Les grils à gaz NAPOLÉON sont fabriqués conformément aux normes strictes du Certificat d’assurance de qualité mondialement reconnues ISO 9001-2000. Les produits NAPOLÉON sont conçus avec des composantes et des matériaux de qualité supérieure, assemblés par des artisans qualifiés qui sont fiers de leur travail.
AVERTISSEMENT Ne tentez pas d’allumer cet appareil avant d’avoir lu la section “INSTRUCTIONS D’ALLUMAGE” de ce manuel. POUR VOTRE SÉCURITÉ N’ENTREPOSEZ PAS ET N’UTILISEZ PAS D’ESSENCE OU AUTRES LIQUIDES ET VAPEURS INFLAMMABLES À PROXIMITÉ DE CET OU TOUT AUTRE APPAREIL. UNE BONBONNE DE PROPANE NON BRANCHÉE NE DEVRAIT PAS ÊTRE ENTREPOSÉE À PROXIMITÉ DE CET OU DE TOUT AUTRE APPAREIL.
QUOI FAIRE ET NE PAS FAIRE À FAIRE À NE PAS FAIRE • Lire le manuel d’instructions au complet avant d’utiliser le gril. • Ne pas tenter d’utiliser une bonbonne qui n’est pas équipée d’un raccord de type QCC1. • Respecter les dégagements recommandés des matériaux inflammables (10" à l’arrière du gril et 10" sur les côtés). Une distance plus grande est recommandée à proximité d’un recouvrement de vinyle ou d’une grande surface vitrée.
INSTRUCTIONS DE BRANCHEMENT DU GAZ RACCORD DE LA BONBONNE: Assurez-vous que le tuyau du régulateur de gaz est sans anomalie. Enlevez les bouchons sur la soupape de gaz à la bonbonne. Connectez le régulateur QCC1 sur la soupape de gaz QCC1. Serrez à la main dans le sens des aiguilles d’une montre. N’utilisez pas d’outil. Faites un test de fuites sur tous les raccords avant d’utiliser le gril.
INSTRUCTION D’ALLUMAGE Ouvrez le couvercle BRÛLEUR DE GAUCHE Fermez tous les boutons de contrôle des brûleurs, ouvrez la soupape d’alimentation en gaz lentement. BRÛLEUR DE CENTRE BRÛLEUR D'ARRIERE BRÛLEUR DE DROITE BOUTON D'ALLUMEUR POUR LE BRÛLEUR D'ARRIERE Allumage du brûleur principal. Allumage du brûleur arrière. Appuyez sur l’un des boutons de contrôle de brûleurs principal et tournezle à “HI”.
INSTRUCTIONS D’OPÉRATION Lorsqu’il est allumé pour la première fois, le gril dégagera une légère odeur. Ceci est un phénomène normal et temporaire causé par l’évaporation des peintures et lubrifiants internes utilisés dans le processus de fabrication et ne se reproduira pas. Allumez simplement votre gril sur “high” pendant une demi-heure. UTILISATION DU BRÛLEUR PRINCIPAL: Avant de cuire les aliments il est recommandé de préchauffer le gril à “high” avec le couvercle fermé pendant environ 10 minutes.
INSTRUCTIONS D’ENTRETIEN Fermez le gaz à la source et débranchez l’appareil avant l’entretien. L’entretien devrait être effectué seulement lorsque le gril est froid pour éviter toutes possibilités de brûlure. Un test de détection de fuites devrait être effectué annuellement ou à chaque fois qu’une composante de gaz est remplacée.
GUIDE DE DÉPANNAGE Problème Le gril ne s’allume pas lorsque le bouton de contrôle est tourné. Solution Manque de gaz. Vérifiez si la bonbonne est vide. Aucune d’étincelle. Fermez le gaz. Retirez la grille et la plaque de brûleur pour vérifier s’il y a une étincelle à l’électrode lorsque vous tournez le bouton de contrôle. Assurez-vous que le fil de l’électrode est bien branché. L’injecteur de la veilleuse est obstrué.
COMMANDE DES PIÈCES DE RECHANGE Avant de contacter le bureau de service du clientele, veuillez prendre note, que notre guide de dépanage est maintenent dispoible sur le net a www.napoleongrills.com. Ici, vous trouver beaucoup d'information comme les instructions de d'opération et de nettoyage et comment remplacer les pièces. Contactez le manufacturier directement pour obtenir des pièces de rechanges et faire des réclamations sur garantie.
STAINLESS STEEL PARTS MAY HAVE A PROTECTIVE PLASTIC COATING, REQUIRED FOR THE MANUFACTURING PROCESS. PLEASE REMOVE THIS COATING BEFORE OPERATING THE UNIT. LES PIÈCES EN ACIER INOXYDABLE PEUVENT ÊTRE RECOUVERTES D'UNE PELLICULE DE PROTECTION, NÉCESSAIRE DURANT LE PROCÉDÉ DE FABRICATION. VOUS DEVEZ ENLEVER CETTE PELLICULE AVANT DE FAIRE FONCTIONNER L'APPAREIL. 1.
2.
3. 4.
ITEM# PART # DESCRIPTION 1 2 3 4 5 n010-0457 n010-0464 n080-0185 n010-0460 n010-0458 n530-0014 n010-0459 n475-0157 n475-0156 n010-0454 n010-0453 n080-0182 n325-0045 n735-0011 n475-0155 n305-0051 n305-0052 n520-0016 n010-0465 n305-0050 n100-0032 n590-0130 n590-0129 n725-0025 n725-0024 n725-0027 n725-0026 n570-0074 n380-0010 w385-0045 n130-0006 n130-0007 n555-0014 n370-0136 n685-0003 n585-0033 n080-0180 n080-0181 n080-0179 n080-0178 n200-0073 n010-0455 n010-0456 n080-0183 n080-0184 n010-0463 n350-0055 n59
5.