
- Napoleon N415-0117 Grill User Guide


2
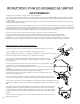
Wall Mounting Instructions:
1. Using the two holes provided in the vertical tube, mount the bracket to the wall.
2. Ensure minimum clearance to combustibles are maintained, 4” (100mm) to sides,
and 6”(150mm) from the rear.
3. Do not locate the grill under unprotected combustible construction.
4.The platform may be swivelled by removing the two #8 x 3/8” flathead phillips screws
and turning the platform to the desired angle. Replace the two screws and tighten.
5. Once the platform is located in the desired position, the grill can be mounted:
a. Lock the lid of the grill closed with the latch.
b. Hold the grill by the handle with one hand, place the other hand under the grill in the centre of the
front tapered surface.
c. Place the grill bottom on the platform and slide it forward to engage the tab protruding from the bottom of the grill.
Ensure that the tab is properly engaged.
d. When the dimples on the bottom of the unit line up with the holes on the platform, the latch is ready to be fastened.
6. Once the grill has been attached, thread the regulator (clockwise) into the regulator mount. On tube burner
version, lift the burner slightly to align it with the orifice. Tighten by hand.
7. To fasten the regulator locking bracket, locate it at the bottom back corner of the regulator mount and turn the regulator until the
gas inlet is aligned with the hole in the regulator locking bracket. Slide the locking bracket forward until the two tabs engage into the
slots on the regulator mount. Tap in firmly.
8. Attach the cylinder to the regulator by turning clockwise. (Be sure not to cross thread the cylinder.)
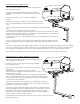
Rail Mount Instructions:
1. Place mount “A” on the outside of the railing, with the mounting platform facing up.
2. Attach mount “B” to mount “A” using the four 1/4-20 x 1” bolts.
3. Level the platform and tighten the top two bolts first. Be sure the platform is pinched tight before
tightening the bottom two bolts.
4. The platform can also be adjusted left to right by loosening the top two bolts and centre
pivot screw. Once the platform is adjusted, tighten all three fasteners.
5. Once the platform is level in both directions, the grill can be mounted:
a. Lock the lid of the grill closed with the latch.
b. Hold the grill by the handle with one hand, place the other hand under the grill in the centre of
the front tapered surface.
c. Place the grill bottom on the platform and slide it forward to engage the tab protruding from
the bottom of the grill. Ensure that the tab is properly engaged.
d. When the dimples on the bottom of the unit line up with the holes on the platform, the latch is
ready to be fastened.
6. Under extreme conditions, the bracket may pivot around the railing. A centre hole has been
provided to allow a bolt to be fastened through the rail to prevent the grill from pivoting on the rail.
7. Once the grill has been attached, thread the regulator (clockwise) into the regulator mount. On
tube burner version, lift the burner slightly to align it with the orifice. Tighten by hand.
8. To fasten the regulator locking bracket, locate it at the bottom back corner of the
regulator mount and turn the regulator until the gas inlet is aligned with the hole in the
regulator locking bracket. Slide the locking bracket forward until the two tabs engage
into the slots on the regulator mount. Tap in firmly.
9. Attach the cylinder to the regulator by turning clockwise. (Be sure not to cross thread
the cylinder.)
A
B