
Instructions / Assembly


www.napoleongrills.com
7
EN
O Posion
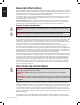
WARNING! Open lid.
WARNING! Ensure all burner controls are in the o posion. Turn on the gas supply
valve.
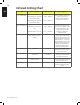
Main Burner
Lighng
Rear Burner Lighng
(Rosserie Burner)
(if equipped)
Side Burner Lighng
(If equipped)
1. Open grill lid. 1. Open grill lid. 1. Open side burner cover.
2. Push and turn any main burner knob slowly
to the ’hi’ posion. This acon will ignite the
pilot ame which will in turn light the selected
burner. If the pilot lights, connue to push
down on the control knob unl the burner lights
and then release.
2. Remove the warming rack. 2. Push and turn side burner control to
high posion.
3. If the pilot does not ignite, then immediately
turn the control knob back to the ‘o posion
and repeat step 2 several mes.
3. Push and turn the rosserie burner
control knob slowly to the ‘hi’ posion.
This acon will ignite the pilot ame
which will in turn light the burner. If the
pilot lights, connue to push down on
the burner control knob unl the burner
lights then release.
3. Press and hold igniter buon unl
burner lights, or light by match.
4. If the pilot and burner will not ignite within
5 seconds, turn the control knob to the ‘o’
posion and wait 5 minutes for any excess gas
to dissipate. Either repeat steps 2 and 3 or light
with a match.
4. If the burner does not ignite, then
immediately turn the control knob back
to the ‘o’ posion and repeat step 3
several mes.
4. If the burner will not ignite within 5
seconds, turn the control knob to the ‘o’
posion and wait 5 minutes for any excess
gas to dissipate. Either repeat steps 2 and
3 or light with a match.
5. If lighng the unit with a match, clip the
match into the supplied lighng rod. Hold the
lit match down through the grill and sear plate
while turning the corresponding burner valve
to high.
5. If the burner will not ignite within 5
seconds, turn the control knob to the
‘o’ posion and wait 5 minutes for any
excess gas to dissipate. Either repeat
steps 3 and 4 or light with a match.
WARNING! The propane cylinder is equipped with an excess ow device. Unless all burners are
turned o prior to turning the cylinder on, only small ames and low heat will be achievable.
WARNING! Do not use the rear burner (rosserie burner) with the main burners operang.
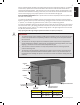
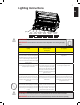
Lighng Instrucons
Lights
Le
Burner
Le Centre
Burner
Rear
Burner
Infra Red
Burner
Right Centre
Burner
Centre
Burner