
User's Manual


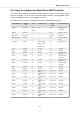
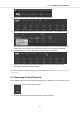
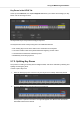
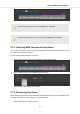
Table Of Contents
- _
- Table of Contents
- 1. Disclaimer
- 2. Welcome to KOMPLETE KONTROL
- 3. The KOMPLETE KONTROL Workflow
- 4. Setting up KOMPLETE KONTROL
- 5. Software Overview
- 6. Keyboard Overview
- 7. Global Controls and Preferences
- 8. MIDI Communication
- 9. Using the MIDI Assignment Editor
- 10. Host Integration
- 11. Browsing the Library
- 11.1. Browser Basics
- 11.2. Opening the Browser
- 11.3. Loading Preset Files
- 11.4. Choosing Between Factory Content and User Content
- 11.5. Filtering Preset Files by Product
- 11.6. Filtering Preset Files by Bank
- 11.7. Resetting the Product Selection
- 11.8. Types and Characters Tags
- 11.9. Working with Favorites
- 11.10. Performing a Text Search
- 11.11. Displaying Preset File Information
- 11.12. Auditioning your Preset Files
- 12. Working with Effects
- 13. Working with Loops and One-Shot Samples
- 14. Managing the Library
- 14.1. Saving Preset Files to the User Library
- 14.2. Deleting User Preset Files from the User Library
- 14.3. Editing the Tags and Properties of User Preset Files
- 14.4. Syncing Multiple Instances
- 14.5. Working with the Files Pane
- 14.6. Loading VST Plug-ins
- 14.7. Installing NKS Instruments
- 14.8. Importing KOMPLETE KONTROL-Compatible User Files
- 15. Controlling Instrument, Loop, One-shot and Effect Parameters
- 16. Smart Play – Playing and Editing Scales and Chords
- 17. Smart Play – Playing and Editing Arpeggiator Sequences
- 17.1. Playing Arpeggiator Sequences
- 17.2. Using a Sustain Pedal to Control the Arpeggiator
- 17.3. Using Arpeggiator Snapshots on the Keyboard
- 17.4. Editing the Arpeggiator
- 17.5. MAIN Parameters
- 17.6. RHYTHM Parameters
- 17.7. OTHER Parameters
- 17.8. ADVANCED Parameters
- 17.9. RANGE Parameters
- 17.10. HOLD Parameter
- 18. Envelopes

If you already have 16 Key Zones, the +Split button is disabled.
If the selected Key Zone is only one-key-wide, the +Split button is disabled.
9.7.3. Selecting MIDI Channels for Key Zones
After creating a new Key Zone you can select another MIDI channel for the Key Zone so that it can
be used to control another instrument.
To select another MIDI channel for a Key Zone:
1. Select the Key Zone for which you want to select another MIDI channel.
2. Select a MIDI channel from the Channel drop-down menu.
The Key Zone’s MIDI channel has changed.
9.7.4. Recoloring Key Zones
When splitting Key Zones the newly created Key Zone automatically gets one of 16 different colors
assigned. If you want to recolor a Key Zone, proceed as follows:
1. Select the Key Zone you want to recolor.
Using the MIDI Assignment Editor
74