
Manual
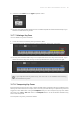


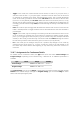


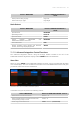
Table Of Contents
- Table of Contents
- 1. Disclaimer
- 2. Welcome to KOMPLETE KONTROL
- 3. Accessibility
- 4. The KOMPLETE KONTROL Workflow
- 5. Setting up KOMPLETE KONTROL
- 6. Software Overview
- 7. Keyboard Overview
- 8. Global Controls and Preferences
- 9. MIDI Communication
- 10. Using the MIDI Assignment Editor
- 11. Host Integration
- 12. Browsing the Library
- 12.1. Browser Basics
- 12.2. Opening the Browser
- 12.3. Loading Preset Files
- 12.4. Choosing Between Factory Content and User Content
- 12.5. Filtering Preset Files by Product
- 12.6. Filtering Preset Files by Bank
- 12.7. Resetting the Product Selection
- 12.8. Types and Characters Tags
- 12.9. Working with Favorites
- 12.10. Performing a Text Search
- 12.11. Displaying Preset File Information
- 12.12. Auditioning your Preset Files
- 13. Working with Effects
- 14. Working with Loops and One-Shot Samples
- 15. Managing the Library
- 15.1. Saving Preset Files to the User Library
- 15.2. Deleting User Preset Files from the User Library
- 15.3. Editing the Tags and Properties of User Preset Files
- 15.4. Syncing Multiple Instances
- 15.5. Working with the Files Pane
- 15.6. Loading VST Plug-ins
- 15.7. Installing NKS Instruments
- 15.8. Importing KOMPLETE KONTROL-Compatible User Files
- 16. Controlling Instrument, Loop, One-shot and Effect Parameters
- 17. Smart Play – Playing and Editing Scales and Chords
- 18. Smart Play – Playing and Editing Arpeggiator Sequences
- 18.1. Playing Arpeggiator Sequences
- 18.2. Using a Sustain Pedal to Control the Arpeggiator
- 18.3. Using Arpeggiator Snapshots on the Keyboard
- 18.4. Editing the Arpeggiator
- 18.5. MAIN Parameters
- 18.6. RHYTHM Parameters
- 18.7. OTHER Parameters
- 18.8. ADVANCED Parameters
- 18.9. RANGE Parameters
- 18.10. HOLD Parameter
- 19. Envelopes

2. Select the value Note from the Type drop-down menu.
→ The Key Zone with its MIDI assignment is re-enabled. Repeat the aforementioned steps if you
want to re-enable other Key Zones.
10.7.7. Deleting a Key Zone
You can delete a Key Zone as follows:
1. Hover the mouse over the Key Zone you want to delete.
2. Click the little cross icon that appears when hovering the mouse over a Key Zone.
→ The Key Zone is deleted and its keys are incorporated into the next Key Zone to the left. If you
delete the leftmost Key Zone, its keys are incorporated into the next Key Zone to its right.
If you only have one Key Zone set up, the cross icon is not available when hovering
the mouse the Key Zone.
10.7.8. Transposing Key Zones
By transposing a Key Zone you raise or lower the MIDI notes assigned to all keys included in a Key
Zone by the same interval, for example, this is useful if you want the keys in separate Key Zones to
trigger the same MIDI notes. Using the Transpose knob you can transpose any Key Zone within
the range from -127 to 127 MIDI notes. The Transpose knob is set to the default value 0 if a Key
Zone is not transposed.
To transpose a Key Zone, proceed as follows:
USIN G TH E MID I AS SIGN M ENT EDI T OR 85