
Manual


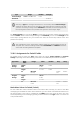
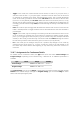


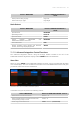
Table Of Contents
- Table of Contents
- 1. Disclaimer
- 2. Welcome to KOMPLETE KONTROL
- 3. Accessibility
- 4. The KOMPLETE KONTROL Workflow
- 5. Setting up KOMPLETE KONTROL
- 6. Software Overview
- 7. Keyboard Overview
- 8. Global Controls and Preferences
- 9. MIDI Communication
- 10. Using the MIDI Assignment Editor
- 11. Host Integration
- 12. Browsing the Library
- 12.1. Browser Basics
- 12.2. Opening the Browser
- 12.3. Loading Preset Files
- 12.4. Choosing Between Factory Content and User Content
- 12.5. Filtering Preset Files by Product
- 12.6. Filtering Preset Files by Bank
- 12.7. Resetting the Product Selection
- 12.8. Types and Characters Tags
- 12.9. Working with Favorites
- 12.10. Performing a Text Search
- 12.11. Displaying Preset File Information
- 12.12. Auditioning your Preset Files
- 13. Working with Effects
- 14. Working with Loops and One-Shot Samples
- 15. Managing the Library
- 15.1. Saving Preset Files to the User Library
- 15.2. Deleting User Preset Files from the User Library
- 15.3. Editing the Tags and Properties of User Preset Files
- 15.4. Syncing Multiple Instances
- 15.5. Working with the Files Pane
- 15.6. Loading VST Plug-ins
- 15.7. Installing NKS Instruments
- 15.8. Importing KOMPLETE KONTROL-Compatible User Files
- 16. Controlling Instrument, Loop, One-shot and Effect Parameters
- 17. Smart Play – Playing and Editing Scales and Chords
- 18. Smart Play – Playing and Editing Arpeggiator Sequences
- 18.1. Playing Arpeggiator Sequences
- 18.2. Using a Sustain Pedal to Control the Arpeggiator
- 18.3. Using Arpeggiator Snapshots on the Keyboard
- 18.4. Editing the Arpeggiator
- 18.5. MAIN Parameters
- 18.6. RHYTHM Parameters
- 18.7. OTHER Parameters
- 18.8. ADVANCED Parameters
- 18.9. RANGE Parameters
- 18.10. HOLD Parameter
- 19. Envelopes

Type Range Number Strength
Control Change From 0-126/To 1-127 0-127
Pitchbend 0-100%
Selecting a Type also changes the behavior of Touch Strip. When Control Change is
selected, the Touch Strip can be used like a fader that retains its position even after
you have removed your nger. When Pitchbend is selected, the Touch Strip behaves
like a spring that returns to zero position after you have removed your nger.
For Control Change, you can set the Range of values that is sent when swiping the Touch Strip,
and the Number of the Control Change message. For Pitchbend, you can set the Strength of the
Touch Strip’s spring behavior. As you increase this value, the Touch Strip returns to the zero
position more quickly.
The conguration of the Touch Strips and the Pedals are saved globally and not per
Template. This means all settings made under TOUCHSTRIP and PEDALS remain the
same when switching between Templates.
10.8.6. Assignments for Switch Pedals
For Pedals used as switch, the Type menu offers the entries Control Change and Program
Change. Depending on the selected entry, a different set of additional parameters is available:
Type Value Mode
Value
Range Value Number Step Wrap
Control
Change
Toggle/
Gate
Off/On
0-127
0-127
Trigger 0 - 127 0-127
Inc Min/Max
(0-127)
-128 to
127
On/Off
Program
Change
Toggle/
Gate
Off/On
0-127
Trigger 0 - 127
Inc Min/Max
0-127
-128 to
127
On/Off
Mode Menu Values for Pedals (Switch)
For the button-like control elements listed in the above table, and only for some of the MIDI
message types available for these control elements, you can choose from different behaviors for
the way the data is sent. This is controlled by the Mode menu. This menu can have up to four
entries, depending on the message type that you have selected in the Type menu. Here is the list
of all possible entries:
USIN G TH E MID I AS SIGN M ENT EDI T OR 90