Nature's Power Pod Contents Important Safety Instructions Warning--- introduction Unpack Your Nature's Power Pod Get to Know Your Nature's Power Using Your Nature's Power Pod How to Recharge Your Nature's Power Pod How to install Your Nature's Power Pod on Top of Nature's Generator How to Connect Your Nature's Power Pod to Nature's Generator -~ How to Maintain and Store Your Nature's Power Pod Troubleshooting Technical Specifications Limited Warranty
important Safety instructions 1. Read these instructions. 2. Keep these instructions. 3, Take note of all warnings. 4. Follow all instructions. 5. Do not use this apparatus near water, 6. Do not block any ventilation openings. 7. Do not use near flammable gases or fumes or other apparatus that produce a large amount of heat. 8. Only use attachments/accessories specified by the manufacturer. 3, Use only with the cart specified by the manufactures, or sold with the apparatus.
Caution Damage requiring service Stop using the Nature's Power Pod and refer servicing to qualified service personnel under the following conditions: « If liquid has been spilled or objects have fallen into your Nature's Power Pod. # If your Nature's Power Pod has been exposed {o rain or water. * If your Nature's Power Pod has been dropped or damaged in any way. « When your Nature's Power Pod exhibits a distinct change in performance. Cold weather Cold temperatures can impact Nature's Power Pod performance.
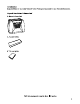
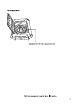
introduction Congratulations on your new Nature's Power Pod, a great expansion to your Nature’s Generator. Unpack Your Nature’s Power Pod 1. Nature's Power Pod 2. Accessory Box 3.
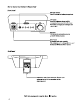
Get to Know Your Nature’s Power Pod Front Panel LED Light Bunion: Press it to show the battery charge level. LED Lights: Each light indicates charge in 203 increments. Once your Nature's Power Pod is fully recharged, alf LED lights will remain solid. 12V Port: 12V DC port Is designed to provide up to 240 wails of power, Solar input: To connect with solar panelist. This Anderson port is designed to be used with up 1o 200 watts of choler power. Back Panel Expansion: Daisy chain connector.
Using Your Nature’s Power Pod How to Recharge Your Nature’s Power Pod Recharging from Solar 1. Place your solar panel where it will get as much direct sunlight as possible. While direct sunlight is always preferred, solar panels should be connected at all dimes fo provide a consistent trickle charge to your battery. Solar panels will also send a charge your unit while in hazy or overcast skies. 2. Insert solar panel plug into Solar Input port on the front of Nature's Power Pod.
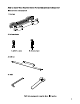
How to instill Your Nature’s Power Pod on Top of Nature’s Generator What Is In the accessory box 1. Brackets 2. Bolts and nuts A: 16mm x PCs B: 25mm x PCs 3. Pod bar 4.
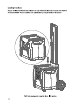
Installing Procedures Step 1: Lift Nature's Power Pod and set it on top of Nature’s Generator. Make sure the feet of Nature’s Power Pod sit between the handle and top case of Nature's Generator.
Step 2: Remove two boils from Nature's Power Pod with included Allen wrench. Put these two bolts aside for now as they will be reused in step 5.
Step 3: Put the brackets on the cart. Bracket will match up with the shape of the cart frame.
Step 4: Use type A bolts and nuts to secure the two brackets. Use wrench to hold the nuts and Allen wrench to tighten the bolts.
Step 5: Place pod bar on the top of Nature's Power Pod. Insert the bolts that were removed in step 2 by Allen wrench.
Step 6: Use type B bolts and noels to secure the brackets and pod bar. Use the wrench to hold the nuts and Allen wrench to tighten the bolts.
How to Connect Your Nature's Power Pod to Nature's Generator You can connect your Nature's Power Pod to your Nature’s Generator to extend the overall run tme. 1. Open the top cover of the Nature's Power Pod, locate the expansion cable, and run the expansion cable out of Nature's Power Pod through the opening on the back of the Nature's Power Pod. 2. Locate Expansion Port on the back of your Nature's Generator and open the rubber cover. 3. Connect the expansion cable to the expansion port, 4.
Troubleshooting My Nature’s Power Pod won’t charge when I connect my solar panel to It. Please follow these steps. 1. Make sure the solar panel is pointed directly toward the sun. It is preferred to position the solar pane! face the south. The solar panel may produce little or no power if it is positioned in shade. 2. Check the cable connection on Nature's Power Pod and make sure it fits tightly. 3. If the LED lights up, but the battery bar is not running.
Technical Specifications Lottery: Type: AGM Sealed Lead Acid Capacity: 100th {1200th} Self-discharge: Recommend to recharge it every 4 months Ports: 12V DC Port: up to 20A {240W max} Expansion Cord: 45 inches Charges: Solar Charger: 200watt Battery Level! LED lights: 5 LED lights General: Dimensions: Operating temperature: 32-104 °F {0-40 °C} Storage Temperature: 23111 °F {-5-45 °C}) Weight: 52 lbs Visit Countersignature for More Information 16
Limited Warranty One Year Limited Worriment Huntley USA Inc. warrants to you, the original purchaser of this new product, that the product shall be free of defects in the original manufacture of the material or workmanship for & period of one {1} year from the original date of your purchase of the product {“Warranty Period”). This product must be purchased from an authorized dealer and packaged with this warranty statement. This warranty does not cover refurbished product.
Hot dares the Warranty not Cover? This warranty does not cover: * Cosmetic damage » Damage due to acts of God, such as lightning strikes » Accident = Misuse « Abuse « Negligence * Commercial use + Modification of any part of the product « Damage due to incorrect operation or maintenance ¢ Connection to an incorrect voltage supply = Attempted repair by anyone other than a facility authorized by Huntley USA Inc.