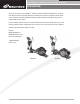
C H A N G I N G T H E G A M E I N H E A LT H A N D F I T N E S S ™ Model EV916 / E916 NAUTILUS ® Be Strong.
C H A N G I N G T H E G A M E I N H E A LT H A N D F I T N E S S ™ INTRODUCTION Thank you for purchasing the Nautilus ® Commercial Series EV916 or E916 Ellipticals. For more than 30 years Nautilus has been producing the world’s finest fi tness equipment used in health clubs and homes around the globe. We hope this product exceeds your expectations and is a valuable tool for your facility. Please carefully read through this manual to familiarize yourself with the operation of your new Nautilus elliptical.
SAFETY REQUIREMENTS: SAVE THESE INSTRUCTIONS! WHEN USING ELECTRICAL EQUIPMENT, ALWAYS FOLLOW THESE BASIC PRECAUTIONS: 6. To avoid potential safety and electrical problems, replace with manufacturer’s specified parts only. 7. Connect the external power supply to a properly grounded AC wall IMPORTANT SAFETY INSTRUCTIONS outlet. Keep all cords away from heated surfaces.
C H A N G I N G T H E G A M E I N H E A LT H A N D F I T N E S S ™ SAFE OPERATION WARNING THESE GUIDELINES ARE DIRECTED TO YOU, AS THE OWNER OF THE MACHINE. YOU SHOULD INSIST THAT ALL USERS FOLLOW THE SAME GUIDELINES. WARNING! Do not begin an exercise program without first consulting a physician. WARNING! If at any time during your workout you feel chest pain, experience severe muscular discomfort, feel faint, or are short of breath, stop exercising immediately.
GETTING STARTED Receiving When the carrier delivers your order, verify that the number of items received equals the number listed on the freight bill or express receipt. Inspect the containers for damage. Itemize discrepancies and damage on the waybill and have the agent sign it. Failure to describe external evidence of loss adequately may result in the carrier refusing to honor your claim. Do not discard the packing materials until you have verified physical condition and proper operation.
C H A N G I N G T H E G A M E I N H E A LT H A N D F I T N E S S ™ Hardware Included Tools Required (4) Screw, 3/8” - 16 x 3/4”, Hex Head (4) Washer, 3/8” Split Lock (4) Washer, 3/8” Flat (22) Screw, #10-32 x 3/4”, Pan Head with Lock Washer (2) Screw, 1/2”-13 x 4”, Hex Head (4) Washer, 1/2” Flat (2) Nut, 1/2”-13, Self Locking (4) Screw, 1/4” x 3/4”, Pan Head with Lock Washer Shears or Razor Knife Components included (1) Bottom Front Left Cover (1) Bottom Front Right Cover (2) Bottom Pivot Cover #1 (2)
Unpacking the Elliptical 1. Inspect the containers for damage. Itemize discrepancies and damage on the waybill and have the agent sign it. Failure to describe external evidence of loss or damage adequately may result in the carrier refusing to honor your claim. 2. Use shears or a razor knife to cut the straps that secure the elliptical cover to the pallet. Remove the cover. 3. Remove the packing materials from the machine. 4. Remove the parts box. 5.
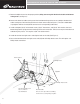
C H A N G I N G T H E G A M E I N H E A LT H A N D F I T N E S S ™ 9. Rotate the elliptical mast into the proper position, taking care not to pinch the electrical cable at the bottom in the process (see Figure 1). 10. Connect the electrical cables coming out of the front bottom flange of the mast assembly to the electrical cables coming out of the front flange of the main frame center tube (see Figure 1). The color-coded cables snap together with basic male/female connectors for corresponding cable colors.
14. Install (1) Bottom Swing Arm Shaft into the swing arm and the install the foot support tube (see Figures 2 and 3). 15. Install and tighten (1) 1/2”-13 hex head screw, (2) 1/2” washers, and (1) 1/2”-13 nuts connecting the swing arm and the foot support tube (both left and right sides). This will require a 3/4” hex socket wrench. Install nuts toward middle of the machine as is shown in Figure 2. Torque bolts to 45 ft/lbs (if torque wrench is available). 16.
C H A N G I N G T H E G A M E I N H E A LT H A N D F I T N E S S ™ If you have an EV916 manufactured PRIOR to September 30, 2005, please follow steps 17-22 (for units manufactured AFTER September 30, 2005, please skip to step 19).
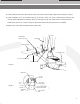
20. Carefully insert the connectors and zip tied loop into the swing arm tube’s opening (see Figure 5). NOTE: If connectors are not inserted into the swing arm tube, they will be damaged during use! 21. Install the swing arm rubber grommet, and insert any remaining slack cable into either tube. 22. Make sure that grommets are fully installed and that only the sheathed cable is exposed (see Figure 6).
C H A N G I N G T H E G A M E I N H E A LT H A N D F I T N E S S ™ 23.Install the (1) Bottom Pivot Cover #1 and (1) Bottom Pivot Cover #2 and align the holes at the sides of the swing arm tube (see Figure 7). 24. Install and tighten (5) #10-32 Phillips head screws. This requires a #2 Phillips head screwdriver. 25. Repeat steps 23 and 24 for the opposite swing arm tube. #10-32x.75 Screw #10-32x.
26. Position console so that the electrical cables can be connected. Use the correct cables with the proper connectors. See wiring diagram on next page. 27. Install the console and tighten (4) 1/4” Phillips head screws (see Figure 8). This requires a #2 Phillips head screwdriver. 28. The elliptical can now be removed from the pallet and is ready for use.
C H A N G I N G T H E G A M E I N H E A LT H A N D F I T N E S S ™ 29. Ensure all console wiring is connected correctly, using the following wiring diagram.
If you need assistance, please have both the serial number of your machine and the date of purchase available when you contact the appropriate Nautilus office listed below. OFFICES IN THE UNITED STATES INTERNATIONAL OFFICES • NAUTILUS INNOVATION CENTER Nautilus, Inc. 1886 Prairie Way Louisville, Colorado, USA 80027 Phone: 800-864-1270 Fax: 800-898-9410 • TECHNICAL/CUSTOMER SERVICE Nautilus, Inc. 10757 East Ute Street Tulsa, Oklahoma.
C H A N G I N G T H E G A M E I N H E A LT H A N D F I T N E S S ™ Model EV916 Model E916 ©2005. Nautilus, Inc. All rights reserved. Nautilus, the Nautilus Logo, Remote Operation Control, ROC, StairMaster and Changing the Game in Health and Fitness are either registered trademarks of trademarks of Nautilus, Inc. Polar is a registered trademark of its respective company. Nautilus, Inc. World Headquarters, 16400 SE Nautilus Drive, Vancouver, WA 98683 1-800-NAUTILUS www.nautilus.com 14 EV916/E916 V.