NEC MobilePro 750C User’s Guide
PROPRIETARY NOTICE AND LIABILITY DISCLAIMER The information disclosed in this document, including all designs and related materials, is the valuable property of NEC Computer Systems Division, Packard Bell NEC, Inc. (NECCSD, PBNEC) and/or its licensors.
Contents Using this Guide Text Conventions...............................................................................v 1 Quick Start Features Overview .............................................................................1-1 About Quick Start..............................................................................1-2 Using Your MobilePro H/PC for the First Time ............................1-2 Installing the Batteries..............................................................
Application Shortcut Keys .................................................................3-5 Assigning Application Shortcut Keys ............................................3-6 Enabling the Display Linkage Switch .................................................3-8 Voice Recording ................................................................................3-9 Using the Voice Recorder..............................................................3-10 PC Cards.............................................
Using this Guide This guide introduces you to your NEC MobilePro™ Handheld Personal Computer (H/PC). Read the following sections. Chapter 1, Quick Start, provides all the information you need to get your MobilePro 750C working and synchronized with your desktop or notebook computer. Chapter 2, Getting Familiar with Your MobilePro 750C, introduces you to your MobilePro features, battery installation, the display panel, and general unit care.
! WARNING Warnings alert you to situations that could result in serious personal injury or loss of life. ! CAUTION Cautions indicate situations that can damage the system hardware or software. NOTE Notes give particularly important information about whatever is being described. vi Using this Guide Names of keys are printed as they appear on the keyboard, for example, Ctrl, Alt, or Enter. Text that you must type or keys that you must press are presented in bold type.
1 Quick Start Congratulations and thank you for purchasing the NEC MobilePro Handheld PC (H/PC). This chapter shows you how you can quickly setup and begin to use it either on its own or as a powerful desktop companion. FEATURES OVERVIEW Your new MobilePro 750C has the following key features: A 256-color LCD screen, with a backlight key on the keyboard that lets you toggle between standard (low) or full backlight.
ABOUT QUICK START The MobilePro 750C H/PC uses the Microsoft® Windows® CE 2.0 operating system, which has a user interface very similar to the Microsoft Windows 95 and Microsoft Windows NT operating systems. This chapter assumes that you are already familiar with at least one of these operating systems. Our purpose here is to get you very quickly up to speed with your new MobilePro. The information in this chapter has intentionally been kept concise.
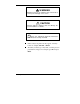
Installing the Batteries 1. Slide the main battery cover lock to the unlocked position. 2. Slide the main battery bay cover toward the arrow and remove it. Opening the main battery bay cover 3. Put the Lithium-Ion battery pack in the bay. Slide the battery toward the arrow. Inserting the battery 4. Firmly press the battery until it is secure.
5. Replace the main battery bay cover. Replacing the main battery bay cover 6. Slide the battery cover lock to the locked position. 7. Remove the backup battery protective insulating sheet by firmly pulling on the sheet tab that protrudes from the backup battery compartment.
! CAUTION Be sure to read the section “Battery Precautions” for important battery handling information. NOTE You can only operate the MobilePro H/PC when the battery cover lock is in the locked position. For optimum data protection, be sure to install both the main battery and the back-up battery before turning on the power. To ensure maximum performance, the battery pack included with your MobilePro comes charged to only 50% capacity from the factory.
After the Setup Wizard completes, you are ready to configure the MobilePro to partner with your desktop (or notebook) computer. Before continuing, connect the MobilePro PC Connect serial cable to an available 9-pin serial port on your desktop (or notebook) computer. Plug the other end into the serial port at the back of the MobilePro.
Insert the “Desktop Software for Microsoft Windows CE” CD. If your system is configured for auto-insert notification, the Setup program is automatically launched. Otherwise, manually run the Setup program in the main directory. The Setup program guides you through the steps that will let your system communicate with the MobilePro. MobilePro H/PC Software CD Installation NOTE Your desktop system must be running Windows 95 or Windows NT 4.0 in order to use the MobilePro H/PC Software Suite.
2 Getting Familiar with Your MobilePro 750C Your NEC MobilePro™ Handheld PC (H/PC) lets you: Edit, create, send, and receive documents including spreadsheets and e-mail Manage your schedule and contacts Access the Internet with the internal modem Synchronize data with your notebook or desktop computer. This chapter introduces you to the MobilePro features, display panel, stylus, and complete battery installation procedures.
WHAT’S IN THE BOX Your MobilePro ships with a number of accessories. When you unpack the MobilePro, check that you have all of the items listed below and that they are in good condition. If anything is missing or damaged, immediately contact the vendor who sold you the unit.
Display Panel Latch Record Button/ Notification LED Display Panel AC Power Port Stylus Backlight Key Microphone Compact Flash Card Slot Modem Port Power Button Keyboard PC Card Slot Front and side features Display Panel Latch — secures the display panel when it is closed. Display Panel (with built-in touch screen) — provides a clear view of information stored or input into the unit. The touch screen lets you activate functions by touching the screen with the stylus.
Power Button — allows you to power on and off the unit when it is open. PC Card Slot — lets you install one Type I or Type II PC Card. Keyboard — gives you a means of entering data using your fingertips. Compact Flash Card Slot — lets you install one Compact Flash Card. Microphone — lets you record your voice. AC Power Port — lets you connect the AC adapter to run your unit on AC power. Record Button — allows you to start/stop digital voice recording.
Speaker ROM Bay Cover Battery Cover Lock IrDA Port Sub Battery Bay Cover RAM Bay Cover PC Card Eject Button VGA Port Main Battery Bay Cover Serial Port Reset Button Bottom view ROM Bay Cover — protects the ROM bay and the installed ROM boards. Battery Cover Lock — secures the cover that protects the main battery and back-up battery bays. Sub Battery (back-up battery) Bay Cover — protects the back-up battery and the back-up battery bay.
Main Battery Bay Cover — protects the main battery bay and the installed battery. VGA Port — provides a connection point for the VGA cable. Infrared (IrDA) Port — allows the MobilePro to communicate without cables with similarly equipped devices, including other MobilePros. Speaker — lets you listen to digital audio. You can program MobilePro audio to remind you of appointments, notify you of operation events, or play applicationassociated sounds.
Opening the display panel ! CAUTION When the MobilePro H/PC is not in use or when you are carrying it, keep the display panel closed. This helps prevent accidental damage to the touch screen or keyboard. USING THE STYLUS To use the stylus, follow these steps. 1. Locate the stylus holder on the back right of the Mo- bilePro. To remove the stylus, slide it away from the unit. 2. Open the MobilePro display panel.
Using the stylus ! CAUTION Never use a device other than an approved stylus with your MobilePro H/PC. Hard-pointed or sharp objects can damage the touch screen. 3. Gently touch the pointed tip of the stylus to select an object on the screen. When you are done using the stylus, return it to its convenient holder on the MobilePro. Recharging the Main Battery Pack The main battery pack contains rechargeable Lithium-Ion cells. Recharge a battery pack when you see the following message.
It takes approximately 4.5 hours to recharge a fully depleted battery pack regardless of the system power state. NOTE Through normal use, the capacity of a battery pack will gradually decline. Should you notice that the battery does not stay charged as long as expected, it is probably necessary to replace the battery with a new one. Please refer to the section “Battery Replacement” in this chapter. A battery pack should recharge approximately 300 times during the life of the battery.
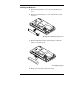
If you use the MobilePro without the back-up battery installed, MobilePro memory may be unstable. The contents of MobilePro memory may be lost if the main battery is removed. Always back up your data onto your notebook or desktop computer before replacing the back-up battery. Main Battery Should you notice the life of a charged battery pack is short, replace it with a new one. Follow these instructions below to replace a battery pack. 1.
Opening the battery bay cover 5. Slide the battery away from the arrow on the battery and remove the battery. 6. Put the new Lithium-Ion battery pack in the bay. Slide the battery in the direction of the arrow. Inserting the battery 7. Firmly press the battery until it is securely in the bay. 8. Replace the main battery bay cover and slide the battery cover lock to the locked position.
Replacing the bay cover NOTE The unit only operates when the battery cover lock is in the locked position. Back-Up Battery A low battery message appears when back-up battery power is depleted. Be sure to replace the back-up battery immediately as described next. 1. When you see the following message, the back-up bat- tery must be replaced. Backup Battery Very Low Save your data, turn off unit power, remove the stylus, and close the display panel.
NOTE If you receive messages indicating that both the main battery and the sub-battery (back-up battery) are very low, replace the back-up battery first. If a drained main battery is not replaced, the backup battery drains more quickly than normal. 2. Disconnect any cables attached to the unit, such as the AC adapter cable. 3. Have a new back-up battery available. ! WARNING Only replace the back-up battery with a CR2032 Lithium battery. Using another battery type can result in an explosion or fire.
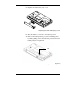
4. Turn the unit over and locate the battery cover lock on the bottom of the MobilePro. Slide the lock to the unlocked position. Locked Position Releasing the Battery Cover Lock 5. Using a small screwdriver, remove the screw and sub- battery bay cover.
NOTE When you loosen the screw, you can remove the sub-battery bay cover by loosening the screw for five rounds. It is not necessary to remove the screw completely. 6. Use the stylus to remove the drained battery from the bay. Removing the battery 7. Angle the new battery into the bay and insert it with the positive (+) notation facing up. Inserting the battery 8. Replace the sub-battery bay cover and slide the lock to the locked position. 9. Tighten the screw to secure the bay cover.
Battery Precautions Read the following battery handling precautions to insure your safety. ! WARNING Heed these warnings when handling batteries. Failure to do so may result in personal injury. There is a danger of explosion if the battery is incorrectly replaced. Replace only with the same type recommended by the manufacturer. The CR2032 battery may explode if mishandled. Do not recharge, disassemble, or dispose of the back-up battery by burning it.
! WARNING (cont’d) Do not use a battery that is damaged or deformed, has any rust on its casing, is discolored, overheats, or emits a foul odor. To prevent data loss, always replace weak batteries as soon as possible. Replace the backup battery first. Always use the MobilePro H/PC with a back-up battery. TAKING CARE OF THE MobilePro The NEC MobilePro is a durable, dependable unit built for extensive use and travel. Follow these guidelines to maintain the condition and performance of your MobilePro.
Precautions Follow these precautions when using your MobilePro and AC adapter. Always plug the AC adapter cord into an easily accessible outlet. It is important to be able to easily shut off power by unplugging the AC adapter if needed. Avoid dropping or bumping the MobilePro or the AC adapter. Do not stack heavy objects on the MobilePro or the AC adapter. When using the AC adapter, make sure the power source falls within the unit’s compatible range of 100–240 volts AC.
When cleaning the system, use a soft, clean, dry cloth. Avoid wiping the display surface with abrasive material, including rough fabric. Do not use a cleaning solution; this may damage the plastic. If the AC adapter becomes extremely hot, unplug the adapter and let it cool. Keep the AC adapter away from the IrDA port to ensure stable communication/transfer operations.
Routine Cleaning Clean or dust your system as follows. ! CAUTION Never use harsh solutions, household cleaners, or spray cleaners that contain caustic materials on the MobilePro. These cleaners are usually high in alkalinity, which is measured in pH. Using these cleaners can cause the plastic surface to crack or discolor. Display screen — Carefully wipe the LCD screen with a soft cloth or a screen wipe designed for that purpose.
3 Using the MobilePro This chapter details how to use the MobilePro. (See the software manual that came with the unit for additional software operating instructions.
POWERING ON AND OFF Power on the MobilePro as follows. 1. Slide the display panel latch to the right. Lift the display panel up towards the rear of the unit. ! CAUTION Do not push the display panel beyond its predesigned stop point as you open the panel. 2. Locate and press the Power button. To power off the unit, press the Power button a second time.
NOTE The first time you install the main battery, the MobilePro automatically powers when you open the display panel. The first time you power on the MobilePro H/PC, screen contrast may need adjustment. Follow the instructions in “Making Display Panel Adjustments.” You can power on or off with the display panel opened or closed. (It depends on the setting.) If the MobilePro H/PC is not used for a specific length of time, it automatically shuts off.
F11, F12 Keys Adjusting the contrast NOTE You can also adjust the contrast through the Control Panel. See the software user’s guide for details. Backlight You can toggle the backlight setting between standard and full by pressing the Backlight button. NOTE Keeping the backlight full depletes the battery twice as fast as when the backlight is standard. Using the backlight set to full while using the AC Adapter does not deplete the battery.
Toggle the backlight as follows. 1. Open the display panel and locate the Backlight key on upper-right side of the keyboard. 2. With power on, press the Backlight key to toggle the backlight between standard and full. Backlight Key Toggling the backlight APPLICATION SHORTCUT KEYS The MobilePro H/PC has programmable function keys (F1 to F10 keys) that let you launch applications directly. The key defaults are listed in the following table.
Default Application Shortcut Keys KEY APPLICATION F1 Inbox F2 Microsoft Internet Pocket Explorer F3 Calendar F4 Contacts F5 Tasks F6 Microsoft Pocket Word F7 Microsoft Pocket Excel F8 Microsoft Pocket PowerPoint F9 Calculator F10 Voice Recorder Assigning Application Shortcut Keys Application launch keys are programmed through the "MobilePro Settings" applet in the Control Panel.
Settings dialog box 3. Scroll or tap on the shortcut key you want to select. As- sign the application using the following buttons: Default — selects the factory-assigned application listed in the Default Application Shortcut Keys table. Browse — opens a directory dialog so you can locate the application you want to assign.
Delete — removes the currently assigned application reference so you can select another application. ENABLING THE DISPLAY LINKAGE SWITCH You can configure your MobilePro H/PC to power on or off by simply opening or closing the display cover. The display linkage switch acts as a switch for both the power and the backlight. Opening the MobilePro powers on the unit. To power on the unit while it is open, use the Power button.
3. Select either to enable suspend mode with battery power or external AC power. VOICE RECORDING Recording voice memos with the MobilePro is easy, even with the unit closed: 1. Hold your MobilePro with the microphone facing you. 2. Press and hold the Record button. A short beep will sound indicating that you should begin speaking. Press the Record Button Microphone Recording voice memos 3. When you are finished speaking release the button.
NOTE Recording works best if you position the microphone about three inches away from your mouth while speaking. Memory required for voice memo storage varies depending on user settings. Refer to “Using the Voice Recorder" for further details. Using the Voice Recorder The MobilePro H/PC features a voice recorder application that lets you record and play voice memos. The application features it's own online documentation detailing how to open, play, and edit audio files.
PC Card Inserting a PC card 3. Verify that the PC card is fitted securely into position. ! CAUTION Make sure you align the PC card correctly for insertion. Inserting a PC card incorrectly can damage the card and/or the MobilePro.
Removing PC Cards Remove a PC card from the MobilePro as follows: 1. Save your data and power off the MobilePro. 2. Locate the PC card slot’s Eject button and press it to re- lease the card from the slot. PC Card Eject Button PC Card Removing a PC card 3. Once the card is released, pull it the rest of the way out of the slot. COMPACT FLASH CARDS Your MobilePro comes with a Compact Flash card slot that supports one Compact Flash card.
NOTE We recommend using the AC adapter when using Compact Flash cards. Using the adapter can help you avoid potential data loss caused by the highenergy consumption of some Compact Flash cards. Inserting Compact Flash Cards Follow these procedures to install a Compact Flash card. 1. Save your data and power off the MobilePro. 2. With the Compact Flash card facing up, insert it into the Compact Flash card slot. Compact Flash Card Inserting a Compact Flash card 3.
! CAUTION Make sure you align the Compact Flash card correctly for insertion. Inserting a Compact Flash card incorrectly can damage the card and/or the MobilePro. Removing Compact Flash Cards Remove a Compact Flash card from the MobilePro as follows: 1. Save your data and power off the MobilePro. 2. Release the card from the slot by pulling it out with your fingertips.
TRANSFERRING DATA With the MobilePro H/PC, you can send and receive data to and from another similarly equipped device using the infrared (IrDA) communication port. Communicate with another MobilePro as follows. 1. Open the display panels on the two MobilePro units that you want to use for communication. 2. Position the MobilePro units so that communication ports face each other. Position the units from 0 to 20 inches apart. Positioning the MobilePros 3.
4. Send your data by using the “Send To” selection in the Windows CE Pocket Explorer File menu. Highlight the file you wish to transfer and choose “Infrared Recipient” from the Send To selections. Your file will be transferred to the other MobilePro. The receiving MobilePro can use the File/Receive command to receive the infrared transmission. NOTE If the units are too far apart or if something blocks the path between the two ports, data may not be sent or received correctly.
are using the internal modem Using AC power saves battery life for when you are on the go and helps prevent data loss. ! CAUTION Follow these precautions whenever you use the AC adapter and the MobilePro. When using the AC adapter, make sure the AC outlet is near the MobilePro and easily accessible. Keep the main battery installed when running on AC power. When communicating or sending transmissions for a long time, use the AC adapter to conserve power. Connect the AC adapter as follows: 1.
Connect the cable as follows: 1. Locate the serial port cover on the MobilePro, and open it. 2. Align and attach the connector on the PC Connect Cable to the serial port on the MobilePro. Connecting the PC Connect cable 3. Connect the other end of the cable to the serial port on your desktop or notebook computer.
4. For an external modem, connect the other end of the cable to the null modem adapter, then connect the adapter to the modem cable. The maximum data rate will be 19,200 bps unless you alter the default setting for the MobilePro serial port. ! CAUTION Make sure you properly align the cable connectors and ports. Incorrect connection can damage the MobilePro H/PC and the computer.
2. Align and attach the connector on the MobilePro VGA ca- ble to the VGA port on the MobilePro. Connecting the VGA cable 3. Connect the other end of the VGA cable to the monitor ca- ble connector. Power on the external monitor. 4. Launch Microsoft Pocket PowerPoint and open the file you want to show. 5. Access the “Set Up Show…” selection from the Tools menu and set the entry in the “View Show on” drop-down field to “External VGA.” 6. Select “View Show” from the View menu.
VGA Cable VGA Cable Monitor Cable Connecting the cable to the monitor ! CAUTION Make sure you properly align the cable connectors and ports. Incorrect connection can damage the MobilePro H/PC and the monitor. Connecting the Internal Modem Use the following steps to connect a phone cable to the internal modem. 1. Locate the modem cover on the MobilePro and open it by pulling down the top of the cover. 2. Carefully plug the RJ-11 connector into the modem con- nector.
3. Connect the other RJ-11 connector into an active (analog) phone jack. RJ-11 Connector Connecting the telephone line ! WARNING Do not connect the internal modem to a digital private branch exchange connector, or the digital side of an integrated digital network. Use only analog phone connections. Failure to do so may result in explosion or fire. During thunderstorms be sure to disconnect the modem phone cable from the MobilePro H/PC. Failure to do so may result in explosion or fire.
1. Press Start on the Taskbar and scroll up to Programs. Access the Communications selection and open Remote Networking. 2. Double tap on Make a New Connection, and name it “Onboard Modem.” 3. In the dialog box, Dial Up Connection, select the port for the on board Modem. 4. Press TCP/IP Settings and be sure that the checkboxes in the General tab and Name Servers tab are enabled. 5. Tap OK and Next to continue. Enter your RAS telephone number (provided by your system administrator). 6.
11. Select any other features you want to enable, then press Finish. You can now access your corporate email remotely using your MobilePro. PRINTING YOUR DOCUMENTS You can print documents created in Microsoft Pocket applications directly from your MobilePro. Select Print… from the Microsoft Pocket application’s File menu. Use a printer that supports PCL emulation connected to the MobilePro serial port, or print via the infrared port if the printer has an infrared port.
3. Remove the main and back-up batteries. See “Battery Re- placement” for details. 4. Turn over the MobilePro and locate the screw that secures the ROM or RAM bay cover. 5. Using a small screwdriver, remove the screw and the bay cover. (The MobilePro does not power on when the ROM bay cover is removed.) 6. With the small screwdriver, remove the screw on the ROM or RAM module. 7. Gently lift up the ROM or RAM module to disconnect it from its connector and remove it from the bay. 8.
When you reset the MobilePro, you may lose stored data and unit parameter settings. Reset the MobilePro as follows. 1. Remove the stylus from its holder and open the display panel. 2. Power on the MobilePro. (You cannot reset the unit with- out the power on.) 3. Close the display panel and turn the MobilePro over. 4. Locate the Reset button on the bottom of the MobilePro. 5. Using the stylus, press the Reset button. This resets the unit.
4 Troubleshooting Your MobilePro H/PC is designed to provide many hours of service while you are at home or on the road. For optimum performance, frequently back up and synchronize the MobilePro data with your notebook or desktop computer. Then if something happens, most of your data is still available. If you have problems, check the information in the following table for possible solutions. Troubleshooting PROBLEM RESOLUTION The MobilePro has no power. Check the main battery.
Troubleshooting (cont'd) PROBLEM RESOLUTION Nothing appears on the screen. (cont'd) Try recharging the main battery pack or replacing the sub-battery. Check that the ROM bay cover is properly secure. A low battery message appears. Recharge the main battery. When using a PC card, such as a modem, the unit powers off. Connect the AC adapter to the unit when using PC cards that require large amounts of energy. The AC adapter doesn't work.
Troubleshooting (cont'd) PROBLEM RESOLUTION The PC card cannot be accessed. Make sure the card is inserted correctly and seated properly. Connect the unit to AC power using the adapter. Some cards do not operate properly unless the AC adapter is connected. The touch screen does not respond. Calibrate the stylus input. (See the software user’s guide for calibration instructions.) Reset the unit. The Reset button does not respond. Remove the main battery and back-up battery.
5 Specifications The following specifications are standard except where noted. Display 640 x 240, 256 color, backlight, liquid crystal display (LCD) touch-screen CPU NEC Vr4111, 80-MHz processor, optimized for Windows CE User Data Entry Methods 80-key QWERTY keyboard with stylus Touch panel (input via stylus) Random Access Memory (RAM) 16 megabytes (MB); expandable to32MB Read-Only Memory (ROM) 16 MB Speaker One built-in speaker Infrared (IrDA) Communication Baud rate: 115.
Serial Interface Baud rate — 115.2 Kbps maximum I/O Ports Modem Serial port (Direct Cable connection) IrDA port VGA port (output) Data — 33.6 Kbps (AT command) Fax — 9.6 Kbps (Fax control command Class I) PC Card Slot One Type I or Type II slot Compact Flash Card Slot One Compact Flash card slot Power Main battery — one rechargeable Lithium-ion (Li-Ion) battery pack (included).
Recharge Time Accessories Use the AC adapter to recharge the MobilePro main battery Recharging time is approximately 4.5 hours when the system is on or off AC adapter — S1424-21A Listed Direct Plug-In Power Unit Input Voltage - 100 to 240V AC; 60Hz, 13W Output Voltage - 9.5V DC 1000 mA Direct Connection Cable Modem Cable VGA Cable Dimensions 9.65 in. (W) x 5.43 in. (D) x 1.24/1.5 in. (H) Weight 1.88 lb.
Available Options 5-4 Specifications Lithium-Ion Rechargeable Battery Pack (S1424-25A) Stylus Pack (S1424-17A) 32-MB RAM Module (S1424-18B) Direct Connection Cable (S1424-12S) VGA Cable (S1424-12V) AC Adapter (S1424-21A)
A Modem Commands AT Commands Command A/ A B0 B1 Dn E0 E1 H0 H1 L0 L1 L2 L3 M0 M1 M2 M3 Description Repeat last command Answer a call Select ITU-T modulation at 300 and 1200bps Select Bell modulation at 300 and 1200bps Dial, where n = P — Pulse dial T — Tone dial W — Wait for dial tone , — Pause ! — Flash hook @ — Wait for 5 seconds silence ; — Return to command mode ^ — Toggle calling tone enable/disable Disable command echo Enable command echo Go on-hook Go off-hook Set lowest speaker volume Set speake
Command O0 O1 P Q0 Q1 Sn=m Sn? T V0 V1 W0 W1 W2 X0 X1 X2 X3 X4 Y0 Y1 Z &C0 &C1 &D0 AT Commands (cont’d) Description Go into online data mode without retrain sequence Go online data mode with retrain sequence Set pulse dial Enable result code Disable result code Write m to S-register n Return the value of S-register n Set dial tone Set numeric result code Set verbose result code CONNECT reports DTE speed CONNECT reports DTE speed, carrier speed and protocol CONNECT reports carrier speed Report CONNECT me
Command &D1 &D2 &D3 &F &G0 &G1 &G2 &K0 &K3 &K4 &K5 &K6 &P0 &P1 &P2 &P3 &Q0 &Q5 &Q6 &S0 &S1 &V \N0 AT Commands (cont’d) Description Go to command mode on ON-to-OFF DTR transition Hang-up and go to command mode on ONto-OFF DTR transition.
AT Commands (cont’d) Description Default Select normal mode connection Select LAPM and MNP connection Select LAPM, MNP and normal mode X connection Select only LAPM connection Select only MNP connection Disable extended result code Enable extended result code Disable data compression Enable MNP 5 data compression negotiation Enable V.42 bis data compression Enable both V.
S-Registers Register S0 S1 S2 S3 S4 S5 S6 S7 S8 S9 S10 S11 S12 S24 S25 S26 S29 S30 S32 S33 S36 S37 S38 S46 S48 Function Rings to Auto answer Ring Counter Escape Character Carriage Return Character Line Feed Character Backspace Character Wait Time for Dial Tone Wait Time for Carrier Pause Time for Dial Delay Modifier Carrier Detect Response Time Carrier Loss Disconnect Time DTMF Tone Duration Escape Prompt Delay Sleep Inactivity Timer Delay to DTR Off RTS-CTS Delay Flash Dial Modifier Disconnect Inactive Ti
Result Codes Numeric 0 1 2 3 4 5 6 7 8 9 10 11 12 13 14 15 16 17 18 19 33 35 40 46 47 48 49 50 51 52 53 54 55 Modem Commands A-6 Verbose OK CONNECT RING NO CARRIER ERROR CONNECT 1200 NO DIAL TONE BUSY NO ANSWER CONNECT 0600 CONNECT 2400 CONNECT 4800 CONNCET 9600 CONNECT 7200 CONNECT 12000 CONNECT 14400 CONNECT 19200 CONNECT 38400 CONNECT 57600 CONNECT 115200 FAX DATA CARRIER 300 CARRIER 1200 CARRIER 2400 CARRIER 4800 CARRIER 7200 CARRIER 9600 CARRIER 12000 CARRIER 14400 CARRIER 16800 CARRIER 19200 CARRIER
Result Codes (cont’d) 56 57 58 59 61 62 63 64 66 67 69 70 77 78 79 80 84 91 +F4 CARRIER 24000 CARRIER 26400 CARRIER 28800 CONNECT 16800 CONNECT 21600 CONNECT 24000 CONNECT 26400 CONNECT 28800 COMPRESSION: CLASS5 COMPRESSION: V.
Index A AC adapter, 2-4, 3-17 power port, 2-4 Application shortcut keys, 3-5 Assigning shortcut keys, 3-6 Audio application using, 3-10 Audio memos, 3-9 B Backlight, 3-4 Backlight key, 2-3 Back-up batteries battery low message, 2-13 replacement, 2-12 Battery cover lock, 2-5 installation, 1-3 precautions, 2-16 types, 1-2 C Caring for the MobilePro, 2-17 Cleaning your MobilePro, 2-20 Compact Flash card, 2-4 removing, 3-14 Connecting external devices, 3-16 Contrast, 3-3 Control keys, 3-5 D Data transmission, 3
PC card eject button, 2-5 PC card slot, 2-4 RAM bay cover, 2-5 Record button, 2-4 Reset button, 2-5 ROM bay cover, 2-5 serial port, 2-5 speaker, 2-6 stylus, 2-3 summary listing, 1-1 VGA port, 2-6 Finding the stylus, 2-7 Function keys, 3-5 I Inbox setup for RAS, 3-22 Infrared port, 2-6 Inserting PC cards, 3-10, 3-12 K Keyboard, 2-4 L LCD/Touch Panel enabling for power control, 3-8 M Main batteries replacement, 2-10 Main battery bay cover, 2-6 Making display panel adjustments, 3-3 Microphone, 2-4 Microsoft Po
upgrading, 3-24 RAS setup, 3-22 Record switch, 2-4 Removing the stylus, 2-7 Replacing batteries, 2-9 Reset button, 2-5 Resetting the MobilePro, 3-25 ROM bay cover, 2-5 upgrading, 3-24 V VGA port, 2-6, 3-19 Voice Recorder using, 3-10 W Windows CE desktop software setup, 1-7 S Serial port, 2-5 Setting a MobilePro time-out, 3-3 Setup desktop software, 1-7 first-time instructions, 1-2 MobilePro Software Suite, 1-7 Setup Wizard using, 1-5 Shortcut keys, 3-5 Specifications, 5-1 Storage requirements, 2-19 Stylus
BATTERY REPLACEMENT ! WARNING There is a danger of explosion if the battery is incorrectly replaced. Replace only with the same or equivalent type recommended by the manufacturer. Discard used batteries according to the manufacturer’s instructions. ! ATTENTION Il y a danger d’explosion s’il y a replacement incorrect de la batterie. Remplacer uniquement avec une batterie du même type ou d’un type recommandé par le constructeur.
(For United States Use Only) FEDERAL COMMUNICATIONS COMMISSION RADIO FREQUENCY INTERFERENCE STATEMENT ! WARNING Changes or modifications to this unit not expressly approved by the party responsible for compliance could void the user’s authority to operate the equipment. NOTE This is a Class B Digital Device. This equipment has been tested and found to comply with the limits for a Class B digital device, pursuant to Part 15 of the FCC Rules.
the RENs should not exceed five (5). To be certain of the number of devices that may be connected to the line, as determined by the total RENs contact the telephone company to determine the maximum REN for the calling area. If the MobilePro causes harm to the telephone network, the telephone company will notify you in advance that temporary termination of service may be required. But if advance notice isn’t possible, the telephone company will notify the customer as soon as possible.
IC CS-03 “NOTICE: The Industry Canada label identifies certified equipment. This certification means that the equipment meets telecommunications network protective, operational and safety requirements as prescribed in the appropriate Terminal Equipment Technical Requirements document. The Department does not guarantee the equipment will operate to the user’s satisfaction.
FCC PART 15 CLASS B NOTICE This equipment has been tested and found to comply with the limits for a Class B digital device, pursuant to Part 15 of the FCC Rules. These limits are designed to provide reasonable protection against harmful interface in a residential installation. This equipment generates, uses and can radiate radio frequency energy and, if not installed and used in accordance with the instructions, may cause harmful interference to radio communications.
FCC WARNING Changes or modifications not expressly approved by the party responsible for compliance could void the user’s authority to operate the equipment. Properly shielded and grounded cables and connectors must be used for connection to host computer and/or peripherals in order to meet FCC emission limits. AC adapter with ferrite core must be used for RF interference suppression.
Declaration of Conformity This device complies with Part 15 of the FCC Rules. Operation is subject to the following two conditions: (1) this device may not cause harmful interference, and (2) this device must accept any interference received, including interference that may cause undesired operation. Trade/Model Name: NEC MobilePro 750C Model No.(s): S1424-04A03 Responsible Party: NEC Computer System Division, A Division of Packard Bell NEC, Inc.