Manual Nero PhotoSnap
Copyright and Trademark Information Copyright and trademark information This document, like the software described therein, is provided as a license and may only be used or reproduced in accordance with the licensing agreement. The contents of this document, as well as the associated software, is subject to change without prior notice. Nero AG rejects any responsibility for the correctness of the contents of this document and rejects any claims that transcend the clauses of the guarantee agreement.
Table of contents Table of contents 1 1.1 1.2 1.3 Start Successfully About the manual About Nero PhotoSnap Basic Steps 5 5 5 6 2 Launching the program 7 3 User Interface 8 4 Program options 10 5 5.1 5.2 5.2.1 5.2.2 5.2.3 5.2.4 5.2.5 5.2.6 5.3 5.3.1 5.3.2 5.3.3 5.3.
Table of contents 10 10.1 10.2 10.3 10.3.
Start Successfully 1 Start Successfully 1.1 About the manual This manual is intended for all users who want to learn how to use Nero PhotoSnap. It is process-based and explains how to achieve a specific objective on a step-by-step basis. To make best use of this documentation, please note the following conventions: Indicates warnings, preconditions or instructions that have to be precisely followed. Indicates additional information or advice. 1.
Start Successfully 1.3 Basic Steps Nero PhotoSnap lets you modify a picture and apply effects to it. Several tools and picture effects are available to you in the right work area for this purpose. The following basic steps are necessary in order to post-process a picture: Load the picture in Nero PhotoSnap. Choose the effect for the picture. Undertake any required fine settings for the effect. Save picture under a new name.
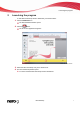
Launching the program 2 Launching the program To start Nero PhotoSnap via Nero StartSmart, proceed as follows: 1. Click the StartSmart icon. The Nero StartSmart window opens. 2. Click the button. The list of Nero applications appears. Nero StartSmart window 3. Select the Nero PhotoSnap entry in the selection list. 4. The Nero PhotoSnap window opens. You have launched Nero PhotoSnap via Nero StartSmart.
User Interface 3 User Interface The program interface of Nero PhotoSnap is where you begin to edit photos and pictures. In one task bar Nero PhotoSnap offers file, display and configuration options, and in the Toolbox area it offers filters and effects for picture editing. The opened picture is displayed in the editing area. Program interface with opened picture In the icon barthe following buttons are available: Opens the Select a picture window, where you can select a picture to open.
User Interface Opens the Options window where you can configure the program. In the dropdown menu, file information can be displayed. Prints the picture. You can configure the printer settings in the drop-down menu. Closes Nero PhotoSnap. Opens the About Nero PhotoSnap window to display information such as the version number. Opens the window Help Information which displays the Online Help. Help can only be opened if it has been installed separately.
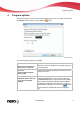
Program options 4 Program options Nero PhotoSnap lets you define the presets for displaying pictures. You define the presets in the Options window, which you open with the button. Options Window The following setting options are available: Check Box Fits the picture to the editing area. If the check box is cleared, the picture is displayed in its original size (100%) in the editing area.
Program options Check Box Also allow picture enlargement during autosizing Enlarges the picture if required to fit into the editing area. If the check box is cleared, the maximum picture enlargement is the original size. Button Defines the background color of the editing area. Background Color Input field Defines how many steps can be undone. Maximum undo steps Button Plug-ins Opens the Configure Plug-in Manager window where you can register plug-ins (currently, no additional plug-ins are available).
Image effects 5 Image effects 5.1 General Effect Area When you select an effect, a corresponding effect area is usually shown. Some effects possess special settings possibilities and areas. Generally, the following options are available: Drop-down menu Creates a name for the selected settings. Preferences Button Saves the preset. Save Button Deletes the selected preset. Delete Button Applies the effect. Apply Button Cancels the action and shows the Toolbox area.
Image effects 5.2 Main effects When a picture is open, you can switch between main effects and other effects in the Toolbox area with the Other Effects and Return to Main Effects buttons. The main effects are particularly useful for correcting imperfections in the digital picture caused by, for example, a faulty shot or a faulty scan. The other effects are used for artistic editing and creative picture manipulation.
Image effects Shows the Crop area where you can extract (crop) part of the area. Shows the Lens distortion area where you can offset pin cushion or barrel lens distortion. Fades in the Brightness and Contrast area. Shows the Noise area, where you can reduce or increment picture noise.
Image effects Shows the Red eye removal area, where you can correct red eyes. Shows the Rotate area, where you rotate the picture. Shows the Hot pixel fixer area, where you can remove so-called hot pixels. See also: General Effect Area 12 Further Graphic Effects 22 Red Eye Removal 35 5.2.1 Settings in the Lighting Region You can correct the exposure with Nero PhotoSnap. For this purpose there is a histogram and gradation correction curve available in the Color/Exposure area.
Image effects 5.2.2 Color Balance You can correct the color of the picture with Nero PhotoSnap and, for example, remove a color cast. Correction options in RGB and HSL modes are available for that purpose in the Color/Color balance area. You can perform the color balance with the RGB tab in RGB mode: colors are defined with combinations of the three primary colors red, green and blue.
Image effects 5.2.3 Resolution Settings Area The resolution, size and font size of a picture can be changed in the resolution area. Resolution Area The following areas are available in the Resolution area: Area Selects a method for changing the size of the picture. Resize Mode Check Box Retains the proportions of the picture. Constrain proportions Area Defines the resolution of the picture in pixels per cm or inch. Document resolution Area Defines the print size of the picture in cm or inches.
Image effects Bilinear Re-calculates the picture if there is size change by taking into account the upper and lower pixels for the recalculation. This method is fast and especially suitable for drawings and illustrations. Bilinear (Bartlett) If there is a size change, the picture is re-calculated by taking into account the surrounding pixels in different parts. Though more exact for picture size reductions than the simple bilinear method, it is slower.
Image effects The following settings are available on the Noise tab: Slider Defines the degree of general noise reduction. Smoothness Area Noise levels Button Auto profile Defines the degree of noise reduction of the primary colors red, green and blue. Automatically reduces noise. The regulators are set to an optimal value. The following slider is available on the +Noise tab: Noise levels Defines the degree of general noise reduction. See also: Main effects 13 5.2.
Image effects Threshold Defines from which edge contrast sharpening should occur. The following slider is available on the Gaussian Blurring tab: Defines how many pixels of an area should be included in the unsharpening calculation. Size There is no general regulator mixing for sharpening that applies to all picture. The optimal regulator mixing must be determined by trial and error. See also: Main effects 13 5.2.
Image effects Option button Rotates the picture 180 degrees. 180 degrees Option button Custom angle Color space Background Color Button Autorotate picture Rotates the picture by any number of degrees. Enter the degrees in the input field or rotate the slider of the circle. Defines a background color for unfilled areas that occur when rotating. Rotates the picture automatically by looking for edges; the picture is rotated so that most edges are horizontal or vertical.
Image effects 5.3 Further Graphic Effects When a picture is open, you can switch between main effects and other effects in the Toolbox area with the Other Effects and Return to Main Effects buttons. The other effects are used for artistic editing and creative picture manipulation. The following further effects are available, clarified by the comparison between the original graphic at the left and the effects used on the right. Shows the Median area where you can use a water color effect.
Image effects Reduce the picture to its edges, i.e. to the transitions between color areas. Applies the vignetting filter. This means that the picture is elliptically shadowed toward the corners. Mirrors the picture horizontally. Mirrors the picture vertically. Applies the relief effect. This means that edges of areas within a picture are highlighted as shaded and other colors are suppressed.
Image effects Shows the Aging area where you can apply an aging effect. Shows the Canvas area, where you can apply the canvas effect. Shows the Glow area, where you can add a glow emanating from a bright surface area. Shows the JPEG artefact removal area, where you can improve pixelated JPEG pictures. Displays the Duotone area, in which a desired color scale can be set by means of two particular contrasting color shades.
Image effects Shows the Kaleidoscope area, where you can use a kaleidoscope effect. Shows the Posterization area, where you can use the oil painting effect. Shows the Solarization area, where you can apply the solarization effect. Shows the Water area, where you can apply water effects.
Image effects 5.3.1 Settings in the Aging Area A picture can be artificially aged in the Aging area. The following sliders are available in the Aging area: Intensity Defines the degree of aging. As a picture ages, it becomes increasingly sepia toned. Desaturation Defines how faded the colors should be. Noise Adds noise to the picture, i.e. randomly distributed artefact pixels. Scratches Adds sepia scratches to the picture. Lines Adds vertical lines to the picture.
Image effects 5.3.4 Duotone Settings Area In the Duotone area two contrasting color shades can be selected with which the picture is to be colored. The following buttons are available: Dark color Opens the Color window in which you can select the one predefined dark color or can mix the corresponding color. Light color Opens the Color window in which you can select the one predefined light color or can mix the corresponding color.
Image formats 6 Image formats 6.1 Compression Settings for the TIFF Format. Nero PhotoSnap has several compression processes available in the TIFF picture format. You can set the desired process and the degree of compression in the Save As > settings window. The following settings options are available in the Compression area: Option button Uses no additional compression method.
Image formats 6.2 Compression Settings for the JPEG Format Nero PhotoSnap possesses several compression processes for saving in the JPEG picture format. JPEG settings window The following setting options are available in the JPEG settings window for JPEG/JPG pictures: Slider Regulates the compression strength. Compression quality Check Box Progressive compression Compresses the picture progressively.
Overview of Data Information and Metadata 7 Overview of Data Information and Metadata The File Information window provides you with information about the picture. If the photo was taken with a digital camera, metadata is usually present, e.g. camera-specific EXIF information such as aperture and shutter time. You can open the File Information window from Nero PhotoSnap or from Nero PhotoSnap Viewer.
Edit Picture 8 Edit Picture Nero PhotoSnap allows pictures to be assigned pre-defined filters and effects. Picture effects are available to you in the Toolbox area picture effects. To edit a picture, proceed as follows: 1. Click the picture effect button you want in the Toolbox area. The corresponding area is displayed. The Preview and Split Preview tabs are displayed. The effects Convert to gray scale to Embossing are applied immediately to button lets you undo the effect you have applied.
Edit Picture A well-exposed picture has a histogram with different elevations spread from left to right. In contrast, a picture which is underexposed or overexposed has no elevations or only very flat elevations in the left and/or right areas. To correct such a picture, you can move the lines accordingly until they achieve the elevations or you can have it done automatically. The hue values then cover the entire brightness range, and the exposure is corrected.
Edit Picture 8.1.2 Lighting with Gradation Curve With Nero PhotoSnap it is possible to correct the lighting of the picture in that the gradation curve is corrected. The gradation curve defines the distribution of the brightness values. On the X axis are the hue values of the original from light to dark, on the X axis the tone values after the correction from light to dark. A straight curve with a 45° angle means that the original values remain unchanged.
Edit Picture 8.2 Balancing the Color of a Picture You can perform a color balance or correct a color cast with Nero PhotoSnap. You can perform the color balance manually, semi-automatically, or automatically. The following requirement has to be fulfilled: The Color/Color balance area is displayed. To correct the color of a picture with Nero PhotoSnap, proceed as follows: 1. To perform a manual color balance: 1. Click the RGB tab or the HSL tab. The RGB tab or the HSL tab is displayed. 2.
Edit Picture 8.3 Red Eye Removal Nero PhotoSnap lets you remove red eyes. Red eye in photos usually occurs when a person or animal is photographed with a flash in dark surroundings. The flash or light is reflected by the retina and appears red in photos. The effect is even greater if the pupil is opened wide. The red-eye effect describes a side effect in photography with a flash.
Edit Picture 1. Click the picture and draw a line. The picture is rotated so that the drawn line is horizontally or vertically positioned. 3. To rotate the picture automatically: 1. Click the Autorotate button. Nero PhotoSnap automatically rotates the picture so that the majority of edges in the picture are horizontally or vertically positioned. 4. Select an item in the Size of the rotated picture drop-down menu to define the size of the rotated picture. 1.
Edit Picture 3. To save the current picture using the JPG, JP2, TIFF or PNG compression settings: 1. Click the small triangle next to the button. 2. Select the Settings entry. The corresponding window opens. 3. Select the settings you want. You have saved the picture.
Nero PhotoSnap Viewer 9 Nero PhotoSnap Viewer 9.1 About Nero PhotoSnap Viewer With Nero PhotoSnap Viewer you are in possession of an easy to use and intuitive picture viewing software with which you can very easily view all you digital photos. Nero PhotoSnap Viewer supports the same picture formats as Nero PhotoSnap. See also: Program Interface 38 Configuration 40 Full Screen 39 About Nero PhotoSnap 5 9.
Nero PhotoSnap Viewer The following buttons are available in the toolbar: Open Opens the Select an Image File to be Opened window in which you can choose a picture. Edit Opens Nero PhotoSnap. Nero PhotoSnap lets you edit your pictures. Zoom In Increases the view of the picture. Zoom Out Decreases the view of the picture. Full Screen Full screen display of the picture. Left/Right Rotates the picture 90° to the left or right.
Nero PhotoSnap Viewer 9.4 Configuration Nero PhotoSnap Viewer lets you define the presets for displaying pictures. The presets are defined in the Settings window, accessible via File > Presets. Settings window (Nero PhotoSnap Viewer) The following setting options are available: Check Box Fits the picture to the size of the viewing area or screen. Increases or decreases the view of the picture if required. If the check box is cleared, the pictures are displayed in their original sizes (100%).
Technical Information 10 Technical Information 10.1 System requirements Nero PhotoSnap is installed along with the Nero Suite. Its system requirements are the same. You can find more detailed information on the system requirements under www.nero.com. 10.2 Key Combinations The following key combinations for entering commands are available in Nero PhotoSnap and Nero PhotoSnap Viewer: [Ctrl+O] Opens the file browser so that a picture can be selected for importing. [Ctrl+P] Prints the opened picture.
Technical Information 10.3 Formats supported 10.3.1 Image formats Bitmap (BMP) Device Independent Bitmaps (DIB) Graphics Interchange Format (GIF) JPEG File Interchange Format (JFIF) Joint Photografic Expert Group (JPEG, JPG, JPE) Picture Exchange (PCX) Portable Network Graphics (PNG) Portable Pixel Map (PPM) Targa Image File (TGA) Tagged Image File Format (TIFF, TIF) Windows Media File (WMF) Dr.
Glossary 11 Glossary DPI The Dots per Inch give the number of pixels per inch (1 inch = 2.54 cm) and thus the resolution which an output device, such as a printer, can provide. EXIF EXIF stands for Exchangeable Image File Format and is a standard of JEITA (Japan Electronic and Information Technology Industries Association) for metadata in picture files. Information such as camera type, aperture, exposure time, distance to object and the date when the photo was taken can be stored in the metadata.
Glossary Lens Aperture A lens aperture is an arrangement on the camera which regulates the amount of light falling onto the lens. It determines, on the one hand, the light intensity on the data carrier and, on the other hand, the color sharpness of the photo. LZW Algorithm The Lempel-Ziv-Welch algorithm uses a standard of loss-free data compression that was developed by Abraham Lempel, Jacob Ziv and Terry Welch.
Index 12 Index 1 100% view............................................... 8 2 256 colors.............................................. 29 A Adapt Automatic......................................................... 13 Brightness........................................................ 14 Contrast ........................................................... 14 Font size .......................................................... 13 Pixel Dimension............................................... 13 Resolution....
Index Kaleidoscope ................................................... 25 Main effects ................................................. 9, 13 Median....................................................... 22, 26 Median effect ................................................... 26 Mirror, horizontally ........................................... 23 Mirror, vertically ............................................... 23 Negative .......................................................... 22 Nostalgia.............
Index P Picture Adapt brightness.............................................. 14 Adapt color ...................................................... 13 Adapt exposure ............................................... 13 Adapt pixel dimension ..................................... 13 Aging ............................................................... 24 Aging filter........................................................ 24 Aquarel effect .................................................. 22 Aquarel filter ..
Index Semi-automatic color balance............... 34 Sharpen................................................. 14 Shortcuts ............................................... 41 Split Preview ......................................... 31 Startup Program............................................................. 7 Surface structure................................... 26 Synchronization View................................................................... 9 System requirements ............................
Contact 13 Contact Nero PhotoSnap is a Nero AG product. Nero AG Im Stoeckmaedle 13-15 Internet: www.nero.com 76307 Karlsbad Help: http://support.nero.com Germany Fax: +49 724 892 8499 330 N Brand Blvd Suite 800 Internet: www.nero.com Glendale, CA 91203-2335 Help: http://support.nero.com USA Fax: (818) 956 7094 E-mail: US-CustomerSupport@nero.com Rover Center-kita 8F-B, 1-2-2 Nakagawa-chuou Tsuzuki-ku Internet: www.nero.com Yokohama, Kanagawa Help: http://support.nero.