Contents Thank you for purchasing a genuine NetComm product. ............................................................. 3 What’s in the Box? ........................................................................................................................ 3 Step 1 - Hardware Installation ...................................................................................................... 4 Step 2 - Software Installation ..............................................................................
Thank you for purchasing a genuine NetComm product. Follow the steps in this Quick Start Guide to correctly install your WebMaster Modem and begin data, fax and voice communications. What’s in the Box? ■ NetComm 56K V.
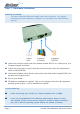
Step 1 - Hardware Installation BEFORE YOU BEGIN: This device should be fitted and installed under normal operation. Any damage caused by abnormal installation or operation is not included in the manufacturer’s warranty. ■ Connect the serial port on the back of the modem (marked RS-232) to a COM port on your Computer using the serial cable. ■ Connect the power pack to a power point and connect the other end to the modem power socket (marked POWER).
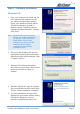
Step 2 - Software Installation Windows® XP 1. Once your Computer has started and you have connected your modem correctly you will be presented with a message saying "New Hardware Found" and the "Found New Hardware Wizard" is displayed. Select "Install the software automatically [Recommended]", and then click "Next" . Note: Windows XP may have generic drivers that install automatically on start-up.
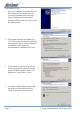
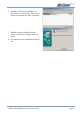
Windows® 2000 1. Once your Computer has started and you have connected your modem correctly you will be presented with a message saying "Welcome to the Found New Hardware Wizard" click on "Next" to start the install process. 2. The Wizard will detect the modem as a "IC+56k External Data Fax Voice Modem" and prompt for drivers. Select "Search for a suitable driver for my device (Recommended)" and then select "Next". 3.
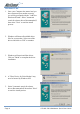
5. The drivers that Windows 2000 uses are not digitally signed by Microsoft and the following message will be displayed. Click "Yes". 6. This completes the "Found New Hardware Wizard" click on "Finish" to complete the installation. 7. Your modem is now installed and ready to use. Rev.2 - YML664 CD1800 56K WebMaster Quick Start Guide www.netcomm.com.
Windows® Me 1. Once your Computer has started and you have connected your modem correctly you will be presented with the "Add New Hardware Wizard". Select "Automatic search for a better driver (Recommended)" then select "Next" to start the install process. 2. Windows will locate all available driver files for your modem. Select one of the drivers and click on "OK" to continue. 3. Windows will now install the drivers. Click on "Finish" to complete the driver installation. 4.
6. Windows will locate all available wave driver files for your modem. Select one of the drivers and click on "OK" to continue. 7. Windows will now install the drivers. Click on "Finish" to complete the driver install. 8. Your modem is now installed and ready to use. Rev.2 - YML664 CD1800 56K WebMaster Quick Start Guide www.netcomm.com.
Windows®98 1. Once your Computer has started and you have connected your modem correctly you will be presented with the "Add New Hardware Wizard". Click "Next" to start the install process. 2. Select "Search for the best driver for your device. (Recommended)" then select "Next" 3. You will now be required to specify the location of the drivers, these are located on the CD ROM supplied. Select "CDROM drive" then click on "Next". 4.
5. This completes the "Add New Hardware Wizard" click on "Finish" to complete the installation. 6. A "Wave Device for Voice Modem" may now be located by Windows. 7. Select "Automatic search for a better driver (Recommended)" then select "Next" to start the install process. 8. You will now be required to specify the location of the drivers, these are located on the CD ROM supplied. Select "CDROM drive" and then click on "Next". Rev.2 - YML664 CD1800 56K WebMaster Quick Start Guide www.netcomm.com.
9. Windows will locate all available wave driver files for your modem. Click on "Next" to continue. 10. Windows will now install the drivers. Click on "Finish" to complete the driver install. 11. Your modem is now installed and ready to use. www.netcomm.com.au Page 12 Rev.
Windows®95 1. Once your Computer has started and you have connected your modem correctly you will be presented with the "Add New Hardware Wizard". Click "Next" to start the install process. 2. Select "Search for the best driver for your device. (Recommended)" then select "Next". 3. You will now be required to specify the location of the drivers, these are located on the CD ROM supplied. Select "CDROM drive" and then click on "Next". 4.
5. This completes the "Add New Hardware Wizard" click on "Finish" to complete the installation. 6. Your modem is now installed and ready to use. www.netcomm.com.au Page 14 Rev.
Driver removal process forCD1800 To remove the drivers for the CD1800 please follow these steps: 1. Click on "Start" then "Settings" and then "Control Panel" (Or simply "Start" then "Control Panel" for Windows XP and Windows 2000). 2. Double click on "Modems" (Or "Phone and modem options" for Windows XP and Windows 2000). 3. Select the "NetComm CD1800 WebMaster Modem" and then click on "Remove". Rev.2 - YML664 CD1800 56K WebMaster Quick Start Guide www.netcomm.com.
Step 3 - Software Installation Now that you have installed your new NetComm modem and its drivers, you will need to install software to make your CD1800 a complete communications solution. Your NetComm Driver CD contains BVRP PhoneTools for Windows - Fax and Data software, and Adobe Acrobat Reader to view the manuals included in the Manuals directory of the CD. BVRP for Windows To install your Facsimile and Answering Machine software: 1. Go to the “Start” button in the right-bottom corner of the screen.
Adobe Acrobat Reader To install your Adobe Acrobat Reader software: 1. Go to the “Start” button in the right-bottom corner of the screen. Select “Run”. 2. Click on “Browse...” and go to “D:\Software\Acrobat\Win32\ar40eng.exe” where D:\ is the letter of your CD-ROM drive. 3. Click “OK” and the software installation screen will appear. Follow the screen instructions to install the software. A copy ofthe Adobe Acrobat User Guide is available in “D:\Manuals\Acrobat” where D:\ is the letter of your CD-ROM drive.
Step 4 - Using BVRP PhoneTools The following section gives basic instructions to allow you to begin using your PhoneTools software. For more information refer to the full User Guide in the Manual directory. The Status Bar gives access to all the functions featured in PhoneTools. You may select a menu option through the “Menus” button. The "LCD" screen displays relevant status information.
Phone Features Making a Phone Call There are a number of different methods to specify the number to call and start dialling: Opens the PhoneBook: Copy Mode window that lets you extract existing correspondents' phone numbers. Displays the Dial box. To make a phone call using the Dial box, enter your correspondent's details (name and phone number), and then click OK. (toggle button) displays four buttons giving access to six Quick Dial Memory Keys each.
Answering Machine The Answering Machine feature allows your modem and computer to become an answering machine. PhoneTools supports two modes of operation: ■ The Greeting Only mode issues an announcement then hangs up. ■ The Greeting & Record mode issues an announcement then records the caller's message. Activating/Deactivating the Answering Machine To turn the answering machine on, click the button corresponding to the mode you wish to use (Greeting Only or Greeting & Record).
5. A dialogue box will prompt you to enter the Pre-recorded message Description. This description should allow you to readily identify the message in the message list. Click “OK” to exit the “Pre-recorded message Description” window. 6. Exit the “Modify/Create Greetings” window. Listening to Received Messages 1. In the list of Received Voice Messages, select the message you wish to play by clicking on it. 2.
Fax Features The following buttons are available: Send Fax: By default, this button starts the Send Fax Wizard. If you did not make this wizard available, the Send Fax window is displayed. Hang Up: Interrupts the current fax transmission. Fax Inbox: Displays the Inbox folder contents. Fax Outbox: Displays the Outbox folder contents.
Faxing a file directly from PhoneTools 1. From the main window, click the “Send Fax” button. By default, this button starts the Send Fax Wizard. Alternatively, if you did not make this option available, the Send Fax window is displayed. 2. Type in the recipients details or extract them from the Phonebook. 3. In the Attached Document section, click the “Select Document” button and select the file to be sent. 4. Various transmission options are available. To enable an option, click the corresponding button.
Step 5 - Registering your Modem To ensure that the conditions of your warranty are complied with, please go to the NetComm web site for quick and easy registration of your product at www.netcomm.com.au Alternatively, you can fill in the Warranty Registration Form and mail it to NetComm Limited, PO Box 1200, Lane Cove NSW 2066. Contact Information If you have any technical difficulties with your product, please do not hesitate to contact NetComm’s Customer Support Department. Email: support@netcomm.com.
Warranty Registration Form Cut along the line Date of Purchase …….......………………...........………................................. Name …….......………………...........………................................. Company …….......………………...........………................................. Address …….......………………...........………................................. …………………….........……........... Tel No ( Post Code .....………...………. ) ..............………....……. Fax No ( E-mail ) .....………...………. …….......………………...........………......
Product Warranty The warranty is granted on the following conditions: 1. This warranty extends to the original purchaser (you) and is not transferable. 2. This warranty shall not apply to software programs, batteries, power supplies, cables or other accessories supplied in or with the product. 3. The customer complies with all of the terms of any relevant agreement with NetComm and any other reasonable requirements of NetComm including producing such evidence of purchase as NetComm may require. 4.