
User's Manual


www.netcomm.com.au Rev.2 - YML664
Page 4 CD1800 56K WebMaster Quick Start Guide
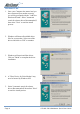
Step 1 - Hardware Installation
BEFORE YOU BEGIN:
This device should be fitted and installed under normal operation. Any damage
caused by abnormal installation or operation is not included in the manufacturer’s
warranty.
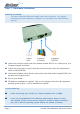
■ Connect the serial port on the back of the modem (marked RS-232) to a COM port on your
Computer using the serial cable.
■ Connect the power pack to a power point and connect the other end to the modem power
socket (marked POWER).
■ Connect the telephone cord to the line socket on the back of the modem (marked LINE) and
the other end to a phone socket.
■ Turn on your modem.
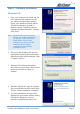
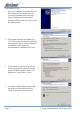
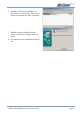
■ The hardware installation is complete. Turn on your computer and refer to the appropriate
operating system in Step 2 - Driver Installation to continue.
Caution/Warning
■■
■■
■
Avoid connecting your modem to a digital telephone line or PABX.
■■
■■
■
If you are using Windows XP or Windows 2000 and you intend on using
your modem, please ensure that the modem is turned on before turning on
your PC so that the operating system detects the modem on startup.