R6250 Smart WiFi Router User Manual April 2015 202-11544-01 350 East Plumeria Drive San Jose, CA 95134 USA
R6250 Smart WiFi Router Support Thank you for selecting NETGEAR products. After installing your device, locate the serial number on the label of your product and use it to register your product at https://my.netgear.com. You must register your product before you can use NETGEAR telephone support. NETGEAR recommends registering your product through the NETGEAR website. For product updates and web support, visit http://support.netgear.com. Phone (US & Canada only): 1-888-NETGEAR.
Contents Chapter 1 Hardware Setup Unpack Your Router . . . . . . . . . . . . . . . . . . . . . . . . . . . . . . . . . . . . . . . . . . . . . . . . . . 8 Hardware Features . . . . . . . . . . . . . . . . . . . . . . . . . . . . . . . . . . . . . . . . . . . . . . . . . . . 8 Front and Side Panel . . . . . . . . . . . . . . . . . . . . . . . . . . . . . . . . . . . . . . . . . . . . . . . . 9 Rear Panel . . . . . . . . . . . . . . . . . . . . . . . . . . . . . . . . . . . . . . . . . . . . . . . . . . . .
R6250 Smart WiFi Router LAN Setup. . . . . . . . . . . . . . . . . . . . . . . . . . . . . . . . . . . . . . . . . . . . . . . . . . . . . . . . . . LAN Setup Screen Settings . . . . . . . . . . . . . . . . . . . . . . . . . . . . . . . . . . . . . . . . . The Role of the Router as a DHCP Server . . . . . . . . . . . . . . . . . . . . . . . . . . . . . Address Reservation. . . . . . . . . . . . . . . . . . . . . . . . . . . . . . . . . . . . . . . . . . . . . . . WPS Wizard for WiFi Connections . . . . . .
R6250 Smart WiFi Router Security Event Email Notifications . . . . . . . . . . . . . . . . . . . . . . . . . . . . . . . . . . . . . 80 Chapter 8 Administration Upgrade the Router Firmware . . . . . . . . . . . . . . . . . . . . . . . . . . . . . . . . . . . . . . . . . 83 View Router Status . . . . . . . . . . . . . . . . . . . . . . . . . . . . . . . . . . . . . . . . . . . . . . . . . . 84 Router Information . . . . . . . . . . . . . . . . . . . . . . . . . . . . . . . . . . . . . . . . . . . . . . .
R6250 Smart WiFi Router Wireless Settings. . . . . . . . . . . . . . . . . . . . . . . . . . . . . . . . . . . . . . . . . . . . . . . . . 120 Network Settings . . . . . . . . . . . . . . . . . . . . . . . . . . . . . . . . . . . . . . . . . . . . . . . . 120 Troubleshoot with the LEDs . . . . . . . . . . . . . . . . . . . . . . . . . . . . . . . . . . . . . . . . . . 121 Power LED Is Off or Blinking . . . . . . . . . . . . . . . . . . . . . . . . . . . . . . . . . . . . . . . 121 Power LED Stays Amber . .
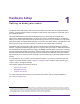
1. Hardware Setup Gettin g to know your ro ute r 1 The R6250 Smart WiFi Router with AC dual band delivers AC1600 WiFi and Gigabit Ethernet speeds. It offers the best wireless coverage for large homes and is ideal for homes with ten or more wireless devices. The router automatically uses NETGEAR Beamforming+ technology to enhance WiFi performance. Because it’s automatic, you don’t have to turn on Beamforming+ or configure it.
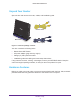
R6250 Smart WiFi Router Unpack Your Router Open the box and remove the router, cables, and installation guide. Ethernet cable WiFi Router Power adapter Figure 1. Check the package contents Your box contains the following items: • R6250 Smart WiFi Router • AC power adapter (plug varies by region) • Category 5 (Cat 5) Ethernet cable • Installation guide with cabling and router setup instructions If any parts are incorrect, missing, or damaged, contact your NETGEAR dealer.
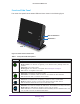
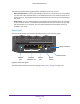
R6250 Smart WiFi Router Front and Side Panel The router front panel has the status LEDs and icons shown in the following figure. WiFi On/Off button WPS button LEDs Figure 2. Router front and side view Table 1. Front panel LED descriptions LED Description Power • • • • • Solid amber. The router is starting. Blinking amber. The firmware is upgrading, or the Restore Factory Settings button was pressed. Solid green. The router is ready. Blinking green. The firmware is corrupted. See www.netgear.
R6250 Smart WiFi Router The WiFi and WPS buttons toggle the WiFi and WPS functions on and off. • WiFi On/Off button. Pressing and holding this button for 2 seconds turns on and off the 2.4 GHz and 5 GHz wireless radios. If the Wireless LED is lit, the wireless radios are on. If this LED is off, the wireless radios are turned off and you cannot connect wirelessly to the router. • WPS button. You can use this button to use WPS to add a wireless device or computer to your wireless network.
R6250 Smart WiFi Router Label The label on the bottom of the router shows the WPS PIN, login information, MAC address, and serial number. Default access information Preset SSID Preset WiFi password Serial number and MAC address Figure 4. The label shows unique information about your router Position Your Router The router lets you access your network from anywhere within the operating range of your wireless network.
2. 2 Getting Started Co n n ec t ing to t he rou te r This chapter explains how to use NETGEAR genie to set up your router after you complete cabling as described in the installation guide.
R6250 Smart WiFi Router Router Setup Preparation You can set up your router with the NETGEAR genie automatically, or you can use the genie menus and screens to set up your router manually. Before you start the setup process, get your ISP information and make sure the computers and devices in the network have the settings described here.
R6250 Smart WiFi Router NETGEAR genie Setup NETGEAR genie runs on any device with a web browser. Installation and basic setup takes about 15 minutes to complete. To use NETGEAR genie to set up your router: 1. Turn the router on by pressing the On/Off button. 2. Make sure that your computer or wireless device is connected to the router with an Ethernet cable (wired) or wirelessly with the preset security settings listed on the bottom label. 3. Launch your Internet browser.
R6250 Smart WiFi Router If the router does not connect to the Internet: 1. Review your settings to be sure that you have selected the correct options and typed everything correctly. 2. Contact your ISP to verify that you have the correct configuration information. 3. Read Chapter 10, Troubleshooting. If problems persist, register your NETGEAR product and contact NETGEAR technical support.
R6250 Smart WiFi Router view and change the settings. The left column has menus. You can use the Advanced tab to access more menus and screens. Language Dashboard (Click to view details) Menus (Click the Advanced tab to view more) Help Figure 5. Basic Home screen with dashboard, language, and online help • Home. This dashboard screen displays when you log in to the router. • Internet. Set, update, and check the ISP settings of your router. • Wireless.
R6250 Smart WiFi Router Manual Method With the manual method, choose the network that you want and type its password to connect. To connect manually: 1. On your computer or wireless device, open the software that manages your wireless connections. This software scans for all wireless networks in your area. 2. Look for your network and select it. The unique WiFi network name (SSID) and password are on the router label. If you changed these settings, look for the network name that you used. 3.
R6250 Smart WiFi Router The genie app dashboard screen displays.
3. Basic Settings Yo u r I nternet connec t i o n a nd Wi Fi n e two rk 3 This chapter contains the following sections: • Internet Setup • Basic Wireless Settings • Set Up a Guest Network • View Attached Devices For information about the ReadySHARE feature on the Basic Home tab, see Chapter 5, USB Storage and Chapter 6, Share a USB Printer.
R6250 Smart WiFi Router Internet Setup The Internet Setup screen is where you view or change basic ISP information. Note: You can use the Setup Wizard to detect the Internet connection and automatically set up the router. See Internet Connection Setup Wizard on page 29. To view or change the basic Internet setup: 1. From the Home screen, select Internet. The fields that display in the Internet Setup screen depend on whether your Internet connection requires a login. • Yes.
R6250 Smart WiFi Router 4. Click Test to test your Internet connection. If the NETGEAR website does not display within 1 minute, see Chapter 10, Troubleshooting. Internet Setup Screen Fields The following descriptions explain all of the possible fields in the Internet Setup screen. The fields that display in this screen depend on whether tan ISP login is required. Does Your Internet connection require a login? Answer either yes or no.
R6250 Smart WiFi Router • Enable • Disable • Disable Port Scan and DoS Protection Router MAC Address. The Ethernet MAC address that the router uses on the Internet port. Some ISPs register the MAC address of the network interface card in your computer when your account is first opened. They accept traffic only from the MAC address of that computer. This feature allows your router to use your computer’s MAC address (also called cloning). • Use Default Address. Use the default MAC address.
R6250 Smart WiFi Router To view or change basic wireless settings: 1. Select Basic > Wireless. The screen sections, settings, and procedures are explained in the following sections. 2. (Optional) Change the settings. The settings are explained in the following section Wireless Settings Screen Fields on page 24. 3. Click Apply. Your settings are saved. If you were connected wirelessly to the router and you changed the SSID or wireless security, you are disconnected from the network. 4.
R6250 Smart WiFi Router Wireless Settings Screen Fields You can use this screen to view or change the wireless network settings and the security option. Enable SSID Broadcast. This feature allows the router to broadcast its SSID so wireless stations can see this wireless name (SSID) in their scanned network lists. This check box is selected by default. To turn off the SSID broadcast, clear this check box, and click Apply. Name (SSID). The SSID is also known as the wireless network name.
R6250 Smart WiFi Router WPA2-PSK is stronger than WPA-PSK. It is advertised to be theoretically indecipherable due to the greater degree of randomness in encryption keys that it generates. WPA2-PSK gets higher speed because it is implemented through hardware, while WPA-PSK is usually implemented through software. WPA2-PSK uses a passphrase to authenticate and generate the initial data encryption keys. Then it dynamically varies the encryption key.
R6250 Smart WiFi Router To set up a guest network: 1. Select Basic > Guest Network. 2. Select any of the following wireless settings: Enable Guest Network. When this check box is selected, the guest network is enabled, and guests can connect to your network using the SSID of this profile. Enable SSID Broadcast. If this check box is selected, the wireless access point broadcasts its name (SSID) to all wireless stations.
R6250 Smart WiFi Router To go to the Attached Devices screen: 1. From the Basic Home screen, select Attached Devices. Wired devices are connected to the router with Ethernet cables. Wireless devices have joined the wireless network. The following information is displayed: • # (number). The order in which the device joined the network. • IP Address. The IP address that the router assigned to this device when it joined the network.
4. Advanced Home Settings Spe cif y c ustom s et t in g s This chapter contains the following sections: • NETGEAR genie Advanced Home Screen • Internet Connection Setup Wizard • WAN Setup • LAN Setup • WPS Wizard for WiFi Connections • Quality of Service (QoS) Setup Some selections on the Advanced Home screen are described in separate chapters: • USB Storage. See Chapter 5, USB Storage. • Security. See Chapter 7, Security. • Administration. See Chapter 8, Administration.
R6250 Smart WiFi Router NETGEAR genie Advanced Home Screen The genie Advanced Home dashboard presents status information. The content is the same as what is on the Router Status screen available from the Administration menu. The genie Advanced Home screen is shown in the following figure: probably show menus too Internet Connection Setup Wizard You can use the Setup Wizard to detect your Internet settings and automatically set up your router.
R6250 Smart WiFi Router The Setup Wizard searches your Internet connection for servers and protocols to determine your ISP configuration. WAN Setup The WAN Setup screen lets you configure a DMZ (demilitarized zone) server, change the maximum transmit unit (MTU) size, and enable the router to respond to a ping on the WAN (Internet) port. To view or change the WAN settings: 1. Select Advanced > Setup > WAN Setup. 2. Specify the following settings: • Disable Port Scan and DoS Protection.
R6250 Smart WiFi Router • Respond to Ping on Internet Port. If you want the router to respond to a ping from the Internet, select this check box. Use this setting only as a diagnostic tool because it allows your router to be discovered. Do not select this check box unless you have a specific reason. • Disable IGMP Proxying. IGMP proxying allows a computer on the local area network (LAN) to receive the multicast traffic it is interested in from the Internet.
R6250 Smart WiFi Router To set up a default DMZ server: 1. Select Advanced > Setup > WAN Setup. 2. Select the Default DMZ Server check box. 3. Type the IP address. 4. Click Apply. Your change takes effect. Change the MTU Size The maximum transmission unit (MTU) is the largest data packet a network device transmits. When one network device communicates across the Internet with another, the data packets travel through many devices along the way.
R6250 Smart WiFi Router until the problem goes away. The following table describes common MTU sizes and applications. Table 2. Common MTU sizes MTU Application 1500 The largest Ethernet packet size. This setting is typical for connections that do not use PPPoE or VPN, and is the default value for NETGEAR routers, adapters, and switches. 1492 Used in PPPoE environments. 1472 Maximum size to use for pinging. (Larger packets are fragmented.) 1468 Used in some DHCP environments.
R6250 Smart WiFi Router To change the LAN settings: 1. Select Advanced > Setup > LAN Setup. 2. Enter the settings that you want to customize. These settings are described in the following section, LAN Setup Screen Settings. 3. Click Apply. Your changes are saved. LAN Setup Screen Settings LAN TCP/IP Setup • IP Address. The LAN IP address of the router. • IP Subnet Mask. The LAN subnet mask of the router.
R6250 Smart WiFi Router Use Router as DHCP Server For most home networks, this check box is selected so that the router acts as a Dynamic Host Configuration Protocol (DHCP) server. • Starting IP Address. Specify the start of the range for the pool of IP addresses in the same subnet as the router. • Ending IP Address. Specify the end of the range for the pool of IP addresses in the same subnet as the router.
R6250 Smart WiFi Router Address Reservation When you specify a reserved IP address for a computer on the LAN, that computer always receives the same IP address each time it accesses the router’s DHCP server. Assign reserved IP addresses to computers or servers that require permanent IP settings. To reserve an IP address: 1. Select Advanced > Setup > LAN Setup. 2. In the Address Reservation section of the screen, click the Add button. 3.
R6250 Smart WiFi Router The following screen lets you select the method for adding the WPS client (a wireless device or computer). You can use either the push button or PIN method. 3. Select either Push Button or PIN Number. • To use the push button method, either click the WPS button on this screen, or press the WPS button on the side of the router. Within 2 minutes, go to the wireless client and press its WPS button to join the network without entering a password.
R6250 Smart WiFi Router the client running that application have to have WMM enabled. Legacy applications that do not support WMM and applications that do not require QoS, are assigned to the best effort category, which receives a lower priority than voice and video. WMM QoS is enabled by default. To disable WMM QoS: 1. Select Advanced > Setup > QoS Setup. 2. Clear the Enable WMM check box 3. Click Apply.
R6250 Smart WiFi Router The QoS Setup screen displays: 5. Select the Enable Upstream QoS (Optimized for Gaming) check box. 6. Specify the maximum uplink bandwidth for your Internet connection: • If you know what your uplink bandwidth is, type it in the Uplink bandwidth Maximum field and select either Kbps or Mbps from the drop-down list. • If you are not sure, click the Speedtest button. Speedtest verifies the upstream speed of your Internet connection.
R6250 Smart WiFi Router The QoS Priority Rule list displays. You can edit or delete a rule by selecting its radio button and clicking either the Edit or Delete button. You can also delete all the rules by clicking the Delete All button. 3. To add a priority rule, scroll down to the bottom of the QoS Setup screen and click Add Priority Rule. 4. In the QoS Policy for field, type the name of the application or game. 5. In the Priority Category list, select either Applications or Online Gaming.
R6250 Smart WiFi Router 8. From the Priority list, select the priority for Internet access for this traffic relative to other applications and traffic. The options are Low, Normal, High, and Highest. 9. Click Apply. The rule is saved in the QoS Policy list. QoS for a Router LAN Port To create a QoS policy for a device connected to one of the router’s LAN ports: 1. Select Advanced > Setup > QoS Setup. 2. Click the Setup QoS rule button. 3. Click the Add Priority Rule button. 4.
R6250 Smart WiFi Router 4. If the device to be prioritized is in the MAC Device List, select its radio button. The information from the MAC Device List populates the policy name, MAC Address, and Device Name fields. If the device is not in the MAC Device List, click Refresh. If it still does not display, fill in these fields manually. 5. From the Priority list, select the priority for Internet access for this device’s traffic relative to other applications and traffic.
5. USB Storage A ccess and Configure a U S B Sto rag e D e vice 5 This chapter describes how to access and configure a USB storage drive attached to your router. The USB port on the router can be used only to connect USB storage devices like flash drives or hard drives, or a printer. Do not connect computers, USB modems, CD drives, or DVD drives to the router USB port.
R6250 Smart WiFi Router Connect a USB Storage Device to the Router ReadySHARE lets you access and share or a USB drive connected the router USB port. If your USB device has special drivers, it is not compatible. To connect a USB storage device: 1. Insert your USB storage device into the USB port on the rear panel of the router. 2. If your USB device has a power supply, you must use it when you connect the USB device to the router.
R6250 Smart WiFi Router To access the USB device from a Windows computer: Use any of these methods to access the USB device: • Select Start > Run. Enter \\readyshare in the dialog box and click OK. • Open a browser and enter \\readyshare in the address bar. • Open My Network Places and enter \\readyshare in the address bar. To map the USB device to a Windows network drive: 1. Connect your USB storage device to the USB port on the router.
R6250 Smart WiFi Router The Map Network Drive screen displays: 6. Select the drive letter to map to the network folder. 7. Click the Finish button. The USB device is mapped to the drive letter that you specified. 8. To connect to the USB storage device as a different user, select the Connect using different credentials check box, click the Finish button, and do the following: a. Type the user name and password. b. Click the OK button.
R6250 Smart WiFi Router If you are using Dynamic DNS, you can type the DNS name rather than the IP address. 4. Type the account name and password for the account that has access rights to the USB drive. The user name (account name) for All – no password is guest. The directories of the USB drive that your account has access to display. For example, you could see: share/partition1/directory1. You can now read and copy files from the USB directory.
R6250 Smart WiFi Router • The photo-capable color printer is directly attached to a PC, but not shared on the network. • The Mac and PC are not visible to each other on the network. To print photos from a Mac on the printer attached to a PC: • On a Mac, access the USB drive by typing \\readyshare in the address field of a web browser. Then copy the photos to the USB drive. • On a Window computer, use a web browser or Microsoft Networking to copy the files from the USB drive to the computer.
R6250 Smart WiFi Router View a USB Device Attached to the Router To view basic information about the USB storage device: 1. Select Basic > ReadySHARE. By default, the Basic radio button is selected, and the screen displays a USB storage device if it is attached to the router USB port. If you logged in to the router before you connected your USB device, you might not see your USB device in this screen. If this happens, log out and then log back in. 2.
R6250 Smart WiFi Router To view or change the USB storage advanced settings: 1. Select Advanced > USB Storage > Advanced Settings. 2. Specify access to the USB storage device. • Network Device Name. The default is readyshare. This is the name used to access the USB device connected to the router. • Workgroup. If you are using a Windows workgroup rather than a domain, the workgroup name is displayed here. The name works only in an operating system that supports NetBIOS, such as Microsoft Windows.
R6250 Smart WiFi Router Available Network Folders You can view or change the network folders on the USB storage device. To view network folders: 1. Select Advanced > USB Storage > Advanced Settings. 2. Scroll down to the Available Networks Folder section of the screen. • Share Name. If only one device is connected, the default share name is USB_Storage. (Some router models have more than one USB port.) You can click the name, or you can type it in the address field of your web browser.
R6250 Smart WiFi Router 3. Click Create Network Folder. If the Add a Network Folder screen does not display, your web browser might be blocking pop-ups. If it is, then change the browser settings to allow pop-ups. 4. In the Folder field, browse and select the folder. 5. Fill in the Share Name field. 6. In the Read Access list and the Write Access list, select the setting that you want. The user name (account name) for All – no password is guest.
R6250 Smart WiFi Router To set up approved USB devices: 1. Select Advanced > Advanced Setup > USB Settings. 2. Click the Approved Devices button. This screen shows the approved USB devices and the available USB devices. You can remove or add approved USB devices. 3. In the Available USB Devices list, select the drive that you want to approve. 4. Click Add. 5. Select the Allow only approved devices check box. 6. Click Apply. Your change takes effect.
R6250 Smart WiFi Router The blue, USB 3.0 port on the front of the router performs faster than the USB 2.0 port on the rear panel of the router. 2. Download ReadySHARE Vault from www.netgear.com/readyshare and install it on each Windows computer. 3. Launch ReadySHARE Vault. 4. Use the dashboard or the Backup tab to set up and run your backup jobs.
R6250 Smart WiFi Router USB Storage 55
6. 6 Share a USB Printer The ReadySHARE Printer utility lets you share a USB printer that is connected to the USB port on your router. You can share this USB printer among the Windows and Mac computers on your network.
R6250 Smart WiFi Router Install the Printer Driver and Cable the Printer Some USB printer manufacturers (for example, HP and Lexmark) request that you do not connect the USB cable until the installation software prompts you to do so. To install the driver and cable the printer: 1. On each computer on your network that shares the USB printer, install the driver software for the USB printer. If you cannot find the printer driver, contact the printer manufacturer. 2.
R6250 Smart WiFi Router To install the utility: 1. If necessary, unzip the ReadySHARE Printer utility setup file. 2. Double-click the ReadySHARE Printer utility setup file that you downloaded. 3. Follow the wizard instructions to install NETGEAR USB Control Center.
R6250 Smart WiFi Router 4. Select a language from the list and click the OK button. Some firewall software, such as Comodo, blocks NETGEAR USB Control Center from accessing the USB printer. If you do not see the USB printer displayed in the screen, you can disable the firewall temporarily to allow the utility to work. 5. Select the printer and click the Connect button. The printer status changes to Manually connected by Mycomputer. Now, only your computer that can use the printer. 6.
R6250 Smart WiFi Router To print and release the printer to any computer on the network: 1. To print your document, use the print feature in your application. The NETGEAR USB Control Center automatically connects your computer to the USB printer and prints the document. If another computer is already connected to the printer, your print job goes into a queue to wait to be printed. 2. If your document does not print, use the NETGEAR USB Control Center to check the status.
R6250 Smart WiFi Router The printer status changes to Manually connected by Mycomputer. Now, only your computer can use the printer. b. To allow the printer to be shared, click the Disconnect button. The printer is released from the connection and the status changes to Available. Use the Scan Feature of a Multifunction USB Printer If your USB printer supports scanning, you can also use the USB printer for scanning.
R6250 Smart WiFi Router To use the scan feature of a multifunction USB printer: 1. Click the NETGEAR USB Control Center icon . 2. Make sure that the printer status shows as Available. 3. Click the Network Scanner button. The scanner screen displays so that you can use the USB printer for scanning. Change NETGEAR USB Control Center Settings You can stop the NETGEAR USB Control Center from starting automatically when you log in to Windows.
R6250 Smart WiFi Router To turn off automatic NETGEAR USB Control Center startup: 1. Click the NETGEAR USB Control Center icon . 2. Select Tools > Configuration. 3. Clear the Automatically execute when logging on Windows check box. 4. Click the OK button. Your change is saved. To change the language: 1. Select Tools > Configuration. 2. In the Language list, select a language. 3. Click the OK button.
R6250 Smart WiFi Router The next time NETGEAR USB Control Center starts, the language changes. To specify the time-out: 1. Select Tools > Configuration. 2. In the Timeout field, type the number of minutes. The time-out is the number of minutes that a computer holds its connection to the printer when the connection isn’t being used. 3. Click the OK button. Your change is saved.
7. Security Cu sto mize t he Firewa ll S e tti ng s 7 This chapter explains how to use the basic firewall features of the router to prevent objectionable content from reaching the computers and devices on your network.
R6250 Smart WiFi Router Set Up Parental Controls The first time that you select Parental Controls from the BASIC Home screen, your browser goes to the Parental Controls website, where you can learn more about Parental Controls. To set up Parental Controls, you must download the genie app. To set up Live Parental Controls: 1. Launch a web browser from a computer or wireless device that is connected to the network. 2. Type http://www.routerlogin.net or http://www.routerlogin.com. A login screen displays.
R6250 Smart WiFi Router Because Live Parental Controls uses free OpenDNS accounts, you are prompted to log in or create a free account. 9. Select the radio button that applies to you: • If you already created an OpenDNS account, leave the Yes radio button selected. • If you did not yet create an OpenDNS account, select the No radio button. If you are creating an account, the following screen displays: a. Complete the fields. b. Click the Next button.
R6250 Smart WiFi Router After you log on or create your account, the filtering level screen displays: 10. Select a radio button for a filtering level that you want and click the Next button.
R6250 Smart WiFi Router 11. Click the Take me to the status screen button. Parental Controls are now set up for the router. 12. To enable Parental Controls, click the Enable Live Parental Controls button. Keyword Blocking of HTTP Traffic Use keyword blocking to prevent certain types of HTTP traffic from accessing your network. The blocking can be always or according to a schedule. To set up keyword blocking: 1. Select Advanced > Security > Block Sites.
R6250 Smart WiFi Router 2. Select one of the keyword blocking options: • Per Schedule. Turn on keyword blocking according to the Schedule screen settings. • Always. Turn on keyword blocking all the time, independent of the Schedule screen. 3. In the Keyword field, enter a keyword or domain, click Add Keyword, and click Apply. The Keyword list supports up to 32 entries. Here are some sample entries: • Specify XXX to block http://www.badstuff.com/xxx.html. • Specify .
R6250 Smart WiFi Router The Block Services screen lets you add and block specific Internet services by computers on your network. This is called service blocking or port filtering. To add a service for blocking, first determine which port number or range of numbers the application uses. To block services: 1. Select Advanced > Security > Block Services. 2. Select either Per Schedule or Always. 3. If you selected Per Schedule, specify a time period in the Schedule screen. 4. Click Add to add a service.
R6250 Smart WiFi Router 8. Select the radio button for the IP address configuration you want to block, and enter the IP addresses. You can block the specified service for a single computer, a range of computers with consecutive IP addresses, or all computers on your network. 9. Click Add. Your changes are saved. Port Triggering to Open Incoming Ports Some application servers (such as FTP and IRC servers) send replies to multiple port numbers.
R6250 Smart WiFi Router 8. When you finish your chat session, your router eventually senses a period of inactivity in the communications. The router then removes the session information from its session table, and incoming traffic is no longer accepted on port numbers 33333 or 113. To configure port triggering, you need to know which inbound ports the application needs. Also, you need to know the number of the outbound port that triggers the opening of the inbound ports.
R6250 Smart WiFi Router 4. Your router performs Network Address Translation (NAT) on the source IP address, and sends this request message through the Internet to the remote computer, which displays the web page from www.example.com. To configure port forwarding, you need to know which inbound ports the application needs. You can usually find this information by contacting the publisher of the application or the relevant user groups or news groups.
R6250 Smart WiFi Router To forward specific incoming protocols: 1. Select Advanced > Advanced Setup > Port Forwarding/Port Triggering. 2. Leave the Port Forwarding radio button selected as the service type. 3. In the Service Name list, select the service name. If the service is not in the list, see Add a Custom Service on page 75 4. Fill in the Server IP Address field 5. Click Add. The list now includes the service.
R6250 Smart WiFi Router 3. Click the Add Custom Service button. 4. In the Service Name field, enter a descriptive name. 5. In the Service Type field, select the protocol. If you are unsure, select TCP/UDP. 6. In the Eternal Starting Port field, enter the beginning port number. • If the application uses a single port, enter the same port number in the Ending Port field. • If the application uses a range of ports, enter the ending port number of the range in the External Ending Port field. 7.
R6250 Smart WiFi Router 2. In the Port Forwarding/Port Triggering screen, configure the router to forward the HTTP service to the local address of your web server at 192.168.1.33. HTTP (port 80) is the standard protocol for web servers. 3. (Optional) Register a host name with a Dynamic DNS service, and configure your router to use the name. To access your web server from the Internet, a remote user has to know the IP address that your ISP assigned.
R6250 Smart WiFi Router 2. Select the Port Triggering radio button. 3. Clear the Disable Port Triggering check box. Note: If the Disable Port Triggering check box is selected after you configure port triggering, port triggering is disabled. However, any port triggering configuration information you added to the router is retained even though it is not used. 4. In the Port Triggering Timeout field, enter a value up to 9999 minutes. This value controls the inactivity timer for the designated inbound ports.
R6250 Smart WiFi Router • Single address restricts the service to a particular computer. 4. Select the service type, either TCP or UDP or both (TCP/UDP). If you are not sure, select TCP/UDP. 5. In the Triggering Port field, enter the number of the outbound traffic port to open the ause the inbound ports to be opened. 6. Enter the inbound connection port information in the Connection Type, Starting Port, and Ending Port fields. 7. Click Apply. The service is added in to the Portmap Table. 8.
R6250 Smart WiFi Router 3. Select your time zone from the list. If you use daylight savings time, select the Automatically adjust for daylight savings time check box. 4. Click Apply. Your settings are saved. Security Event Email Notifications To receive logs and alerts by email, provide your email information in the E-mail screen, and specify which alerts you want to receive and how often. To set up email notifications: 1. Select Advanced > Security > E-mail. 2.
R6250 Smart WiFi Router 7. (Optional) Fill in the fields in the Send logs according to this schedule section of the screen. Logs are sent automatically. If the log fills up before the specified time, the log is emailed. After the log is sent, the log is cleared from the router memory. If the router cannot email the log file, the log buffer might fill up. In this case, the router overwrites the log and discards its contents. 8. Click Apply. Your settings are saved.
8. 8 Administration Man age your net work This chapter describes the router settings for administering and maintaining your router and home network. This chapter includes the following sections: • Upgrade the Router Firmware • View Router Status • View Logs of Web Access or Attempted Web Access • Manage the Configuration File • Change the Password • Password Recovery For information about upgrading or checking the status of your router over the Internet, see Remote Management on page 106.
R6250 Smart WiFi Router Upgrade the Router Firmware The router firmware (routing software) is stored in flash memory. You can update the firmware from the Administration menu on the Advanced tab. You might see a message at the top of the genie screens when new firmware is available for your product. You can use the Check button on the Router Update screen to check if new firmware is available, and to update your product. To check for new firmware and update your router: 1.
R6250 Smart WiFi Router View Router Status To view router status and usage information: Select Advanced Home or select Administration > Router Status. Router Information Hardware Version. The router model. Firmware Version. The version of the router firmware. It changes if you upgrade the router firmware. GUI Language Version. The localized language of the user interface. LAN Port. • MAC Address. The Media Access Control address.
R6250 Smart WiFi Router Connection. This shows if the router is using a fixed IP address on the WAN. If the value is DHCP Client, the router obtains an IP address dynamically from the ISP. IP Subnet Mask. The IP subnet mask used by the Internet (WAN) port of the router. Domain Name Server. The Domain Name Server addresses used by the router. A Domain Name Server translates human-language URLs such as www.netgear.com into IP addresses. Show Statistics Button To view statistics: 1.
R6250 Smart WiFi Router Connection Status Button To view the Internet connection status: 1. Select Advanced Home or select Administration > Router Status. 2. In the Internet Connection pane, click the Connection Status button. The following information displays: • IP Address. The IP address that is assigned to the router. • Subnet Mask. The subnet mask that is assigned to the router. • Default Gateway. The IP address for the default gateway that the router communicates with. • DHCP Server.
R6250 Smart WiFi Router Wireless Settings (2.4 GHz and 5 GHz) The following settings are displayed: Name (SSID). The wireless network name (SSID) that the router uses. Region. The geographic region where the router is being used. It might be illegal to use the wireless features of the router in some parts of the world. Channel. The operating channel of the wireless port being used. The default channel is Auto. When Auto is selected, the router finds the best operating channel available.
R6250 Smart WiFi Router To view logs: Select Advanced > Administration > Logs. The log screen shows the following information: • Date and time. The date and time the log entry was recorded. • Source IP. The IP address of the initiating device for this log entry. • Target address. The name or IP address of the website or news group visited or to which access was attempted. • Action. Whether the access was blocked or allowed. To refresh the log screen, click the Refresh button.
R6250 Smart WiFi Router Back Up Settings To back up the router’s configuration settings: 1. Select Advanced > Administration > Backup Settings. 2. Click Backup Settings. A copy of the current settings is saved. 3. Choose a location to store the .cfg file that is on a computer on your network. Restore Configuration Settings To restore configuration settings that you backed up: 1. Click the Browse button to find the cfg file. 2. Click the Restore button.
R6250 Smart WiFi Router Change the Password This feature let you change the default password that is used to log in to the router with the user name admin. This is not the same as changing the password for wireless access. The label on the bottom of your router shows your unique wireless network name (SSID) and password for wireless access (see Label on page 11). To set the password for the user name admin: 1. Select Advanced > Administration > Set Password. 2.
R6250 Smart WiFi Router To recover your password: 1. In the address field of your browser, type www.routerlogin.net. A login screen displays. 2. Click the Cancel button. If password recovery is enabled, you are prompted to enter the serial number of the router. The serial number is on the product label. 3. Enter the serial number of the router. 4. Click the Continue button. A screen displays requesting the answers to your security questions. 5. Enter the saved answers to your security questions. 6.
9. Advanced Settings Settin g up unique sit u ati o ns 9 This chapter describes the advanced features of your router. Networking knowledge is needed to implement some of these features. This chapter includes the following sections: • Advanced Wireless Settings • Wireless Access Point (AP) • Dynamic DNS • Static Routes • Remote Management • Universal Plug and Play • IPv6 • Traffic Meter For information about the Approve USB feature, see Specify Approved USB Devices on page 52.
R6250 Smart WiFi Router Advanced Wireless Settings You can use this screen to turn the wireless radio on and off, to specify WPS settings, to use AP mode, and to set up a wireless access list. The Fragmentation Length, CTS/RTS Threshold, and Preamble Mode options in this screen are reserved for wireless testing and advanced configuration only. Do not change these settings unless you have a specific reason to do so.
R6250 Smart WiFi Router 2. Select or clear the Enable Wireless Router Radio check box. Clearing this check box turns off the WiFi feature of the wireless router. 3. (Optional) Select the Turn off wireless signal by schedule check box and fill in the fields to specify the times when you do not need a wireless connection. For example, you could turn off the wireless signal for the weekend if you leave town. 4. Click Apply. Your changes take effect.
R6250 Smart WiFi Router Set up the Router in Bridge Mode You can set up your R6250 Smart WiFi Router to run in Bridge mode. This mode lets you connect multiple devices wirelessly at the faster 802.11ac speed. To use the router in Bridge mode, you need two WiFi Routers: one set up as a router and the other set up as a bridge. R6300 Smart WiFi Router R6250 Smart WiFi Router in Bridge mode Figure 6. Router in Bridge mode with an 802.
R6250 Smart WiFi Router 3. Scroll down and select the Use other operation mode check box and the Enable Bridge mode radio button. The screen adjusts. 4. Click the setup bridge mode wireless settings button. 5. Specify the settings of the other router to which this router will connect. a. Select the wireless network frequency (2.4 GHz or 5 GHz). For 802.11ac mode, select 5 GHz. b. In the Name (SSID) field, enter the wireless network name (SSID). c. In the Security Option section, select a radio button. d.
R6250 Smart WiFi Router View or Change WPS Settings To specify WPS Settings: 1. Select Advanced > Advanced Setup > Wireless Settings. The Router’s PIN field displays the PIN that you use on a registrar (for example, from the Network Explorer on a Vista Windows computer) to configure the router’s wireless settings through WPS. 2. (Optional) Select or clear the Disable Router’s PIN check box.
R6250 Smart WiFi Router 3. Click Add. The Wireless Card Access Setup screen opens and displays a list of currently active wireless cards and their Ethernet MAC addresses. 4. If the computer or device you want is in the Available Wireless Cards list, select that radio button; otherwise, type a name and the MAC address. You can usually find the MAC address on the bottom of the wireless device.
R6250 Smart WiFi Router Wireless Access Point (AP) You can set up the router to run as an access point (AP) on the same local network as another router. To set up the router as an AP: 1. Use an Ethernet cable to connect the Internet port of this router to a LAN port in the other router. Cable this port to a LAN port on the other router 2. Select Advanced > Advanced Setup > Wireless AP. 3. Select the Enable Access Point Mode check box. The AP Mode section of the screen expands. 4.
R6250 Smart WiFi Router • Get an IP address dynamically from the other router. The other router on the network assigns an IP address to this router while this router is in AP mode. • Fixed IP address (not recommended). Use this setting if you want to manually assign a specific IP address to this router while it is in AP mode. Using this option effectively requires advanced network experience.
R6250 Smart WiFi Router The BASIC Home screen displays. 4. Select ADVANCED > Advanced Setup > Dynamic DNS. 5. Select the Use a Dynamic DNS Service check box. 6. In the Service Provider list, select NETGEAR. 7. Select the No radio button. 8. In the Host Name field, type the name that you want to use for your URL. The host name is sometimes called the domain name. Your free URL includes the host name that you specify, and ends with mynetgear.com. For example, specify MyName.mynetgear.com. 9.
R6250 Smart WiFi Router A login screen displays. 3. Enter the router user name and password. The user name is admin. The default password is password. The user name and password are case-sensitive. The BASIC Home screen displays. 4. Select ADVANCED > Advanced Setup > Dynamic DNS. 5. Select the Use a Dynamic DNS Service check box. 6. In the Service Provider list, select one of the following: • NETGEAR • NoIP.com • www.DynDNS.org 7. Select the Yes radio button.
R6250 Smart WiFi Router The screen adjusts and displays the Show Status, Cancel, and Apply buttons. 8. In the Host Name field, type the host name (sometimes called the domain name) for your account. 9. For a www.NoIP or www.DynDNS account, in the User Name field, enter the user name for your account. 10. For a NETGEAR account at www.no-ip, in the Email field, type the email address for your account. 11. In the Password (6-32 characters) field, type the password for your DDNS account. 12.
R6250 Smart WiFi Router 4. Select ADVANCED > Advanced Setup > Dynamic DNS. 5. Change your DDNS account settings as necessary. 6. Click the Apply button. Your changes are saved. Static Routes Static routes provide more routing information to your router. Typically, you do not need to add static routes. You have to configure static routes only for unusual cases such as multiple routers or multiple IP subnets on your network.
R6250 Smart WiFi Router 2. Click Add. 3. In the Route Name field, type a name for this static route (for identification purposes only.) 4. Select the Private check box if you want to limit access to the LAN only. If Private is selected, the static route is not reported in RIP. 5. Select the Active check box to make this route effective. 6. Type the IP address of the final destination. 7. Type the IP subnet mask for this destination. If the destination is a single host, type 255.255.255.255. 8.
R6250 Smart WiFi Router Remote Management The remote management feature lets you access your router over the Internet to view or change its settings. Note: Be sure to change the router default login password to a secure password. The ideal password contains no dictionary words from any language and contains uppercase and lowercase letters, numbers, and symbols. It can be up to 30 characters. See Change the Password on page 90. To set up remote management: 1.
R6250 Smart WiFi Router Normal web browser access uses the standard HTTP service port 80. For greater security, enter a custom port number for the remote web management interface. Choose a number from 1024 to 65535, but do not use the number of any common service port. The default is 8080, which is a common alternate for HTTP. 5. Click the Apply button. Your changes take effect. 6.
R6250 Smart WiFi Router network traffic. Longer durations can compromise the freshness of the device status, but can significantly reduce network traffic. 4. Type the advertisement time to live in hops. The time to live for the advertisement is measured in hops (steps) for each UPnP packet sent. The time to live hop count is the number of steps a broadcast packet is allowed to propagate for each UPnP advertisement before it disappears. The number of hops can range from 1 to 255.
R6250 Smart WiFi Router 3. Click the Apply button. Your changes take effect. Requirements for Entering IPv6 Addresses IPv6 addresses are denoted by eight groups of hexadecimal quartets that are separated by colons. Any four-digit group of zeroes within an IPv6 address can be reduced to a single zero or altogether omitted.
R6250 Smart WiFi Router which is also indicated by the underline (_) under the IPv6 address. If no address is acquired, the field displays Not Available. 3. Specify how the router assigns IPv6 addresses to the devices on your home network (the LAN) by selecting one of the following radio buttons: • Use DHCP Server. This method passes more information to LAN devices, but some IPv6 systems might not support the DHCv6 client function. • Auto Config. This is the default setting. 4.
R6250 Smart WiFi Router which is also indicated by the underline (_) under the IPv6 address. If no address is acquired, the field displays Not Available. 3. (Optional) In the DHCP User Class (If Required) field, enter a host name. Most people do not need to fill in this field, but if your ISP has given you a specific host name, enter it here. 4. (Optional) In the Domain Name (If Required) field, enter a domain name. You can type the domain name of your IPv6 ISP.
R6250 Smart WiFi Router The screen adjusts: The router automatically detects the information in the following fields: • Router’s IPv6 Address on WAN. This field shows the IPv6 address that is acquired for the router’s WAN (or Internet) interface. The number after the slash (/) is the length of the prefix, which is also indicated by the underline (_) under the IPv6 address. If no address is acquired, the field displays Not Available. • Router’s IPv6 Address on LAN.
R6250 Smart WiFi Router IPv6 Pass Through In pass-through mode, the router works as a Layer 2 Ethernet switch with two ports (LAN and WAN Ethernet ports) for IPv6 packets. The router does not process any IPv6 header packets. To set up a pass-through IPv6 Internet connection: 1. Select Advanced > Advanced Setup > IPv6. The IPv6 screen displays. 2. In the Internet Connection Type list, select Pass Through. The screen adjusts, but no additional fields display. 3. Click the Apply button.
R6250 Smart WiFi Router • Default IPv6 Gateway. The IPv6 address of the default IPv6 gateway, which is supposed to be on the router’s WAN interface. • Primary DNS Server. The primary DNS server that resolves IPv6 domain name records for the router. • Secondary DNS Server. The secondary DNS server that resolves IPv6 domain name records for the router.
R6250 Smart WiFi Router The router automatically detects the information in the following fields: • Router’s IPv6 Address on WAN. This field shows the IPv6 address that is acquired for the router’s WAN (or Internet) interface. The number after the slash (/) is the length of the prefix, which is also indicated by the underline (_) under the IPv6 address. If no address is acquired, the field displays Not Available. • Router’s IPv6 Address on LAN.
R6250 Smart WiFi Router The screen adjusts: The router automatically detects the information in the following fields: • Router’s IPv6 Address on WAN. This field shows the IPv6 address that is acquired for the router’s WAN (or Internet) interface. The number after the slash (/) is the length of the prefix, which is also indicated by the underline (_) under the IPv6 address. If no address is acquired, the field displays Not Available. • Router’s IPv6 Address on LAN.
R6250 Smart WiFi Router • Use DHCP Server. This method passes more information to LAN devices, but some IPv6 systems might not support the DHCv6 client function. • Auto Config. This is the default setting. 7. (Optional) Select the Use This Interface ID check box, and specify the interface ID that you want to be used for the IPv6 address of the router’s LAN interface. If you do not specify an ID here, the router generates one automatically from its MAC address. 8. Click the Apply button.
R6250 Smart WiFi Router • - Download only. The restriction is applied to incoming traffic only. - Both Directions. The restriction is applied to both incoming and outgoing traffic. Select the Connection time control radio button and enter the allowed hours in the Monthly limit field. 4. (Optional) If your ISP charges an amount of extra data volume when you make a new connection, enter the extra data volume in MB in the Round up data volume for each connection by field. 5.
10. 10 Troubleshooting This chapter provides information to help you diagnose and solve problems you might have with your router. If you do not find the solution here, check the NETGEAR support site at http://support.netgear.com for product and contact information.
R6250 Smart WiFi Router Quick Tips This section describes tips for troubleshooting some common problems. Sequence to Restart Your Network When you need to restart your network, follow this sequence: 1. Turn off and unplug the modem. 2. Turn off the router. 3. Plug in the modem and turn it on. Wait 2 minutes. 4. Turn on the router and wait 2 minutes. Check Ethernet Cable Connections If your device does not power on, make sure that the Ethernet cables are securely plugged in.
R6250 Smart WiFi Router Troubleshoot with the LEDs After you turn on power to the router, the following sequence of events should occur: 1. When power is first applied, verify that the Power/Test LED is lit. 2. Verify that the Power LED lights amber within a few seconds, indicating that the self-test is running. 3. After approximately 30 seconds, verify the following: • The Powert LED lights solid green. • The Internet LED is lit.
R6250 Smart WiFi Router LEDs Never Turn Off When the router is turned on, the LEDs turn on for about 10 seconds and then turn off. If all the LEDs stay on, there is a fault within the router. If all LEDs are still on 1 minute after power-up: • Cycle the power to see if the router recovers. • Press and hold the Reset button to return the router to its factory settings. For more information, see Troubleshoot Your Network Using the Ping Utility on page 126.
R6250 Smart WiFi Router this range, check the connection from the computer to the router, and reboot your computer. • If your router’s IP address was changed and you do not know the current IP address, clear the router’s configuration to factory defaults. This sets the router’s IP address to 192.168.1.1. For more information, see Factory Settings on page 129. • Make sure that your browser has Java, JavaScript, or ActiveX enabled.
R6250 Smart WiFi Router • Your ISP might check for your computer’s host name. Assign the computer host name of your ISP account as the account name in the Internet Setup screen. • Your ISP allows only one Ethernet MAC address to connect to Internet and might check for your computer’s MAC address. In this case, do one of the following: - Inform your ISP that you have bought a new network device, and ask them to use the router’s MAC address. - Configure your router to clone your computer’s MAC address.
R6250 Smart WiFi Router Troubleshoot Internet Browsing If your router can obtain an IP address but your computer is unable to load any web pages from the Internet, check the following: • Your computer might not recognize any DNS server addresses. A DNS server is a host on the Internet that translates Internet names (such as www addresses) to numeric IP addresses. Typically, your ISP provides the addresses of one or two DNS servers for your use.
R6250 Smart WiFi Router • If you want to view the wireless settings for the router, use an Ethernet cable to connect a computer to a LAN port on the router. Then log in to the router, and select Wireless see (Basic Wireless Settings on page 22). Note: Be sure to click Apply if you change settings.
R6250 Smart WiFi Router For a wired connection, make sure that the numbered LAN port LED is lit for the port to which you are connected. Check that the appropriate LEDs are on for your network devices. If your router and computer are connected to a separate Ethernet switch, make sure that the link LEDs are lit for the switch ports that are connected to your computer and router.
A.
R6250 Smart WiFi Router Factory Settings You can return the router to its factory settings. Use the end of a paper clip or a similar object to press and hold the Reset button on the back of the router for at least 7 seconds. The router resets, and returns to the factory configuration settings shown in the following table. Table 3. Factory default settings Feature Router login Internet connection Local network (LAN) Default behavior User login URL www.routerlogin.com or www.routerlogin.
R6250 Smart WiFi Router Table 3. Factory default settings (continued) Feature Wireless Firewall Default behavior Wireless communication Enabled SSID name See router label Security WPA2-PSK (AES) Broadcast SSID Enabled Transmission speed Auto* Country/region United States in the US; otherwise varies by region RF channel 6 until region selected Operating mode Up to 145 Mbps at 2.
R6250 Smart WiFi Router Technical Specifications Table 4. R6250 Router specifications Feature Description Data and routing protocols TCP/IP, RIP-1, RIP-2, DHCP, PPPoE, PPTP, Bigpond, Dynamic DNS, UPnP, and SMB Power adapter • • • • Dimensions Dimensions: 195 x 199 x 65 mm (7.68 x 7.84 x 2.56 in) Weight Weight: 417 (0.
R6250 Smart WiFi Router Table 4. R6250 Router specifications (continued) Feature Description Operating frequency range 2.4 GHz 2.412–2.462 GHz (US) 2.412–2.472 GHz (Japan) 2.412–2.472 GHz (Europe ETSI) 5 GHz 5.18–5.24 + 5.745–5.825 GHz (US) 5.18–5.24 GHz (Europe ETSI) FCC: 5.25–5.35 GHz (DFS band) 5.47–5.725 GHz (DFS band) 5600–5650 MHz is disabled and unavailable for use CE (Europe ETSI): 5.25–5.35 GHz (DFS band) 5.47–5.725 GHz (DFS band) 802.
AC1 WiFi Cable Modem Router Model C6250 NETGEAR®
package c onten The b o x c ontains t h ts e followin g items Etherne Modem router t cab\e power a dapter
You can use this diagram to connect your modem router or follow the detailed instructions in this booklet. 3. Connect a computer or WiFi device to the modem router. 1. Connect a coaxial cable. Use a coaxial cable that is provided by your cable company to connect the cable port on the modem router to a cable wall outlet or a line splitter. To connect with WiFi, use the WiFi network name (SSID) and network key (password) on the product label.
Contents LEOs ................................................................................................................................ 2 Install Your Modem Router ....................................................................................... 4 Set Up Your Internet Service ................................................................................... 6 WiFi Network Name and Password ......................................................................... 8 Join the WiFI Network .......
LEOS \he L EOs on t h e modern r o u act\v\t~r ter light t o indicate m odern r o u t Wif\ onJ er Off butto WPS b u t ton Downstr e a m LED Upstrea m LED \nternet LED 2 .
LED Description Power • Solid green. Power is supplied to the modem router. • Off. No power is supplied to the modem router. • Solid red . Thermal cutoff mode. Power off the modem router, let it cool, and move it away from heat sources (such as a TV, DVD player, or speakers) and keep it vertical in open air. Downstream • Solid amber. One downstream channel is locked. • Blinking amber. The modem router is scanning for a downstream channel. • Solid green. Two or more downstream channels are locked.
LED Description 5 GHz WiFi • Solid green. The 5 GHz radio is on. • Blinking green. The 5 GHz radio is transmitting or receiving data. • Blinking amber. WPS (Wi-Fi Protected Setup) is active. • Off. The 5 GHz radio is off. Ethernet • Solid green. A device is connected to an Ethernet port and powered on. Each Ethernet port provides two port LEDs on the back panel. • Blinking green. An Ethernet port is transmitting or receiving data. • Off. No device is connected to an Ethernet port.
3. Connect the power adapter to the modem router and plug the _ power adapter into an electrical outlet. Wait for the Online LED to light solid green ·~ , which might take up to 1 0 minutes. 4. Connect a computer or Wi Fi device to the modem router. 111 To connect with WiFi, use the WiFi network name (SSID) and network key (password) on the product label. For a wired connection, use an Ethernet cable to connect a computer to a yellow Ethernet port on the modem router. 5. 6.
7. When prompted, enter ad min for the user name and password for the password. 8 . Set up your Internet service. For more information, see Set Up Your Internet Service~~ on page 6 . II Set Up Your Internet Service Set up Internet service by using Comcast Xiinity's self-activation process. If you are unable to self-activate your modem router, call Comcast Xfinity customer service.
Call Comcast Xfinity to Set Up Your Internet Connection If you are unable to self-activate your modem router, call Comcast Xfinity customer service. Before you call Comcast Xfinity, make sure that your account number, account phone number, email address, and password are nearby. The modem router's model number is C6250. The serial number and MAC address are on the product label. ~ To set up your Internet connection by calling Comcast Xflnity: 1.
If the modem router is visible to the Com cast Xfmity representative, reboot the modem router. Check your online status again. WiFi Network Name and Network Key The preset WiFi network name (SSID) and network key (password) are unique to your modem router, like a serial number. Because the modem router automatically uses WiFi security, you do not need to set it up. The WiFi settings are on the product label.
Join the WiFi Networ k You can either use Wi-Fi Protected Setup (WPS) or select your WiFi network and type its password. For help with the WPS button on your computer or WiFi device, check the instructions or online help that came with that computer or device. );> To select your network and enter its password: 1. Open the software utility that manages your WiFi connections on the computer or WiFi device that you want to connect to your modem router. This utility scans for WiFi networks in your area. 2.
View or Change the Modem Router Settings After you use genie to set up the modem router, you can log in to the modem router to view or change its settings. Log In to the Modem Router );;;> To log in to the modem router: 1 . Connect a computer or WiFi device to the modem router. You can use an Ethernet cable or connect with WiFi: For a wired connection, use an Ethernet cable to connect your computer to a yellow Ethernet port on your modem router. To connect with WiFi, select and join your WiFi network. 2.
3. Enter admin for the user name and password for the password. The BASIC Home screen displays. 4. Select ADVANCED >Administration > Set Password . 5. Type your old password and type the new password twice. 6. Click the Apply button. Your changes are saved. Share a USB Drive on the Network ReadySHARE lets you access and share a USB drive connected to the modem router USB port . (If your USB drive uses special drivers, it is not compatible.) );> To access the USB drive from a Windows computer: 1.
When you connect the USB drive to the modem router USB port, it might take up to two minutes before the modem router is ready for sharing. By default, the USB drive is available to all computers on your local area network (LAN). 2. Select Start > Run . 3. Enter \ \readyshare in the dialog box. 4. Click the OK button. :,. To access the USB drive from a Mac: 1. Insert your USB storage drive into the USB port on the modem router.
Share a USB Printer You can connect a USB printer to a USB port on the modem router and print wirelessly. ~ To set up ReadySHARE Printer: 1. Connect the USB printer to a USB port on the modem router with a USB printer cable. 2. On each computer that will share the printer, do the following: a. b. c. 3. Install the current USB printer driver software (available from the printer manufacturer). Download the NETGEAR USB Control Center utility from www.netgeor.com/reodyshore and install it.
NETGEAR genie App The free NETGEAR genie app lets you easily monitor, connect, and control your home network from a Windows or Mac computer, tablet, or smartphone. You can share and stream music or videos, diagnose and repair network issues, set up parental controls, and more: Access your modem router and change its settings or diagnose and repair network issues. Make a printer AirPrint compatible so that you can print from an iPad or iPhone. • Use My Media to find and play media files in your network.
Support Thank you for purchasing this NETGEAR product. After installing your device, locate the serial number on the label of your product and use it to register your product at https.//my.netgear.com. You must register your product before you can use NETGEAR telephone support. NETGEAR recommends registering your product through the NETGEAR website. For product updates and web support, visit http:/jsupport.netgear.com. NETGEAR recommends that you use only the official NETGEAR support resources.
$& 6PDUW :L)L 5RXWHU 0RGHO 5 ,QVWDOODWLRQ *XLGH
3DFNDJH &RQWHQWV 7KH ER[ FRQWDLQV WKH IROORZLQJ LWHPV ,I DQ\ LWHPV DUH LQFRUUHFW PLVVLQJ RU GDPDJHG FRQWDFW \RXU 1(7*($5 GHDOHU (WKHUQHW FDEOH 5 :L)L 5RXWHU 3RZHU DGDSWHU ,Q VRPH UHJLRQV D UHVRXUFH &' LV LQFOXGHG LQ WKH SDFNDJH
3UHSDUH \RXU PRGHP 8QSOXJ \RXU PRGHP ,I LW KDV D EDWWHU\ EDFNXS UHPRYH WKH EDWWHU\ &RQQHFW \RXU PRGHP 3OXJ LQ \RXU PRGHP 3XW WKH EDWWHU\ EDFN LQ 7KHQ FDEOH WKH PRGHP WR WKH URXWHU ,QWHUQHW SRUW ,QWHUQHW 3RZHU RQ WKH URXWHU :DLW IRU WKH :L)L /(' WR OLJKW &RQQHFW D FRPSXWHU
6XSSRUW 7KDQN \RX IRU SXUFKDVLQJ WKLV 1(7*($5 SURGXFW $IWHU LQVWDOOLQJ \RXU GHYLFH ORFDWH WKH VHULDO QXPEHU RQ WKH ODEHO RI \RXU SURGXFW DQG XVH LW WR UHJLVWHU \RXU SURGXFW DW https://my.netgear.com
&RQWHQWV ,QVWDOO
,QVWDOO
&RQQHFW \RXU PRGHP 5RXWHU 0RGHP D 3OXJ LQ WKHQ WXUQ RQ \RXU PRGHP 5HSODFH WKH EDWWHULHV LI \RX UHPRYHG WKHP SUHYLRXVO\ E :LWK WKH \HOORZ (WKHUQHW FDEOH WKDW FDPH ZLWK WKH URXWHU FRQQHFW \RXU PRGHP WR WKH ,QWHUQHW SRUW RI \RXU URXWHU 3
$GG SRZHU WR WKH URXWHU 2Q 2II D &RQQHFW WKH SRZHU DGDSWHU WR WKH URXWHU DQG SOXJ WKH SRZHU DGDSWHU LQWR DQ RXWOHW E :DLW IRU WKH :L)L /(' RQ WKH IURQW SDQHO WR OLJKW ,I QR /('V DUH OLW SUHVV WKH 3RZHU 2Q 2II EXWWRQ RQ WKH UHDU SDQHO RI WKH URXWHU 4
&RQQHFW D FRPSXWHU
,I 1(7*($5 JHQLH VWLOO GRHV QRW GLVSOD\ WU\ WKH IROORZLQJ 0DNH VXUH WKDW WKH FRPSXWHU LV FRQQHFWHG WR RQH RI WKH IRXU /$1 (WKHUQHW SRUWV RU ZLUHOHVVO\ WR WKH URXWHU 0DNH VXUH WKDW WKH URXWHU KDV IXOO SRZHU DQG WKDW LWV 3RZHU /(' LV OLW 7R PDNH VXUH WKDW WKH EURZVHU GRHV QRW FDFKH WKH SUHYLRXV SDJH FORVH DQG UHRSHQ WKH EURZVHU 7KHQ W\SH ZZZ URXWHUORJLQ QHW ,I WKH FRPSXWHU LV VHW WR D VWDWLF RU IL[HG ,3 DGGUHVV WKLV FRQGLWLRQ LV XQFRPPRQ FKDQJH LW WR REWDLQ DQ ,3 DGGUHVV DXWRPDWLFDOO\
1(7*($5 UHFRPPHQGV WKDW \RX GR QRW FKDQJH WKH SUHVHW :L)L 66,' RU SDVVZRUG ,I \RX GR FKDQJH WKH VHWWLQJV WKH 66,' DQG SDVVZRUG RQ WKH ODEHO QR ORQJHU DSSO\ 5HFRUG WKH SUHVHW :L)L VHWWLQJV RQ WKH ODEHO LQ WKH VSDFH KHUH IRU HDV\ UHIHUHQFH :L)L QHWZRUN QDPH 66,' 1HWZRUN NH\ SDVVZRUG ,I \RX FKDQJH WKH GHIDXOW VHWWLQJV UHFRUG WKHP KHUH IRU HDV\ UHIHUHQFH DQG VWRUH WKLV ERRNOHW LQ D VDIH SODFH :L)L QHWZRUN QDPH 66,' 1HWZRUN NH\ SDVVZRUG ¾ 7R UHWULHYH RU XSGDWH \RXU :L)L SDVVZRUG
-RLQ WKH :L)L 1HWZRUN
$FFHVV WKH 5RXWHU WR 0DNH 0RUH &KDQJHV $IWHU \RX XVH 1(7*($5 JHQLH WR VHW XS WKH URXWHU \RX FDQ ORJ LQ WR WKH URXWHU WR YLHZ RU FKDQJH LWV VHWWLQJV /RJ ,Q WR WKH 5RXWHU ¾ 7R ORJ LQ WR WKH URXWHU /DXQFK D ZHE EURZVHU IURP D FRPSXWHU RU ZLUHOHVV GHYLFH WKDW LV FRQQHFWHG WR WKH URXWHU 7\SH ZZZ URXWHUORJLQ QHW RU ZZZ URXWHUORJLQ FRP LQ WKH DGGUHVV ILHOG RI WKH EURZVHU $ ORJLQ VFUHHQ GLVSOD\V (QWHU DGPLQ IRU WKH XVHU QDPH DQG SDVVZRUG IRU WKH SDVVZRUG 7KH %$6,& +RPH VFUHHQ GLVSOD\V &
6HOHFW WKH (QDEOH 3DVVZRUG 5HFRYHU\ FKHFN ER[ &OLFN WKH $SSO\ EXWWRQ :KHQ SURPSWHG DQVZHU TXHVWLRQV 7KH DQVZHUV DUH VDYHG 5HFRYHU D )RUJRWWHQ $GPLQ 3DVVZRUG 7KH GHIDXOW SDVVZRUG IRU WKH DGPLQ XVHU QDPH LV SDVVZRUG ,I \RX FKDQJHG WKH SDVVZRUG DQG XVHG WKH SDVVZRUG UHFRYHU\ IHDWXUH \RX FDQ UHWULHYH WKLV SDVVZRUG ¾ 7R UHWULHYH D IRUJRWWHQ DGPLQ SDVVZRUG /DXQFK D ZHE EURZVHU IURP D FRPSXWHU RU ZLUHOHVV GHYLFH WKDW LV FRQQHFWHG WR WKH URXWHU 7\SH ZZZ URXWHUORJLQ QHW RU ZZZ URXWH
5HDG\6+$5( $FFHVV
WKH 86% GULYH LV DYDLODEOH WR DOO FRPSXWHUV RQ \RXU ORFDO DUHD QHWZRUN /$1 6HOHFW *R ! &RQQHFW WR 6HUYHU (QWHU VPE UHDG\VKDUH DV WKH VHUYHU DGGUHVV &OLFN WKH &RQQHFW EXWWRQ 5HDG\6+$5( 9DXOW %DFNXS $SS
/DXQFK 5HDG\6+$5( 9DXOW &OLFN WKH 'DVKERDUG RU WKH %DFNXS WDE WR VHW XS DQG UXQ \RXU EDFNXS 5HDG\6+$5( 3ULQWHU ¾ 7R VHW XS 5HDG\6+$5( 3ULQWHU &RQQHFW WKH 86% SULQWHU WR WKH URXWHU 86% SRUW ZLWK D 86% SULQWHU FDEOH ,QVWDOO WKH SULQWHU GULYHU VRIWZDUH DYDLODEOH IURP WKH SULQWHU PDQXIDFWXUHU RQ HDFK FRPSXWHU WKDW ZLOO VKDUH WKH SULQWHU 9LVLW www.netgear.com/readyshare DQG GRZQORDG DQG LQVWDOO WKH 1(7*($5 86% &RQWURO &HQWHU XWLOLW\ RQ HDFK FRPSXWHU WKDW ZLOO VKDUH WKH SULQWHU
3HUVRQDO )73 6HUYHU :LWK \RXU FXVWRPL]HG IUHH 85/ \RX FDQ UHPRWHO\ DFFHVV \RXU RZQ )73 VHUYHU WKDW LV VHW XS RQ \RXU KRPH QHWZRUN ¾ 7R VHW XS )73 DQG \RXU IUHH 85/ LQ WKH URXWHU )URP WKH $'9$1&(' WDE VHOHFW 86% 6WRUDJH ! $GYDQFHG 6HWWLQJV 6HOHFW WKH )73 YLD ,QWHUQHW FKHFN ER[ &OLFN WKH $SSO\ EXWWRQ )URP WKH $'9$1&(' WDE VHOHFW $GYDQFHG 6HWWLQJV ! '\QDPLF '16 DQG VHOHFW 1(7*($5 DV WKH VHUYLFH SURYLGHU )RU PRUH LQIRUPDWLRQ DERXW WKLV IHDWXUHV VHH WKH XVHU PDQXDO DYDLODEOH RQOLQ
7UDGHPDUNV 1(7*($5 WKH 1(7*($5 ORJR DQG &RQQHFW ZLWK ,QQRYDWLRQ DUH WUDGHPDUNV DQG RU UHJLVWHUHG WUDGHPDUNV RI 1(7*($5 ,QF DQG RU LWV VXEVLGLDULHV LQ WKH 8QLWHG 6WDWHV DQG RU RWKHU FRXQWULHV ,QIRUPDWLRQ LV VXEMHFW WR FKDQJH ZLWKRXW QRWLFH 1(7*($5 ,QF $OO ULJKWV UHVHUYHG &RPSOLDQFH )RU WKH FXUUHQW (8 'HFODUDWLRQV RI &RQIRUPLW\ YLVLW http://support.netgear.com/app/answers/detail/a_id/11621/. )RU UHJXODWRU\ FRPSOLDQFH LQIRUPDWLRQ YLVLW http://www.netgear.