
Installation Guide

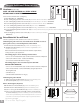

Vinyl Column Assembly & Installation
Over Wood Posts
9
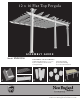
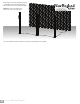
12 x 16 Flat Top Pergola
1
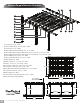
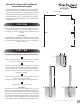
Using the vinyl weld glue, insert the One Way 4”x4” Internal
Wood Post Guide in the one end of the main column posts.
This step is only applicable if your wood 4x4 post are embedded
into the ground. If your pergola is going to be installed on
wood or concrete surface, please dispose of these three pieces.
Note: If you have purchased an optional base trim mold kit,
please slide them onto the main column bottoms.
Using a step ladder, guide the bottom vinyl columns over the
wood 4x4 posts
.
Using a step ladder guide the top vinyl columns over the
wood 4x4 posts.
Please Note:
Ensure that holes at top of column are orientated correctly for
future beam and rafter placement. See diagram at top of next page.
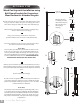
Connect the bottom and top vinyl column by using vinyl weld
and sliding together.
Please Note: Vinyl Weld Glue has about a
sixty second cure time and about a
20 minute dry time.
Slide the bottom post trim into position to cover the joint on
the column.
Slide the top post trim into approximate position just below the
bottom routed hole on the bottom of the top vinyl column assembly.
If necessary, adjust post heights accordingly to ensure future
level
installation of beams and rafters as necessary. If slope is
severe
causing a height difference between the posts, you may
need
to trim down the bottoms of your vinyl columns as
necessary.
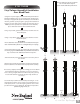
Secure the vinyl columns to the wood posts using 4 – 2 1/2“
self-auguring stainless steel screws at 8” up from the base
of the posts, and 4 – 2 1/2” self-auguring stainless steel screws
just above the trim cap as illustrated. This will prevent possible
uplift during high winds,
etc.
1
2
4
STEP THREE
5
6
7
8
2 3 4
5 6
7
Slope?
8
8“
*Ensure that holes at top of column
are orientated correctly for
future beam and rafter placement.
*
3