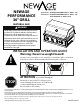
NEWAGE PERFORMANCE 36” GRILL SKU#66981 - NEWAGE PERFORMANCE 36” GRILL - NG SKU#66279 - NEWAGE PERFORMANCE 36” GRILL - NG WITH NEWAGE 36” GRILL CART (NATURAL GAS) WARNING The NewAge grill must be installed by a licensed gas fitter, in accordance with the manufacturer’s instructions and all applicable codes and requirements of the authority having jurisdiction.
DANGER Read and follow the instructions in this manual fully and completely before installing, servicing or operating the grill to reduce the risk of : 1. Fire 2. Personal injury or property damage 3. Improper installation THIS PRODUCT IS DESIGNED FOR OUTDOOR USE ONLY. Do not install or operate indoors, in a garage, in a screened in porch, gazebo, or any other enclosed area. This outdoor cooking gas appliance is not intended to be installed in or on recreational vehicles , boats or in a non-ventilated room.
WARNING CALIFORNIA PROPOSITION 65 1. This product can expose you to chemicals including Carbon Monoxide, which is a byproduct of combustion known to the State of California to cause cancer and birth defects or other reproductive harm. For more information go to www.P65Warnings.ca.gov. 2. California law requires businesses to warn customers of potential exposure to such substances.
Index Safe Operating Practices 6 Parts Supplied 11 Tools Needed 12 Product Inspection 12 Product Specifications 13 Installing Grill on NewAge Grill Cabinet 14 Installing Grill on NewAge Grill Cart 15 Installing Grill on custom built cabinet 16 Assembling the Grill 20 Optional Accessories 22 Gas Connections 25 Leak Testing Instructions 29 AA Battery Maintenance 31 Pre-Grill Checklist 32 Lighting the Grill 33 Burner Position and Flame Adjustment 36 General Grill Operation and C
NEWAGE PRODUCTS INC. PERFORMANCE GRILLS MANUFACTURER WARRANTY PROOF OF PURCHASE IS REQUIRED TO OBTAIN WARRANTY SERVICE. Please have the following information available when you call our customer service team: • Name, address and telephone number • Product Name / SKU Number • A clear, detailed description of the problem • Proof of purchase including order number Register your NewAge Products purchase online for quicker customer assistance and access to exclusive benefits Visit www.newageproducts.
Safe Operating Practices 1. NewAge Grill must be assembled and installed according to the instructions in the manual. 2. Read the entire instruction manual prior to operating grill. 3. NewAge Grill must be used outdoors in a well ventilated area, and cannot be used indoors, in a enclosed area such as a garage, gazebo, screened in porch or other similar enclosed area. 4. NewAge grills are not designed or certified for and are not to be installed in or on recreational vehicles, portable trailers, boats. 5.
Safe Operating Practices 26. Never grill without the drip pan installed. Hot grease can leak down and produce a fire or explosion. 27. Clean grease trays regularly to prevent grease fires. Refer to page 10 for additional information. 28. Spiders and insects like to nest in the burners, venturis, valves and orifices of a grill, disrupting the gas flow. This very dangerous condition can cause a fire behind the control panel, damaging the grill and risking personal injury.
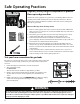
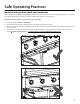
Safe Operating Practices Regularly clean your grill components to prevent flare-ups and grease fires Just like the cooking appliances in your home, your NewAge Grill needs to be regularly cleaned and maintained to operate at peak performance. This not only produces tastier, healthier food, but it reduces the chance of dangerous flare-ups or grease fires. Here are the key areas to keep clean: 1. Remove cooking grates and scrape excess food particles with a BBQ brush after every use.
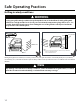
Safe Operating Practices Never let your gas hose touch your burner box The underside of your grill gets incredibly hot. Pushing your excess gas line into the cavity below your grill, or coiling it beneath the burner box can melt the exterior coating of the gas hose and cause a fire. Take these steps to make sure your hose is positioned safely: 1. Ensure your grill is off and cooled down. 2. Kneel down and look in the cavity for the hose at the left-hand side of the grill. 3.
Safe Operating Practices Grilling in windy conditions WARNING Using your grill in windy conditions may disrupt the front-to-back airflow. If, while grilling with all burners on high and the hood closed, you notice that the temperature gauge fails to rise.....be careful. If wind has kept hot gases from exiting the rear of the grill the control panel and knobs may have become extremely hot.
Parts Supplied Main Grill Parts 4x Flame Tamer Panel 3x Cooking Grate 1x Natural Gas Hose (Pre-installed) 4x M6 Flat Head Screws 1x SS Warming Rack 2x Rubber Bumpers Optional Accessories Griddle SKU#66940 Smoker Box SKU#66946 *Accessories offering depends on location and subject to change.
Tools Needed #2 Phillips head screwdriver Box Cutter Tape Measure Pipe Dope Thread Sealant Gas Line Pipe Dope 6mm Open Wrench Product Inspection • • • • 12 Check to see all parts are received as per the order placed. Contact NewAge Products at 1-877-306-8930; for any missing parts. Inspect the products for any damages before starting the installation. Go through the installation instructions carefully before starting the installation.
Product Specifications H D W NewAge 36” Grill Dimensions Width (W) 35.98” Depth (D) 24.20” Height (H) 23.04” Details Material Stainless Steel Main Grilling Area Primary Burner BTU 12,000 BTUs x 4 Warming Rack Area Fuel Type Natural gas Cutout Width 34.5” Total Power Output 48,000 BTUs Cutout Depth 22.3” Net Weight 126.8 Lbs Cutout Height 11.
Installing Grill on NewAge Grill Cabinets and Carts For more detailed instructions on installation steps, refer to the NewAge Grill Cabinet installation guide. 1 Place grill onto the cabinet. 2 Secure grill to cabinet by inserting two M6x50mm from the bottom. Flat head screws are provided with the Grill. 14 While connecting the gas hose to the grill, make sure the hose is not bunched up below the grill.
Installing Grill on NewAge Grill Cabinets and Carts For more detailed instructions on installation steps, refer to the NewAge Grill Cart installation guide. 1 Make sure the rear casters on the cart are locked. 3 Secure grill to cabinet by inserting two M6x50mm from the bottom. Flat head screws are provided with the Grill. 2 Place the grill onto the cart. While connecting the gas hose to the grill, make sure the hose is not bunched up below the Grill.
Installing Grill on custom built cabinet The installation must conform with local codes or, in the absence of local codes, with the National Fuel Gas Code, ANSI Z223.1/NFPA 54, Natural Gas and Propane Installation Code, CSA B149.1. If you are connecting an appliance to a fixed fuel piping system specifying the use of a rigid pipe, semi-rigid tubing, and/ or a connector that complies with the standard for Connectors for Outdoor Gas Appliances and Manufactured Homes, ANSI Z21.75 CSA 6.27.
Installing Grill on custom built cabinet CLEARANCES: TO NON-COMBUSTIBLE CONSTRUCTION A minimum of 4” (10 cm) clearance from the back of the grill to non-combustible construction is required to allow the hood to be opened fully. TO COMBUSTIBLE CONSTRUCTION This appliance should NOT be installed over, under or next to unprotected combustible construction. A minimum clearance to vertical and rear combustible material is 18” (45 cm) and 14” (36cm) on the sides.
Installing Grill on custom built cabinet Layout for Non-combustible enclosure WARNING • The upper vent opening must be at least 20 square inches. • The lower vent opening must be at least 10 square inches. opening. It is recommended to use a rubber grommet at the opening. L ATERIA ABLE M OMUST NON-C Note: Avoid abrasion of hose against the H Rubber grommet D 2.375” Dia W MINIMUM 20 SQ IN (130 SQ CM) OF VENTILATION REQUIRED ON EACH END OF CABINET.
Natural Gas Installation Rigid Connection in a Built in Enclosure WARNING Only licensed gas fitter must perform the required gas fitting on NewAge gas appliances. To ensure satisfactory performance, the gas supply line must be sized to accommodate the total BTU/h requirements of all the gas-fired equipment that will be connected to that line. In no case should pipe less than 3/4” inside diameter or 1” outside diameter ever be used to connect this product.
Assembling the Grill 1 Install Flame Tamer Panel on top of the burner. 2 Make sure the Flame Tamer Panel sits properly on the dowel pins as shown below. 3 Similarly, install the remaining Flame Tamer Panels . 4 Install the three cooking grates on top of the Flame Tamer Panels as shown. 5 Tools and Parts needed. 3x SS Grates 1x SS Warming Rack 4x Flame Tamer Panel 20 Install the warming rack, by placing it on the provided brackets.
Assembling the Grill 6 Insert the AA battery cell into the Flame Igniter Battery Case. Then enclose it by tightening the Knob on the given threads in clockwise direction as shown. NOTE: AA Battery is not included with package.
Optional Accessories Installing the Griddle 1 Place the Griddle on top of the cooking grates as shown below. Grease pan can be slide in or out from the griddle to remove the grease collected. WARNING • During the usage the griddle gets extremely hot and must be handled with care. Make sure to let the griddle cool down for minimum 30 minutes before removing the grease pan for cleaning. 22 • Do not close the lid when you are cooking on the Griddle.
Optional Accessories Installing the Smoker Box NOTE • • • • Do not put more than 0.2 Kg (0.4 Lbs) of wood chips in the smoker box for smoking. Do not pour more than 1/2 litre of liquid for moisturing the meat. Do not place smoker box on top of the sear burner. For good smoke performance, soak the wood chips for not less than 30 minutes, drain excess liquid and fill the smoker tray completely. To improve smoke performance, keep the hood closed as much as possible while food is grilling.
Optional Accessories Installing the Smoker Box Open the smoker box to add wood chips or any beverage. 24 Smoke vents can be adjusted by sliding the knob to control the smoke intensity.
Gas Connections WARNING Never connect a gas line directly to the grill. A pressure regulator must be installed on all gas equipment. Removing or failing to install the pressure regulator can result in fire, and serious personal injury and will void the warranty. This grill is designed for non-combustible enclosures only, and must be installed and serviced by a licensed gas fitter to local codes.
Instructions for Installer (Licensed Gas Fitter) Gas Line Purging You should purge the gas line of air before attempting to light the grill. • • • • Make sure all grill controls are in the “OFF” position. Slowly turn on the main gas supply. Open the lid for the entire purging procedure. Push in the control knobs (do not turn) for the Sear Burner and the Main Burner on the furthest right for about 20 seconds to allow the air in the system to purge.
Natural Gas Installation WARNING Only licensed gas fitters must perform the required gas fitting on NewAge gas appliances. To ensure satisfactory performance, the gas supply line must be sized to accommodate the total BTU/h requirements of all the gas-fired equipment that will be connected to that line. In no case should pipe less than 3/4” inside diameter or 1” outside diameter ever be used to connect this product.
Natural Gas Installation 1 Connect one end of Corrugated extension hose to the manifold at the bottom and other end to the natural gas hose from the inside of the cabinet. Feed the Natural Gas hose through cutout hole on back panel. 2 Connect to Natural Gas supply using the quick connect fitting.
Leak Testing Instructions WARNING This must be done before initial use, annually, and whenever any gas components are replaced or serviced. Do not smoke while performing this test, and remove all sources of ignition. See Leak Testing Diagram for areas to check. Never conduct a leak test using fire or flame. Sparks or open flames will result in a fire or explosion, damage to property, serious bodily injury, or death. Testing a Gas Leak Ensure all control knobs are in the off position.
Leak Testing Instructions Fixing a Gas Leak • • • • • • 30 Shut off the gas supply. Turn all grill controls to the “ON” position to purge the grill of any gas build-up, then turn the controls back “OFF”. Wash off the soapy solution with cold water and dry. Tighten the loose joint, or replace the faulty part with manufacturer-recommended replacement parts. Repeat the leak test to ensure that no leaks are present.
AA Battery Maintenance WARNING • • • • • • • • You must read following instructions before using AA dry cell batteries for Grill. Failure to read and follow the below instructions may result in fire, personal injury and damage to property if used improperly. DO NOT insert an old/used AA dry cell battery into the battery pocket of the Pulse Igniter. Always store AA battery in its original brand packaging, or place them in a plastic container.
Pre-Grill Checklist Before FIRST use ensure that: 1. 2. 3. 4. 5. All packaging, and packing materials have been removed from the Grill and burners You have a fuel supply connected. You need AA battery to operate the pulse igniter. A licensed gas fitter has performed a leak test on all the fittings that supply the fuel to the grill. If your Grill does not light in 4-5 seconds you may need to purge the line. (refer to purging the line) 6.
Lighting the Grill WARNING • • Always keep the lid open when lighting the grill. Never leave children unsupervised around the NewAge grill. Do not store items of interest to children around or below the grill, or in the cabinet. Never allow children to crawl inside a cabinet or enclosure. CAUTION • • • Never light the grill if you smell gas. Keep face and body parts away from the grill when lighting.
Lighting the Grill NOTES • • • Any of the Burners can be lit first using the Pulse Ignitor/ Match. It is upto the customer preference and requirement. If Burners does not light or flame is too low, you may have spider or other insect blockage inside or vicinity of the burner holes. See “Replace the Burners” section. The IR burner lighting process is similar to that of Main Burners. Method 1 (Using Pulse Ignitor Button): 1. 2. 3. 4. 5. 6. Read and complete PRE-GRILL checklist.
Lighting the Grill Method 2 (Access Holes): If the burners fail to light after a couple of attempts, it can be lit using the supplied match lighting stick. Follow the steps below for manual grill lighting. 1. 2. 3. 4. 5. 6. Read and complete PRE-GRILL checklist. Make sure all control knobs are set to OFF. Always light grill with lid open. Turn fuel supply ON. Place a match in the aligator clip on the match holder and light the match.
Burner Position and Flame Adjustment CAUTION Proper placement of each burner is critical after cleaning they must be centered on the brass orifice, resting level without any rocking. Failure to meet these conditions may cause a very dangerous condition that can cause personal injury and property damage. Gas control knobs should be in the ‘OFF” position, and fuel line should be disconnected from gas valve manifold.
Burner Position and Flame Adjustment Adjusting the Airshutter valve To adjust the flame properly the air shutter valve needs to be adjusted to achieve an optimum gas and oxygen mixture for burning. The burner has to be removed for adjusting the air shutter valve. 1 Loosen the bolts (A) and remove burner from the grill. A 2 Loosen the screw on the air shutter valve and turn the air shutter valve to change the air opening.
Burner Position and Flame Adjustment Low Flame Adjustment CAUTION 1. Make sure that the Grill is not hot. 2. Remove the Remove the Cooking grate and Flame Tamer so you can see the flames while adjusting the burners. 3. Fluctuations in gas pressure, may affect burner performance at the “LOW” setting. 4. Quality of the gas; itself may affect burner performance at the “LOW” setting. 1 Turn the burner to “LOW” setting. 13 Insert a small flat screwdriver into the hole.
General Grill Operation and Cooking Procedures WARNING • • • • Never leave children unsupervised around the NewAge grill. Pre-heating for more than 15 minutes may overheat and cause damage to the grill. Never cover slots, holes, or passages in the grill fire box or cover an entire rack with material such as aluminum foil. Doing so blocks air flow through the oven and may cause carbon monoxide poisoning. Aluminum foil linings may trap heat causing a fire hazard. Do not leave the grill unattended.
General Grill Operation and Cooking Procedures Direct Cooking This method involves placing the food directly over the lighted burners. This is a common way to cook foods that take less than 20 minutes or to sear larger foods at the beginning of the cooking process. Turning too soon and too often is one of the most common grilling mistakes. Never spray water on the grill or into grease.
General Grill Operation and Cooking Procedures Indirect Cooking You can cook larger foods slowly to perfection on one side of the grill by using indirect heating technique. This can be achieved by leaving the burners directly below the food “OFF” and igniting the burners to the side of the food. The heat from the lighted burner circulates gently throughout the grill, cooking the food without any direct flame touching it.
Grill Maintenance and Cleaning Regular Maintenance Wash regularly with clean fresh water, mild detergent and a micro fiber cloth. After washing rinse in clean water and wipe the surface dry with your cloth remembering to go with the grain on brushed stainless steel. Generally you should wash your stainless steel every three months. Coastal areas or next to a chlorine pool more frequently every 2 weeks.
Grill Maintenance and Cleaning Cleaning the cooking grids: After cooking, turn control knobs to “OFF” and let grill cool before attempting to clean your cooking grates. Before first use and periodically it is suggested that you wash the cooking grids in a mild soap and warm water solution. You can use a washcloth or a vegetable brush to clean your cooking grates. Remove the Burners: 1. Remove the Grill Racks and Flame Tamers. 2. Unscrew the fasteners securing the burners to the tray. 3. Lift the burner up.
Grill Maintenance and Cleaning Flame Tamer Panels: The Flame Tamer Panels normally burn off any accumulated food drippings. But you may occasionally experience larger spills that don’t burn off under normal use. When this happens: 1. Let the grill cool completely. Remove the racks and then the Flame Tamer Panels by lifting the front edge and lifting them upward. 2. Flip the trays over and put them back in place over the burner. 3.
Grill Maintenance and Cleaning SPECIAL NOTE FOR LOCATIONS NEAR POOLS AND COASTAL AREAS: The 304 stainless steel material used in the construction of a NewAge Grill is highly rust resistant, however, chlorine in the air from swimming pools or the salt from sea air may cause surface rust to appear and even create some pitting if left on the product. Here are a few tips to avoid this: Regularly wipe down the exterior surfaces with a damp cloth. Micro fiber cloths perform very well.
Troubleshooting Please check and confirm the following points before calling Customer Service. 1. 2. 3. 4. Is the fuel supplied to the grill? Is the main shut-off valve open? Are you using the correct type of fuel for the grill? ( Propane gas or Natural Gas) Attempt to match-light the burner (see page 33). Check to see that other burners on the unit operate. Clean electrode tip of any debris. PROBLEM POSSIBLE CAUSES 1. Low heat/ Low flame when For natural gas - undersized supply line.
Troubleshooting PROBLEM POSSIBLE CAUSES 4. Main burner will not light with the Pulse Ignitor, but will light with a match Electrode is covered by cooking residue Clean wire or electrode using a cloth and rubbing alcohol. Electrode and burners are wet Wipe with dry cloth. Ignition electrode cracked or broken; sparking where cracked Replace the valve. This must be done by a licensed gas fitter. Flame thrower orifice is blocked Clean the orifice or replace the valve as required. Faulty Pulse Ignitor.
Troubleshooting PROBLEM POSSIBLE CAUSES 9. Electric Ignition (Pulse Ignitor) Gas supply is off not working properly Check gas supply. Turn OFF and ON your gas supply and try lighting again. Ignition electrode not in correct position. The distance from the tip of the electrode to the burner should be 4 mm. Faulty Pulse Ignitor If a spark occurs anywhere but the ignitor tip, replace the Pulse Ignitor. Check to see if the grill will match-light. See “Manually Lighting the Main Grill” section.
Exploded View and Spare Parts 11 4 3 5 9 7 8 14 1 12 6 2 10 13 49
Exploded View and Spare Parts Item No. Eng. Part No. SKU No. for spares offered 1. GLE-01.002.03A-01 - 2.0 Series Burner Knob 2. GLE-01.002.05A-01 - 2.0 Series Main Bezel 3. GLE-02.001.05A-01 4. GLE-02.001.010A-01 - Grill 2.0 36 Inch Warming Rack 5. GLE-02.001.04A-01 - Grill 2.0 Flame Tamer Description D Grill 2.0 36 Inch Cooking Grate Grill 2.0 Main Burner Assembly 6. GLE-01.001.
NEWAGE PERFORMANCE GRIL DE 36 PO Nº d’UGS 66981 - NEWAGE PERFORMANCE GRIL DE 36 PO, GAZ NATUREL Nº d’UGS 66279 - NEWAGE PERFORMANCE GRIL DE 36 PO, GAZ NATUREL AVEC CHARIOT DE GRIL 36 PO (GAZ NATUREL) AVERTISSEMENT Le gril NewAge doit être installé par un monteur d’installations au gaz license conformément aux instructions du fabricant et à tous les codes et exigences applicables de l’autorité compétente.
DANGER Lisez et suivez entièrement les instructions de ce manuel avant d’installer, d’entretenir ou d’utiliser le gril afin de réduire le risque de : 1. Incendie 2. Dommages corporels ou matériels 3. Mauvaise installation CE PRODUIT EST CONÇU POUR UN USAGE EXTÉRIEUR UNIQUEMENT. N’installez et n’utilisez pas à l’intérieur, dans un garage, sur une galerie protégée par un moustiquaire, dans un abri de jardin ou dans tout autre espace clos.
AVERTISSEMENT PROPOSITION 65 DE LA CALIFORNIE 1. Ce produit peut vous exposer à des produits chimiques, dont le monoxyde de carbone, qui est un sousproduit de combustion connu dans l’État de la Californie pour causer des cancers et des malformations congénitales ou d’autres atteintes à l’appareil reproducteur. Pour plus d’informations, consultez le site www.P65Warnings.ca.gov. 2. La loi californienne oblige les entreprises à avertir leurs clients d’une exposition potentielle à de telles substances.
Index Pratiques d’exploitation sécuritaires 6 Pièces fournies 11 Outils requis 12 Inspection du produit 12 Spécifications du produit 13 l’installation d’un gril sur armoire et chariot de gril NewAge 14 Installation d’un gril sur un meuble sur mesure 16 Assemblage du gril 20 Accessoires optionnels 22 Raccordements au gaz 25 Instructions pour les tests de fuite 29 Entretien des piles AA 31 Liste de contrôle précédent la cuisson.
NEWAGE PRODUCTS INC. PERFORMANCE GRILLS MANUFACTURER WARRANTY UNE PREUVE D’ACHAT EST REQUISE POUR OBTENIR UN SERVICE SOUS GARANTIE.
Pratiques d’exploitation sécuritaires 1. Le gril NewAge doit être assemblé et installé conformément aux instructions du manuel. 2. Lisez l’intégralité du manuel d’instructions avant d’utiliser le gril. 3. Le gril NewAge doit être utilisé à l’extérieur, dans un endroit bien ventilé, et ne peut pas être utilisé à l’intérieur, dans un endroit fermé tel qu’un garage, un pavillon, un porche grillagé ou tout autre endroit fermé similaire. 4.
Pratiques d’exploitation sécuritaires de contrôle. Il peut en résulter des boutons fondus ou des composants d’allumage endommagés. 23. Les adultes et les enfants doivent être informés des dangers des températures de surface élevées. Ne laissez jamais les enfants sans surveillance autour du gril NewAge. 24. Ne touchez jamais à mains nues les grilles, le couvercle ou les surfaces métalliques environnantes pendant que vous faites des grillades.Pratiques d’exploitation sécuritaires 25.
Pratiques d’exploitation sécuritaires Nettoyez régulièrement les éléments de votre gril pour éviter les flambées et les feux de graisse Tout comme les appareils de cuisson de votre maison, votre gril NewAge doit être régulièrement nettoyé et entretenu pour fonctionner au maximum de ses performances. Cela permet non seulement de produire des aliments plus savoureux et plus sains, mais aussi de réduire les risques de flambées dangereuses ou d’incendies de graisse. Voici les zones clés à garder propres : 1.
Pratiques d’exploitation sécuritaires Never let your gas hose touch your burner box The underside of your grill gets incredibly hot. Pushing your excess gas line into the cavity below your grill, or coiling it beneath the burner box can melt the exterior coating of the gas hose and cause a fire. Take these steps to make sure your hose is positioned safely: 1. Ensure your grill is off and cooled down. 2. Kneel down and look in the cavity for the hose at the left-hand side of the grill. 3.
Pratiques d’exploitation sécuritaires Utiliser le gril dans des conditions venteuses AVERTISSEMENT L’utilisation de votre gril dans des conditions venteuses peut perturber la circulation de l’air de l’avant vers l’arrière. Si, pendant que vous grillez avec tous les brûleurs en position haute et le couvercle fermé, vous remarquez que la jauge de température ne monte pas... soyez vigilant.
Pièces fournies Parties principales du gril 4x Panneaux pare-flammes 3x Grilles SS 1x Tuyau de gaz naturel (préinstallé) 4 x Vis à tête plate M6 1x Grille de réchauffage SS 2 x Butées de rechange en caoutchouc Accessoires optionnels Plancha Nº d’UGS66940 Boîte à fumaison Nº d’UGS66946 *L’offre des accessoires dépend de l’emplacement et est sujette à changement.
Outils requis Tournevis à tête Phillips nº 2 Couteau à lame rétractable Ruban à mesurer Pipe Dope Thread Sealant Pâte à joint de conduite de gaz Clé à fourche de 6 mm Inspection du produit • • • • 12 Assurez-vous d’avoir reçu toutes les pièces conformément à la commande que vous avez passée. S’il manque des pièces, contactez NewAge Products au 1 877 306-8930. Avant de commencer l’installation, inspectez les produits pour y déceler tout dommage.
Spécifications du produit H D W Gril NewAge de 36 po Dimensions Largeur (L) 36” Profondeur (P) 23.58” Hauteur (H) 23.10” Détails Matériau Stainless Steel Type de carburant Gaz Naturel Production totale d’énergie Poids net 51,000 BTUs Net Weight 126.8 Lbs 136.35 Lbs Zone de cuisson principale Zone de la grille de réchauffage Largeur de l’ouverture Profondeur de l’ouverture 634 Sqare Inches 290 Square Inches 38.5 po 22.3 po Hauteur de l’ouverture 11.
l’installation d’un gril sur armoire et chariot de gril NewAge Pour des instructions plus détaillées sur les étapes d’installation, consultez le guide d’installation du meuble pour gril NewAge. 1 2 14 Placez le gril sur le meuble. Fixez le gril au meuble en insérant deux vis M6x50 mm par le bas. Des vis à tête plate sont fournies avec le gril. Lorsque vous raccordez le tuyau de gaz au gril, assurez-vous que le tuyau n’est pas entassé sous le gril.
l’installation d’un gril sur armoire et chariot de gril NewAge Pour des instructions plus détaillées sur les étapes d’installation, consultez le guide d’installation du chariot de gril NewAge. 1 Assurez-vous que les roulettes arrière du chariot sont verrouillées. 3 Fixez le gril au meuble en insérant deux vis M6x45 mm par le bas. Des vis à tête plate sont fournies avec le gril. 2 Placez le gril sur le chariot.
Installation d’un gril sur un meuble sur mesure L’installation doit être conforme aux codes locaux ou, en l’absence de codes locaux, au National Fuel Gas Code, ANSI Z223.1/NFPA 54, au Storage and Handling of Liquefied Petroleum Gases, ANSI/NFPA 58 ; ou au Natural Gas et au Propane Installation Code, CSA B149.1 ; Propane Storage and Handling.
Installation d’un gril sur un meuble sur mesure DÉGAGEMENTS : D’UNE CONSTRUCTION NON COMBUSTIBLE Un dégagement minimum de 10 cm (4 po) entre l’arrière du gril et la construction non combustible est nécessaire pour permettre l’ouverture complète du couvercle. D’UNE CONSTRUCTION COMBUSTIBLE Cet appareil ne doit PAS être installé au-dessus, au-dessous ou à côté d’une construction combustible non protégée.
Installation d’un gril sur un meuble sur mesure Aménagement d’une enceinte non combustible AVERTISSEMENT • • L’ouverture de l’évent supérieur doit être d’au moins 20 pouces carrés. L’ouverture inférieure de l’évent doit être d’au moins 10 pouces carrés. MATÉR LE BUSTIB N COM IAU NO Remarque : Évitez l’abrasion du tuyau contre l’ouverture. Il est recommandé d’utiliser un œillet en caoutchouc au niveau de l’ouverture. H Œillet en caoutchouc D 2.
Installation de gaz naturel Connexion rigide dans une enceinte intégrée AVERTISSEMENT Seul l’installateur de gaz license doit effectuer le montage de gaz requis sur les appareils à gaz NewAge. Pour assurer un rendement satisfaisant, la conduite d’alimentation en gaz doit être dimensionnée pour répondre aux besoins totaux en BTU/h de tous les équipements au gaz qui seront connectés à cette conduite.
Assemblage du gril 1 Installez le panneau pare-flammes sur le dessus du brûleur. 2 Assurez-vous que le panneau pareflammes repose correctement sur les goujons, comme indiqué ci-dessous. 3 De la même manière, installez les autres panneaux pare-flammes. 4 Installez les trois grilles de cuisson sur les panneaux pare-flammes et le brûleur de saisie comme indiqué. 5 Installez la grille réchauffage en la plaçant sur les supports fournis. Outils et pièces nécessaires.
Assemblage du gril 6 Insérez la pile AA dans le boîtier à piles du dispositif d’allumage à impulsion. Puis, fermez-le en serrant le bouton sur les filets dans le sens des aiguilles d’une montre, comme indiqué. REMARQUE : La pile AA n’est pas incluse dans l’emballage.
Accessoires optionnels Installation de la plancha 1 Placez la plancha sur le dessus des grilles de cuisson comme indiqué ci-dessous. Le bac à graisse peut être glissé à l’intérieur ou à l’extérieur de la plancha pour enlever la graisse collectée. AVERTISSEMENT • 22 • • Pendant l’utilisation, la plancha devient extrêmement chaude et doit être manipulée avec précaution. Veillez à laisser la plancha refroidir pendant au moins 30 minutes avant de retirer le bac à graisse pour le nettoyer.
Accessoires optionnels Installation de la boîte de fumaison • • • • • REMARQUE Ne mettez pas plus de 0,2 kg (0,4 lb) de copeaux de bois dans la boîte de fumaison pour fumer. Ne versez pas plus d’un demi-litre de liquide pour humidifier la viande. Ne placez pas la boîte de fumaison sur le brûleur de saisie. Pour un bon rendement de la fumée, faites tremper les copeaux de bois pendant au moins 30 minutes, égouttez l’excès de liquide et remplissez complètement le plateau de la boîte.
Accessoires optionnels Installation de la boîte de fumaison Ouvrez le fumoir pour ajouter des copeaux de bois ou une boisson quelconque. 24 Il est possible de régler les évents pour la fumée en faisant glisser le bouton pour contrôler l’intensité de la fumée.
Raccordements au gaz WARNING Ne connectez jamais une conduite de gaz directement au gril. Un régulateur de pression doit être installé sur tous les gaz équipement. Tous les codes locaux nécessitent un régulateur de pression et NewAge fournit le régulateur correct avec votre gril. Enlever ou ne pas installer le régulateur de pression peut entraîner un incendie, et grave blessures et annulera la garantie.
Instructions pour l’installateur (monteur d’installation au gaz) Purge de la conduite de gaz Vous devez purger la conduite de gaz de son air avant de tenter d’allumer le gril. • • • • Assurez-vous que toutes les commandes du gril se trouvent dans la position « OFF ». Allumez lentement l’alimentation principale en gaz. Ouvrez le couvercle pendant toute la procédure de purge.
Installation de gaz naturel AVERTISSEMENT NewAge recommande que seuls les professionnels certifiés effectuent l’installation de gaz requise sur les appareils à gaz NewAge. Pour assurer un rendement satisfaisant, la conduite d’alimentation en gaz doit être dimensionnée pour répondre aux besoins totaux en BTU/h de tous les équipements au gaz qui seront connectés à cette conduite.
Installation de gaz naturel 1 Raccordez le tuyau de gaz naturel au collecteur et faites passer l’autre extrémité par le trou découpé sur le panneau arrière. 2 Raccordez l’alimentation en gaz naturel en utilisant le raccord rapide. Tirez le collier sur le raccord Natural Gas Supply * Les appareils à gaz pour la cuisson extérieure ne doivent pas être utilisés sous une construction combustible suspendue.
Instructions pour les tests de fuite AVERTISSEMENT Cela doit être fait avant la première utilisation, chaque année, et chaque fois que des composants du gaz sont remplacés ou entretenus. Ne fumez pas pendant ce test et éliminez toute source d’allumage. Consultez le diagramme des tests de fuite pour connaître les zones à vérifier. N’effectuez jamais de test de fuite en utilisant du feu ou une flamme.
Instructions pour les tests de fuite Réparer une fuite de gaz • • • • • • 30 Coupez l’alimentation en gaz. Mettez toutes les commandes du gril en position « ON » pour purger le gril de toute accumulation de gaz, puis remettez les commandes en position « OFF ». Lavez la solution savonneuse à l’eau froide et séchez. Serrez le joint desserré ou remplacez la pièce défectueuse par des pièces de rechange recommandées par le fabricant. Répétez le test de fuite pour vous assurer qu’il n’y a pas de fuite.
Entretien des piles AA AVERTISSEMENT • • • • • • • • Vous devez lire les instructions suivantes avant d’utiliser des piles sèches AA pour le Brûleur Latéral. Si vous ne lisez pas et ne suivez pas les instructions ci-dessous, cela pourrait entraîner un incendie, des blessures corporelles et des dommages matériels en cas d’utilisation incorrecte. N’insérez PAS de pile sèche AA usagée dans le compartiment à piles du dispositif d’allumage à impulsion.
Liste de contrôle précédent la cuisson. Avant la PREMIÈRE utilisation, assurez-vous que : 1. 2. 3. 4. Tous les emballages et matériaux d’emballage ont été retirés du gril et des brûleurs Vous avez une alimentation en carburant connectée. Toutes les parties électriques sont connectées. Un monteur d’installations au gaz license a effectué un test d’étanchéité sur tous les raccords qui alimentent le gril en combustible. 5.
Allumer le gril AVERTISSEMENT • • Gardez toujours le couvercle ouvert lorsque vous allumez le gril. Ne laissez jamais d’enfants sans surveillance autour du gril NewAge. Ne rangez pas les objets qui intéressent les enfants autour ou sous le gril, ou dans le meuble. Ne permettez jamais aux enfants de se glisser à l’intérieur d’un meuble ou d’un boîtier. MISE EN GARDE • • • N’allumez jamais le gril si vous sentez une odeur de gaz.
Allumer le gril REMARQUES • • • N’importe lequel des brûleurs peut être allumé en premier à l’aide du dispositif d’allumage à impulsion/allumette. Tout dépend de la préférence et de l’exigence du client. Si le brûleur ne s’allume pas ou si la flamme est trop faible, il se peut qu’une araignée ou un autre insecte soit bloqué à l’intérieur ou à proximité des orifices du brûleur. Consultez la section « Remplacement des brûleurs ».
Allumer le gril Method 2 (Access Holes): Si les brûleurs ne s’allument pas après quelques tentatives, il est possible de les allumer à l’aide du bâton d’allumage fourni. Suivez les étapes ci-dessous pour l’allumage manuel du gril. 1. 2. 3. 4. 5. 6. Lisez et complétez la liste de contrôle PRÉ-CUISSON. Assurez-vous que tous les boutons de commande sont réglés sur OFF (arrêt). Allumez toujours le gril avec le couvercle ouvert. Ouvrez l’alimentation en carburant (ON).
Position du brûleur et réglage de la flamme MISE EN GARDE Le bon positionnement de chaque brûleur est essentiel après le nettoyage ; ils doivent être centrés sur l’orifice en laiton, en reposant à niveau sans aucun balancement. Le non-respect de ces conditions peut entraîner une situation très dangereuse qui peut causer des dommages corporels et matériels. Les boutons de commande de gaz doivent être en position « OFF » et la conduite de carburant doit être déconnectée du collecteur de la vanne de gaz.
Position du brûleur et réglage de la flamme Adjusting the Airshutter valve To adjust the flame properly the air shutter valve needs to be adjusted to achieve an optimum gas and oxygen mixture for burning. The burner has to be removed for adjusting the air shutter valve. 1 Loosen the bolts (A) and remove burner from the grill. A 2 Loosen the screw on the air shutter valve and turn the air shutter valve to change the air opening.
Position du brûleur et réglage de la flamme Réglage de la flamme basse MISE EN GARDE 1. Assurez-vous que le gril n’est pas chaud. 2. Retirez la grille de cuisson et le dompteur de flammes, de sorte que vous pouvez voir les flammes pendant le réglage des brûleurs. 3. Les fluctuations de la pression du gaz peuvent affecter les performances du brûleur au réglage “BAS”. 4. La qualité du gaz; elle-même peut affecter les performances du brûleur au réglage “BAS”. 1 Tournez le brûleur au réglage « BAS ».
Fonctionnement général du grill et procédures de cuisson AVERTISSEMENT • • • • Ne laissez jamais d’enfants sans surveillance autour du gril NewAge. Un préchauffage de plus de 15 minutes peut entraîner une surchauffe et endommager le gril. Ne couvrez jamais les fentes, les trous ou les passages de la boîte à feu du gril et ne couvrez jamais une grille en entier avec un matériau tel que du papier d’aluminium.
Fonctionnement général du grill et procédures de cuisson Cuisson directe Cette méthode consiste à placer les aliments directement sur les brûleurs allumés. C’est une façon courante de cuire des aliments qui prennent moins de 20 minutes ou de saisir des aliments plus volumineux au début du processus de cuisson. Tourner trop tôt et trop souvent est l’une des erreurs les plus courantes en matière de grillades. Ne vaporisez jamais d’eau sur le grill ou dans la graisse.
Fonctionnement général du grill et procédures de cuisson Cuisson indirecte Vous pouvez faire cuire lentement et à la perfection des aliments plus gros sur un côté du gril en utilisant la technique de la cuisson indirecte. Cela peut être réalisé en laissant les brûleurs directement sous la nourriture à « OFF » et en allumant les brûleurs sur le côté de la nourriture. La chaleur du brûleur allumé circule doucement dans le gril, faisant cuire les aliments sans qu’aucune flamme directe ne les touche.
Entretien et nettoyage du gril Entretien régulier Lavez régulièrement l’évier avec de l’eau douce et propre, un détergent doux et un chiffon en microfibre. Après avoir lavé, rincez avec de l’eau douce et essuyez la surface pour la sécher avec votre chiffon en n’oubliant pas d’aller dans le sens du grain sur l’acier inoxydable brossé. En général, vous devez laver votre acier inoxydable tous les trois mois.
Entretien et nettoyage du gril Nettoyage des grilles de cuisson : Après la cuisson, tournez les boutons de commande sur « OFF » et laissez le gril refroidir avant de tenter de nettoyer vos grilles de cuisson. Avant la première utilisation et de façon régulière, il est conseillé de laver les grilles de cuisson dans une solution d’eau chaude et de savon doux. Vous pouvez utiliser une débarbouillette ou une brosse à légumes pour nettoyer vos grilles de cuisson. Retirez les brûleurs : 1.
Entretien et nettoyage du gril Panneaux pare-flammes : The Flame Tamer Panels normally burn off any accumulated food drippings. But you may occasionally experience larger spills that don’t burn off under normal use. Quand cela se produit : 1. Laissez le gril refroidir complètement. Retirez les grilles puis les plateaux en céramique en soulevant le bord avant et en les soulevant vers le haut. 2. Retournez les plateaux et remettez-les en place sur le brûleur. 3.
Entretien et nettoyage du gril REMARQUE SPÉCIALE POUR LES ENDROITS SITUÉS PRÈS DES PISCINES ET DES ZONES CÔTIÈRES : Le matériau en acier inoxydable 304 utilisé dans la construction d’un gril NewAge est très résistant à la rouille, cependant, le chlore présent dans l’air des piscines ou le sel de l’air marin peuvent provoquer l’apparition de rouille en surface et même créer des piqûres s’ils sont laissés sur le produit.
Dépannage Veuillez vérifier et vous assurer des points suivants avant d’appeler le service clientèle. 1. 2. 3. 4. Le gril est-il alimenté en combustible? La vanne de sectionnement principale est-elle ouverte? Utilisez-vous le bon type de combustible pour le gril? (Gaz propane ou gaz naturel) Essayez d’allumer le brûleur avec une allumette (consultez la page 33). Vérifiez que les autres brûleurs de l’unité fonctionnent. Nettoyez la pointe de l’électrode de tout débris. PROBLÈME LES CAUSES POSSIBLES 1.
Dépannage PROBLÈME LES CAUSES POSSIBLES 4. Le brûleur principal ne s’allume pas avec le dispositif d’allumage, mais avec une allumette oui L’électrode est recouverte de résidus de cuisson Nettoyez le fil ou l’électrode à l’aide d’un chiffon et d’alcool à friction. L’électrode et les brûleurs sont mouillés Essuyez-les avec un chiffon sec. Électrode d’allumage fissurée ou cassée; étincelles à l’endroit fissuré Remplacez la vanne. Cela doit être fait par un monteur d’installations au gaz certifié.
Dépannage PROBLÈME LES CAUSES POSSIBLES 9. Allumage électrique (disposi- L’alimentation en gaz est coupée tif d’allumage à impulsion) qui Vérifiez l’alimentation en gaz. Coupez et rouvrez votre alimentation en ne fonctionne pas correctement gaz et réessayez d’allumer. L’électrode d’allumage n’est pas dans la bonne position. La distance entre la pointe de l’électrode et le brûleur doit être de 4 mm.
Vue éclatée et pièces de rechange 11 4 3 5 9 7 8 14 1 12 6 2 10 13 49
Vue éclatée et pièces de rechange Article n°. Nº de pièce ing. Numéro d'UGS des pièces de rechange offertes 1. GLE-01.002.03A-01 - Bouton de brûleur de la série 2.0 2. GLE-01.002.05A-01 - Collerette de bouton de la série 2.0 3. GLE-02.001.05A-01 4. GLE-02.001.010A-01 - Grille réchauffage de 36 pouces 5. GLE-02.001.04A-01 - Pare-flammes du grill 2.0 Description Grille de cuisson de 36 pouces Assemblage du brûleur tubulaire du grill 2.0 6. GLE-01.001.