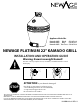
Appliance Model No. Kamado Grill - Black - SKU#65996 Kamado Grill - Blue - SKU#65997 Kamado Grill - Two Tone - SKU#65998 NEWAGE PLATINUM 22” KAMADO GRILL INSTALLATION AND OPERATION GUIDE ! Warning: Excessive weight hazard! Use two or more people to move, assemble, or install Kamado to avoid back injury. ATTENTION: Is your Kamado damaged? STOP Need help or spare parts? For fastest service, contact NewAge Products at 1-877-306-8930; or support@newageproducts.com. Do not return to the retailer.
Safety and Care Safety 1. Do not use kamado indoors. Strictly intended for Outdoor use only. 2. Use at least two people to lift and move the kamado. While lifting hold the kamado from bottom and back. 3. Place and use the kamado in a safe and level spot. Do not place it on a slope, uneven surface or under low trees or branches. 4. Do not use lighter fluid, gas or other combustible liquids. This may result in producing chemical taste to your food. 5.
Safety and Care Care 1. The Kamado is self cleaning. Heat it up to 260ºC for 30 minutes and it will scorch off all of the food and debris. 2. DO NOT use water or any other types of cleaning product to clean the inside of your Kamado. The walls are porous and will absorb any fluids used, this could cause the Kamado to crack. If the soot becomes excessive then use a wire brush to scrape off the carbon remnants before the next use. 3.
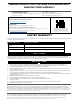
NEWAGE PRODUCTS INC. PLATINUM 22IN KAMADO GRILL MANUFACTURER WARRANTY PROOF OF PURCHASE IS REQUIRED TO OBTAIN WARRANTY SERVICE. Please have the following information available when you call our customer service team: • Name, address and telephone number • Product Name / SKU Number • A clear, detailed description of the problem • Proof of purchase including order number Register your NewAge Products purchase online for quicker customer assistance and access to exclusive benefits Visit www.newageproducts.
Index Safety and Care 2 Safety and Care 3 Unpacking 6 Product Inspection 6 Product Specifications 6 Parts Included and Spare Parts 7 Tools Included 9 Accessories 9 Assembling the Kamado 10 Assembling the Kamado Basic Setup 11 Installing the Accessories 12 Starting the Charcoal 18 Cleaning the Ash 19 Controlling the Temperature 20 Cooking Guide 22 Replacing the sealing gasket 25 Replacing the Hinge Spring 26 NewAge Customer Service 27
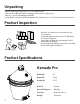
Unpacking • Begin by placing the package on a covered flat surface. • Remove all cardboard, foam packaging material and clear plastic bags. • Dispose / recycle all packaging materials. • Verify all the contents in the box and gather the required tools. See “Tools Needed” in the list below. Product Inspection • • • • Check to see all parts are received as per the order placed. Contact NewAge Products at 1-877-306-8930; for any missing parts.
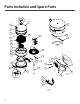
Parts Included and Spare Parts A 13 15 17 16 14 18 24 20 25 11 9 8 DETAIL A SCALE 2 : 5 7 19 11 6 10 22 30 2 21 12 5 3 26 14 23 E 29 1 30 B 4 28 31 27 14 DETAIL E SCALE 2 : 13 7 DETAIL B SCALE 2 : 9
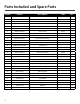
Parts Included and Spare Parts ItemNo PartNo Description SKU QTY. 1 KDO-22.001A-01-XX Kamado Bottom - 1 2 KDO-22.002.01A-01 Bottom Vent Liner 65982 1 3 KDO-22.003A-01 Bottom Vent Assembly-I 65983 1 4 KDO-22.004A-01 Bottom Vent Assembly-II 65984 1 5 KDO-22.005A-01 Kamado Firebox 65970 1 6 KDO-22.006A-01 Ash Bucket Assembly 65985 1 7 KDO-22.007A-01 Charcoal Tray 65973 1 8 KDO-22.008A-01 Charcoal Divider 65975 1 9 KDO-22.
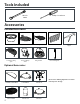
Tools Included Wrench 10mm Phillips Screwdriver Accessories Included Accessories Ash Bucket Charcoal Grate Second tier cooking grate Charcoal chimney starter Cooking Grate Hang Cook Kit Charcoal zone divider Grate Lifter Gripper Charcoal Stirring Rod Optional Accessories 14” Half Moon Heat Diffuser 9 Cast Iron Griddle 11” Heat Diffuser Kamado cart Kamado Cover Pizza Stone *Accessories offering depends on location and subject to change.
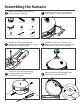
Assembling the Kamado Gather the following parts and tools supplied with the package. 1 Install handle in position by matching holes with the screws on the Kamado. 2 Install four cap nuts along with the spring washer and M6x12 washer using a spanner to secure the handle. 3 Install Top vent on top of the Kamado. Make sure to align side holes on the vent with the holes on top of the Kamado. 4 Secure the Top vent to Kamado by installing M5x35 screws using the provided screwdriver.
Assembling the Kamado Basic Setup Cooking Grate Charcoal Grate Ash Bucket Fire Box 3 1 Install charcoal grate in top the ash bucket. Install Firebox inside the kamado first. 2 4 Install Ash bucket inside the firebox. Install Cooking grate on top of the firebox Different accessories can be installed with the kamado to suit the cooking requirements. Refer to the section “Installing the Accessories“.
Installing the Accessories Charcoal Zone Divider Charcoal divider can be placed on top of the charcoal grate in order to use half of the space or even to create two different heat zones. Second Tier Cooking Grate Expander Grate adds extra cooking real estate and it can be used as a warming rack since it sits higher than the cooking grates. Hang Cook Kit Hang cook kit is a versatile cooking accessory. It can be used to cook food by hanging it from the fork in the middle.
Installing the Accessories Charcoal stirring rod Grate Lifter Gripper Charcoal stirring rod is used to stir the charcoal prior to ignition, to knock off the ash so it can fall into the ash bucket. The gripper securely clamps onto any grill grate, allowing you to move it aside to add more coals while avoiding burn hazards and touching dirty grates. 11in Heat Diffuser The 11in Heat Diffuser can be place inside the kamado on the rim of the firebox.
Installing the Accessories Assembling the Charcoal Chimney Starter 1 Unpack the charcoal starter assembly provided with the Kamado and gather the parts required for assembly. 3 Tighten the two screws provided with the assembly using the phillips screw driver. 14 2 Assemble the charcoal starter by aligning the holes on side of base with base plate and the handle.
Installing the Accessories Pizza Stone Configuration 1 - For Baking 1 Place the Pizza Stone Frame on top of the firebox and then place the pizza stone on top of the frame. Configuration 2 - For Indirect Cooking 2 15 Slide the pizza stone into the bottom of the frame and place the assembly on top of the fire box. Put the grill on top of the pizza stone assembly for indirect cooking.
Installing the Accessories Cast Iron Griddle 1 Place the two halves (Grill griddle and Dual sided griddle) of Cast Iron Griddle assembly on top of the fire box. Grill griddle Dual sided griddle The cast iron dual-sided griddle offers a smooth surface for more surface area contact, or it can be flipped over to the ribbed surface to deliver grill on food.
Installing the Accessories Kamado Cart Kamado cart comes with castor wheels for mobility and side tables on both sides for more cooking preparation area. WARNING At least two or more people are required to lift the kamado. Cover Cover your kamado mounted on cart, when not in use, with Kamado cover. This cover comes with adjustable drawcord which can be pulled to tightly secure fit the cover during high winds.
Starting the Charcoal NOTE: NewAge does not recommend the use of chemical fire starters as it may leave undesirable flavor on the food. Also, some chemical fire starters may produce harmful gases. 1 Put in the natural fire starter (crumpled paper is recommended) into the bottom of the charcoal starter. 3 Light up the natural fire starter, open the kamado and place the charcoal starter on the charcoal grate. wait till the charcoal is light up.
Cleaning the Ash Ash bucket collects ash in a clean and convenient way. The ash bucket can hold 2.6 liters of ash from about 3Kg of charcoal. It has a handle for easy removal. The middle chimney of the bucket distributes airflow fast and evenly underneath charcoal tray. The dome shape cap on top of the bucket not only protects the chimney opening from falling ash, but also it distributes airflow around it evenly.
Controlling the Temperature Top Vent Top vent regulates the volume of air going out of the kamado. The Top vent can be set at different positions to finetune cooking temperature inside the kamado. Each number on the top vent represents 20% opening, with number 1 being 20% and number 5 being %100. Thermometer Thermometer is a temperature gauge attached to top dome of the kamado. The thermometer provides an average temperature inside the Kamado.
Open Controlling the Temperature Close Positions of bottom vent % of Air Intake Right Slide adjustment % of Air Intake Left Slide Adjustment 0% 1 2 3 4 5 1 2 3 4 5 20% 1 2 3 4 5 1 2 3 4 5 1 2 3 4 5 1 2 3 4 5 1 2 3 4 6% 40% 12% 1 2 3 4 5 1 2 3 4 5 60% 18% 80% 24% 1 2 3 4 5 1 2 3 4 5 100% 5 30% Reaching the Maximum Temperature 1. 2. 3. 4. 5. Note: It is easier to increase the Start the charcoal, fully open the lid and the bottom vent.
Cooking Guide Direct Heating In the direct heating food is placed on the grill above the heating source for cooking. The heat from the charcoal directly hits food and makes it easier for Grilling and Searing. However there may be some disadvantages like uneven cooking and also longer cooking time depending on what you are cooking. Ideal for: • • Grilling Searing WARNING Grilling Make sure to “burp” the top lid before opening it, to prevent the flashback.
Cooking Guide Indirect Heating Unlike the direct heating, indirect heating allows cooking food without the direct contact with heat. A heat deflector between the Grill and the heat source allows diffusing the heat along the edges to the dome. Heat radiates throughout the closed dome and cooks food evenly. Ideal for: • • • Baking Roasting Smoking WARNING Make sure to “burp” the top lid before opening it, to prevent the flashback.
Cooking Guide Roasting Roasting is the slow cooking of meat or vegetables, uncovered, with dry, indirect heat. 1. 2. 3. 4. Light the charcoal and pour it in the fire box. Install the 18” heat diffuser and cooking grate. Close the lid and adjust the lower vent and top vent halfway. Wait until the kamado reaches the desired temperature of 300 to 450 °F degrees. Adjust the top and bottom vents by closing the openings to stabilize the temperature. 5. Place the food inside the Kamado for roasting.
Replacing the sealing gasket 1 Remove the old sealing gasket from the kamado by using a scraper. 31 Clean the edge by using Acetone with a cloth. ACETONE 25 2 4 Use a metal brush to clean the debris. Peel off the new sealing gasket, start attaching the gasket from back position near the hinge and continue circumferentially along the top edge.
Replacing the Hinge Spring 1 Tools and parts required. Springs 21 Allen Key 1 Close the lid and remove the stopper screw, using an Allen key and a spanner, at the back of the hinge assembly. 3 Close the kamado top and fix the stopper screws using an Allen key and a spanner. Spanner Open the Kamado to the back until the springs are released from expansion and replace the springs. WARNING CRUSH HAZARD Keep your fingers clear from the space between the Kamado lid and bottom.
NewAge Customer Service Please gather and have the following information available when contacting NewAge customer service: • Model number • Date of purchase • Proof of purchase by the original owner • Production code The production code can be located on the back of the kamado. For fastest service, contact NewAge Products at 1-877-306-8930; or support@newageproducts.com.
Nº de modèle d’appareil Gril Kamado - Noir - UGS nº 65996 Gril Kamado - Bleu - UGS nº 65997 Gril Kamado - Deux tons - UGS nº 65998 NEWAGE PLATINUM 22” KAMADO GRILL GUIDE D’INSTALLATION ET MODE D’EMPLOI ! Avertissement : Danger de charge excessive! Pour éviter les blessures au dos, déplacez, assemblez et installez le Kamado avec l'aide de deux personnes ou plus.
SÉCURITÉ ET SOINS Sécurité 1. 2. 3. 4. 5. 6. 7. 8. 9. 10. 11. 12. 13. 14. 15. 16. 17. 18. 19. 20. 21. 22. 23. 24. N’utilisez pas le Kamado à l’intérieur. Conçu strictement pour un usage à l’extérieur uniquement. Il faut au moins deux personnes pour soulever et déplacer le Kamado. Lorsque vous soulevez le Kamado, tenez-le de la base et de l’arrière. Placez et utilisez le Kamado à un endroit sécuritaire et au niveau.
Sécurité et soins Soins 1. Le Kamado est autonettoyant. Chauffez-le jusqu’à 260 °C pendant 30 minutes et il brûlera toute la nourriture et tous les débris. 2. N’utilisez PAS d’eau ou tout autre type de produit de nettoyage pour nettoyer l’intérieur de votre Kamado. Les parois sont poreuses et absorberont tout liquide utilisé, ce qui aura pour effet de fissurer le Kamado.
NEWAGE PRODUCTS INC. PLATINUM 22IN KAMADO GRILL MANUFACTURER WARRANTY UNE PREUVE D’ACHAT EST REQUISE POUR OBTENIR UN SERVICE SOUS GARANTIE.
Index SÉCURITÉ ET SOINS 2 Sécurité et soins 3 Déballage 6 Inspection du produit 6 Spécifications du produit 6 Pièces comprises et pièces de rechange 7 Outils compris 9 Accessoires 9 Assemblage du Kamado 10 Assemblage du Kamado - Installation de base 11 Installation des accessoires 12 Allumage du charbon 18 Nettoyage des cendres 19 Contrôle de la température 20 Guide de cuisson 22 Guide de cuisson 22 Guide de cuisson 23 Guide de cuisson 24 Remplacement du joint d’étanchéit
Déballage • Commencer par placer l’emballage sur une surface plane doté d’un revêtement; • Retirer tout le carton, les matériaux d’emballage en mousse et les sacs en plastique transparents; • Mettre au rebut/recycler tous les matériaux d'emballage; • Vérifier l’ensemble du contenu de la boîte et réunir les outils nécessaires. Consultez la section « Outils requis » dans la liste ci-dessous.
Pièces comprises et pièces de rechange A 13 15 17 16 14 18 24 20 25 11 9 8 DETAIL A SCALE 2 : 5 7 19 11 6 10 22 30 2 21 12 5 3 26 14 23 E 29 1 30 B 4 28 31 27 14 DETAIL E SCALE 2 : 13 7 DETAIL B SCALE 2 : 9
Pièces comprises et pièces de rechange Nº Nº de pièce Description UGS QTÉ. 1 KDO-22.001A-01-XX Base de Kamado - 1 2 KDO-22.002.
Outils compris Clé 10 mm Tournevis à tête cruciforme Accessoires Accessoires compris Seau à cendres Rallonge de grille Grille à charbon Cheminée de charbon Grille de cuisson Trousse de cuisson suspendue Séparateur de charbon Pince de grille Tige de mélange du charbon Accessoires optionnels Diffuseur en demilune 9 Plancha en fonte Diffuseur de chaleur 18 po Housse Kamado Chariot Kamado Pierre à pizza *L’offre des accessoires dépend de l’emplacement et est sujette à changement.
Assemblage du Kamado Réunissiez les pièces et les outils suivants fournis dans l’emballage. Top Vent M5x35 Screw Handle Cap Nuts M6x12 Washers Wrench 3 Installez l’évent supérieur sur le haut du Kamado. Assurez-vous d’aligner les trous latéraux sur l’évent avec les trous sur le haut du Kamado. 4 Ouvrez le couvercle du Kamado et serrez les écrous depuis l’intérieur en utilisant une clé.
Assemblage du Kamado - Installation de base Grille de cuisson Grille à charbon Seau à cendres Boîte à feu 3 1 Installez la grille à charbon sur le dessus du seau à cendres. Commencez par installer la boîte à feu à l’intérieur du Kamado. 2 4 Installez le seau à cendres à l’intérieur de la boîte à feu. Installez la grille de cuisson sur le haut de la boîte à feu. Il est possible d’installer divers accessoires avec le Kamado selon les exigences de cuisson.
Installation des accessoires Séparateur de zone de charbon Le séparateur de charbon peut être posé sur le haut de la grille à charbon afin d’utiliser la moitié de l’espace ou même pour créer deux zones de chaleur distinctes. Rallonge de grille La rallonge de grille ajoute une espace de cuisson supplémentaire et il est possible de l’utiliser comme réchaud puisqu’elle se trouve légèrement plus haute que les grilles de cuisson.
Installation des accessoires Tige de mélange du charbon Pince La tige de mélange du charbon est utilisée pour bouger le charbon avant l’allumage, pour écraser la cendre pour qu’elle tombe dans le seau à cendres. La pince se fixe solidement à la grille, ce qui vous permet de la déplacer de côté pour ajouter plus de charbon tout en évitant de vous brûler ou de toucher les grilles sales.
Installation des accessoires Assemblage du dispositif d’allumage du charbon 1 Déballez le dispositif d’allumage du charbon fourni avec le Kamado et rassemblez les pièces requises pour l’assemblage. 3 Serrez les deux vis fournies avec l’assemblage en utilisant le tournevis cruciforme. 14 2 Assemblez le dispositif d’allumage du charbon en alignant les trous sur le côté de la base avec la plaque et la poignée.
Installation des accessoires Pierre à pizza Configuration 1 - Pour la cuisson 1 Placez le cadre de la pierre à pizza sur le haut de la boîte à feu, puis placez la pierre à pizza sur le dessus du cadre. Configuration 2 - Pour la cuisson indirecte 2 15 Faites glisser la pierre à pizza dans la base du cadre et placez l’assemblage sur le dessus de la boîte à feu. Mettez le grill sur le dessus de la pierre à pizza pour une cuisson indirecte.
Installation des accessoires Plancha en fonte 1 Placez les deux moitiés (plancha de grill et plancha réversible) de la plancha en fonte sur le dessus de la boîte à feu. Plancha de grill Plancha réversible La grille réversible en fonte offre une surface lisse pour une plus grande surface de contact ou elle peut être retournée sur la surface nervurée pour obtenir les marques du gril sur la nourriture.
Installation des accessoires Chariot Kamado Le chariot Kamado est doté de roues pivotantes pour lui conférer de la mobilité et des tables des deux côtés pour une plus grande surface pour préparer les aliments. AVERTISSEMENT! Il faut au moins deux personnes ou plus pour soulever le Kamado. Housse Couvrez votre Kamado monté sur roue avec la housse lorsque vous ne l’utilisez pas.
Allumage du charbon REMARQUE : NewAge ne recommande pas l’utilisation d’allume-feu chimiques, car ils pourraient laisser un arôme indésirable sur la nourriture. De plus, certains allume-feu chimiques pourraient produire des gaz nocifs. Mettez l’allume-feu naturel (du papier Remplissez le dispositif d’allumage du chiffonné est recommandé) à la base du charbon avec la quantité souhaitée de dispositif d’allumage du charbon. charbon.
Nettoyage des cendres Le seau à cendres permet de recueillir la cendre d’une façon propre et pratique. Le seau à cendres peut recueillir 2,6 litres de cendre provenant d’environ 3 kg de charbon. Il dispose d’une poignée pour faciliter la dépose. La cheminée centrale du seau distribue la circulation d’air de façon rapide et égale en dessous du plateau à charbon.
Contrôle de la température Évent supérieur L’évent supérieur régule le volume d’air qui sort du Kamado. L’évent supérieur peut être réglé à différentes positions pour ajuster avec précision la température de cuisson à l’intérieur du Kamado. Chaque chiffre de l’évent supérieur représente 20 % d’ouverture, 1 correspondant à 20 % et 5 à 100 %. Thermomètre Le thermomètre est un indicateur de température fixé au dôme supérieur du Kamado. Le thermomètre fournit une température moyenne à l’intérieur du Kamado.
Ouverture Contrôle de la température Fermeture Positions de l’évent inférieur Réglage coulissant vers la droite % d’admission d’air Réglage coulissant vers la gauche % d’admission d’air 0% 1 2 3 4 5 1 2 3 4 5 20 % 1 2 3 4 5 6% 40 % 1 2 3 4 5 1 2 3 4 5 12 % 1 2 3 4 5 1 2 3 4 5 60 % 18 % 80 % 1 2 3 4 5 1 2 3 4 5 24 % 1 2 3 4 5 1 2 3 4 5 100 % 30 % Atteindre la température maximale Remarque : Il est plus facile 1.
Guide de cuisson Chauffage direct Dans le chauffage direct, la nourriture est placée sur le gril audessus de la source de chaleur pour la cuisson. La chaleur du charbon entre en contact directement avec les aliments et il est ainsi plus facile de griller et de saisir. Il peut toutefois y avoir des désavantages, comme une cuisson inégale et un temps de cuisson plus long, selon ce que vous cuisinez.
Guide de cuisson Chauffage indirect Contrairement au chauffage direct, le chauffage indirect permet de cuire des aliments sans un contact direct avec la chaleur. Un déflecteur de chaleur situé entre le gril et la source de chaleur permet de diffuser la chaleur le long des bords du dôme. La chaleur irradie à travers le dôme fermé et cuit la nourriture de façon égale.
Guide de cuisson Rôtir Rôtir consiste à faire cuire lentement de la viande ou des légumes, à découvert, à l’aide d’une chaleur indirecte sèche. 1. Allumez le charbon et mettez-le dans la boîte à feu. 2. Installez le diffuseur de chaleur 18 po et la grille de cuisson. 3. Fermez le couvercle et réglez les évents inférieur et supérieur à demi ouverts. 4. Attendez jusqu’à ce que le Kamado atteigne la température souhaitée de 300 à 450 °F degrés.
Remplacement du joint d’étanchéité 1 31 Retirez le joint d’étanchéité usé du Kamado en utilisant un grattoir. Nettoyez le bord en utilisant de l’acétone avec un chiffon. ACETONE 25 2 Utilisez une brosse en métal pour nettoyer les débris. 4 Pelez le nouveau joint d’étanchéité. Commencez à fixer le joint à partir de la position arrière, près de la charnière, et continuez sur la circonférence le long du bord supérieur.
Remplacement du ressort de charnière 1 Outils et pièces nécessaires. Springs 21 Allen Key 1 Fermez le couvercle et retirez la vis de blocage en utilisant une hexagonale et une tricoise. 3 Fermez le haut du Kamado et fixez les vis de blocage à l’aide d’une clé hexagonale et d’une tricoise. Spanner Ouvrez le Kamado à l’arrière jusqu’à ce que les ressorts soient libérés de l’expansion et remplacez-les.
Service à la clientèle de NewAge Lorsque vous contactez le service à la clientèle de NewAge, veuillez rassembler les renseignements suivants et les avoir à portée de main : • Numéro de modèle • Date d’achat • Preuve d’achat par le propriétaire d’origine • Code de production Vous pouvez trouver le code de production à l’arrière du Kamado. Pour un service plus rapide, contactez NewAge Products au 1 877 306-8930; ou écrivez à support@newageproducts.com.