
Instructions / Assembly

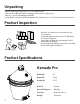
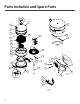
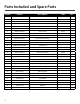
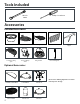
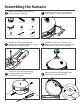
Table Of Contents
- Safety and Care
- Safety and Care
- Unpacking
- Product Inspection
- Product Specifications
- Parts Included and Spare Parts
- Tools Included
- Accessories
- Assembling the Kamado
- Assembling the Kamado Basic Setup
- Installing the Accessories
- Starting the Charcoal
- Cleaning the Ash
- Controlling the Temperature
- Cooking Guide
- Replacing the sealing gasket
- Replacing the Hinge Spring
- NewAge Customer Service
- SÉCURITÉ ET SOINS
- Sécurité et soins
- Déballage
- Inspection du produit
- Spécifications du produit
- Pièces comprises et pièces de rechange
- Outils compris
- Accessoires
- Assemblage du Kamado
- Assemblage du Kamado - Installation de base
- Installation des accessoires
- Allumage du charbon
- Nettoyage des cendres
- Contrôle de la température
- Guide de cuisson
- Guide de cuisson
- Guide de cuisson
- Guide de cuisson
- Remplacement du joint d’étanchéité
- Remplacement du ressort de charnière
- Service à la clientèle de NewAge

10
Assembling the Kamado
Top Vent M5x35 Screw
M5 Nut
Handle Cap Nuts
Spring Washers
M6x12 Washers Wrench
Phillips
Screwdriver
Gather the following parts and tools
supplied with the package.
Install handle in position by matching
holes with the screws on the Kamado.
Install four cap nuts along with the
spring washer and M6x12 washer using a
spanner to secure the handle.
Install Top vent on top of the Kamado.
Make sure to align side holes on the vent
with the holes on top of the Kamado.
Secure the Top vent to Kamado by
installing M5x35 screws using the
provided screwdriver.
Open the kamado lid and tighten nuts
from inside using the spanner.
1
2 3
4
4