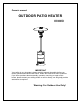
Owner’s manual OUTDOOR PATIO HEATER APH-4000PV APH-4000SV IMPORTANT Your safety is very important, please read this manual thoroughly before you install, operate and maintain this heater. Retain this manual for future reference. If you have questions about assembly, operation, servicing or repair of this heater, please contact your selling dealer or call us directly, we will gladly provide assistance as required.
Table of Contents Important Warning……………………………………………………… …………2 Introduction………………………………………………………………………….3 Specification………………………………………………………………………...3 Important Safety Precautions…………………………………………….…… .3-5 Assembly…………………………………………………………………………....5 Tools required………………………………………………………………………5 Unpacking…………………………………………………………..………………5 Component List………………………………………………..…………………...6 LP gas hook up and installation of the cylinder…………………………………6 Assembly Instructions………………………………………..………………….
recommended by the instructions. ♦ Warning: For your safety If you smell gas: 1.Shut off gas to the appliance. 2.Extinguish any open flame near the appliance. 3.If odor continues, immediately call your gas supplier or local fire department. Introduction Thank you for choosing Outdoor Patio Heater. Please take the time to read these instructions and follow each step carefully for safe operation. Retain this manual for future reference.
operating instructions. If any time gas odor is detected, shot off the appliance immediately, find and correct the leak. Please set up the propane supply with utmost care. Alert both children and elders to the hazard of high surface emperatures. Care must be taken for the supervision of children in the vicinity of an operating or hot heater. Your children and pets should be supervised when they are in area of heater.
instructions, and of the hazards involved. If this heater is used in a commercial or rental installation, it is the responsibility of the purchaser to check with the local codes for properly acquainting with the safety precautions and instructions. Failure to comply with the precautions and instructions provided with this heater can result in death, serious bodily injury and property loss or damage from hazards of fire, explosion, burn, asphyxiation, carbon monoxide poisoning.
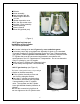
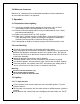
Reflector Burner assembly Base assembly with the allast weight & Bracket uel -line Cylinder decorative cover Post / the Slip socket cover Regulator / hose assembly Fastener package Owner’s manual Wheel Kit (optional part) ( Figure 1) 1.4 LP gas hook up and installation of the cylinder 1.4.1 Gas requirements: Our heater is designed to use LP gas only, never substitute gases.
1.5 Assembly Instructions Step 1. Set the burner assembly on a flat surface. Remove the protective end cap from the only one end of the male flared fitting at the end of the fuel line. Leave the other end cap on to protect the fitting while you are doing this assembly. Screw the male flared fitting into the inlet fitting at the base of the burner head and tighten using a ¾ wrench. Be sure that the connection is tight (do not over-tighten).
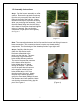
Step 3. If you prefer the heater comes with the wheel kit, you need to purchase them from your selling dealer. You can attach the wheel kit with the fasteners provided now. See Figure 5. Step 4. Place the cylinder decorative cover over the base assembly / brackets. ( ( (Figure 5) Step 5. Please carefully insert the Post/Slip Socket Cover assembly with the fuel line into the post support socket assembly. Be sure that the lower end of the fuel line passes through the hole in the post support plate.
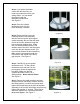
Step 8. Connect an approved propane cylinder to regulator / hose assembly. Properly tighten the regulator’s hand wheel and connection device to tank valve. Do not use tools. First check for leaks: Be sure the fittings at the end of the feed line going into the burner head and other end of the fuel feed line where the hose is attached are tight. Leak test with a soapy solution by mixing one part liquid soap solution with two parts water only. Do not use flame! 1. Turn the Control Knob to the “OFF” position.
2.2 Minimum clearances Minimum 24” clearances from combustible materials must be maintained at all times while the heater is in operation. 3. Operation 3.1 Preparation before lighting 3.1.1 Check any possible shipping damage of the heater. If any is found, immediately contact your selling dealer or call us directly. 3.1.2 Please review thoroughly and be sure you understand all of the “safety precautions and warnings”. 3.1.3 Make sure control knob is at “OFF” position. 3.1.
position. Depress and hold the control knob for 2-3 minutes to purge the air from the gas line and flow of gas to the pilot assembly. Do not press on the igniter while you are purging the line. 3.3.2 Important Light step While Hold the control knob in, press the Piezo Igniter button (red button), the Piezo Igniter will be lit. On occasion conduct to light several times. After the pilot is lit, continue to depress the control knob for 30 seconds to heat the thermocouple.
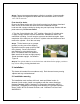
Allow at least 45 minutes for the heater to cool down after using. Store the heater upright in a sheltered area away from inclement weather such as rain, snow and dust. We have our patio heater cover available to protect the burner head. We recommend using our heat head cover when your heater is in storage. Note: Be sure the heater is cool down before using the cover.
Never use wood or plastic, it may break and block the parts. Never spray any cleaning product on the emitter grid or burner area. 6. Troubleshooting Problem Burner won’t light Possible Cause Air in gas line Purge gas line by holding control knob at “PILOT” position for at least two minutes. Blockage in orifice Clean orifice Gas pressure is low Replace cylinder Igniter is not sparking Use match to light pilot through the hole at the base of heater head.
7. Service and warranty Information To learn how to service and procure parts for worn out, defective or damaged components, please contact your selling dealer or call us directly for assistance. Please provide us with heater’s model number and the serial number. Warning: Use our original equipment replaced parts only. Use unauthorized parts or modification of parts can void warranty and create an unsafe condition. 8.
the original purchaser may have additional rights and remedies in law. 8.7 This warranty does not cover commercial or rental use.