
Outdoor Patio Heater Owner's Manual


11
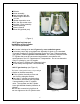
position. Depress and hold the control knob for 2-3 minutes to purge the air
from the gas line and flow of gas to the pilot assembly. Do not press on the
igniter while you are purging the line.
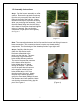
3.3.2 Important Light step
While Hold the control knob in, press the Piezo Igniter button (red button), the
Piezo Igniter will be lit. On occasion conduct to light several times.
After the pilot is lit, continue to depress the control knob for 30 seconds to heat
the thermocouple. Release the control knob and the pilot should stay lit. You
can visually observe the ignition of the pilot through sliding the hole cover at
the base of the heater head assembly.
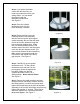
Caution:
Close the hole cover once the pilot flame stays on. Do not attempt to slide this
cover when the main burner is lighting, operating.
Lower the cylinder cover onto the base.
3. 4 Setting Control
Press and turn the control knob from “ PILOT” to full “ON” position, the burner
will light immediately for maximum heat output. The knob can be turned back
to reduce or desired setting.
Note: While in use, the burner flame should be mainly blue in appearance with a
small amount of yellow.
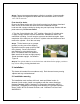
Caution: White smoke may appear around the emitter screen during the first few
minutes of the initial burning. The burner is burning off oily materials
during the first few minutes of the initial burning.
3.5 Turn Off and re-light
If you turn the knob back to “PILOT” position, the main burner will extinguish
but the pilot will remain lit.
Turn the control knob clockwise to “OFF” position.
Note: Do not attempt to relight the heater for 5 minutes after turn off the
heater. The safety system built into the heater will not allow you to
immediately re-light the heater from the “OFF” position.
Repeat following
“
Important Light step
” procedure, you don’t have to wait more
than few seconds to restart the “PILOT” light and then ignite the main burner.
3.6 Turn Off and Shut Down
Turn the control knob clockwise to “OFF” position.
Turn off gas supply.
Disconnect the cylinder and remove when the heater is not in use.
4. Storage