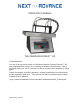
OPERATOR’S MANUAL THE FREEDOM ROCKER™ DX Congratulations! You are now the proud owner of the Next Advance Freedom Rocker™ DX, the programmable version for versatility and deluxe functionality! We’re sure that once you use it, you won’t want to process your samples by hand again. Please thoroughly read this operator’s manual explaining this instrument’s proper operation and care. This manual can also be viewed with via web browser at this address: http://www.nextadvance.com/manuals/FreedomRockerDX_manual.
OPERATOR’S MANUAL FOR THE FREEDOM ROCKER™ DX TABLE OF CONTENTS ANATOMY OF THE FREEDOM ROCKER™ DX............................................. 3 SETTING UP YOUR FREEDOM ROCKER ................................................... 4 AUTOMATIC AND MANUAL MODES OF OPERATION................................... 4 Top Level Menu ......................................................................................... 4 Manual Mode.......................................................................................
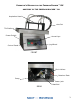
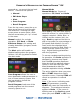
OPERATOR’S MANUAL FOR THE FREEDOM ROCKER™ DX ANATOMY OF THE FREEDOM ROCKER™ DX Aspiration Head Tube Set Tilt Platform Power Switch Arrow Keys Jog Wheel Control Panel FRONT Pinch Valves Retainer Plate Pump Power Jack Manifold REAR 3
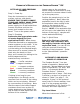
OPERATOR’S MANUAL FOR THE FREEDOM ROCKER™ DX SETTING UP YOUR FREEDOM ROCKER Step 1: Power Up Place the instrument on a level surface, such as a lab bench. ENSURE THAT POWER CONNECTIONS ARE SAFELY AWAY FROM WET AREAS! Plug the 12VDC power supply into a wall outlet then connect the other end into the power jack located on the rear panel. Turn on the power switch.
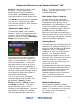
OPERATOR’S MANUAL FOR THE FREEDOM ROCKER™ DX powered on, you are at the top level menus. There are five options: o Manual Manual Mode Manual Mode has 3 types of operations: Fill, Rock, and Drain. o Edit Auto Steps o Alert o Save Program o Recall Program From the top menu, press the up or down arrow keys to scroll through the selections. Pushing the right arrow enters a menu option, while the left arrow takes you “up” a level in the menu. Manual mode is for a single operation: Fill, Rock, or Drain.
OPERATOR’S MANUAL FOR THE FREEDOM ROCKER™ DX Rocking commences with a countup timer. If the cursor were blinking next to the countdown timer value, then Rocking would commence with a count-down timer. step 1. Push the left arrow to go up a level. You will see the step number displayed. The Rocking speed may be adjusted “on-the-fly”, using the jog wheel. The minimum speed is 30% and the maximum is 100%. You can move to the next step number by pressing the down key.
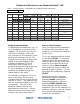
OPERATOR’S MANUAL FOR THE FREEDOM ROCKER™ DX Table 1. Sample Program - overnight Western antibody staining and washing No.
OPERATOR’S MANUAL FOR THE FREEDOM ROCKER™ DX When the program has finished, a beeping sound will occur (if the audible alert is enabled). Buffer or reagent will remain in the tray (the last drain does not occur) and the platform will continue to rock so that the sample does not dry out. To run the instrument again, simply press START once more. CHANGING BOTTLES It is easy to disconnect the tubing from the bottles. First tighten the cap to ensure that no liquid will spill when you carry the bottle.
OPERATOR’S MANUAL FOR THE FREEDOM ROCKER™ DX Turn the instrument around so that the rear of the FREEDOM ROCKER™ is facing you and the entire instrument rests on a level surface. To remove the tubing from the pinch valve, use Manual Mode and have the instrument FILL or DRAIN a volume of 0 ml to the container with the matching color to the tubing you want to insert or remove. DO NOT ROTATE THE PINCH VALVES BY HAND. You must also pivot the tubing retainer plate out of the way to remove the tubing.
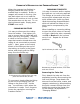
OPERATOR’S MANUAL FOR THE FREEDOM ROCKER™ DX (closer to you). Notice that the pin (see arrow in the figure above) protruding from both sides fits in the slot at the bottom corner of the pump head. The two spacer blocks (circled) should rest on the sloping sides of the pump head and the pins in the backers (white arrow) need to slide into the slot at the bottom of the pump head. When placing the backer into position, squeeze it against the tubing so that its holes line up.
OPERATOR’S MANUAL FOR THE FREEDOM ROCKER™ DX Then, connect the luer lock fittings to the aspiration head and the others ends onto the One>Click™ caps on the bottles. ASPIRATION HEADS The aspiration head can be swung out of the way when accessing the trays. sanitizing solution, e.g. 5% bleach or 30% ethanol, followed by thorough rinsing with distilled water. Please note that the tube set and the aspiration head should not be autoclaved because the temperature is too high for some of the plastic parts.
OPERATOR’S MANUAL FOR THE FREEDOM ROCKER™ DX If liquid is not dispensed or aspirated, the caps are probably tightly screwed onto the bottles and air is not able to enter or leave the bottles and equalize the pressure. Loosen the caps on the bottles. If not caught early, this could lead to tubing popping off a fitting or leakage at a fitting. SUPPORT A thorough list of FAQs is at http://www.nextadvance.com/FAQs/ FAQs-Freedom-Rocker.htm.