Safety Precautions Do not subject the device to severe impact or drop it from heights. Do not use the device in extreme hot or cold, dusty or damp conditions. Do not expose it to direct sunlight. Avoid using the device near strong magnetic fields. Keep the device away from water and other liquids. In the event that water or other liquids enter the device, power off the product immediately and clean the device.
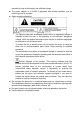
operable as long as the battery has sufficient charge. The power adaptor is a CLASS II apparatus with double insulation, and no external ground is provided. Safety symbol explanation: - - - The lightning flash with arrowhead symbol within an equilateral triangle is intended to alert the user to the presence of non-insulated “dangerous voltage”within the product’ s enclosure that may be of sufficient magnitude to constitute a risk of electric shock.
Listening Cautions Do not listen to your earphones or headphones at a high volume. Hearing expert advice against continuous extended play. Excessive volume through earphones and headphones can cause hearing loss. If you experience a ringing in your ears, reduce volume or discontinue use. Do not use while operating a motorized vehicle. It may create a traffic hazard and is illegal in many areas.
Table of Content Safety Precautions............................................................................................ 1 Listening Cautions ............................................................................................ 3 Feature Summary............................................................................................. 5 Accessories ...................................................................................................... 5 Buttons & Ports.........................
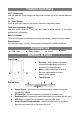
Feature Summary Wi-Fi Connectivity With the latest Wi-Fi technology, this device can connect you to the Internet wherever you are. 7.0”Touch Screen Touch or slide your finger on the screen, the screen responds instantly. Third-party Application Support With the built-in Android TM OS, you can install a large number of third-party applications in this device. Built-in G-sensor The screen changes to landscape or portrait automatically when the device rotates.
Rear View j i. Reset pin hole –used to reset your device if the device freezes. j. Built-in Speakers j i Charging Battery The device has a built-in rechargeable battery. No extra battery installation is required. Just charge the device when it indicates low battery. To charge the battery, connect the device to any standard wall outlet via the DC-IN port using the power adaptor. It takes about 5 hours to fully charge the battery.
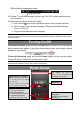
USB notification message as shown. Drag downwards (4) Choose “Turn off USB Storage”and then tap “Turn Off”to disconnect the device from computer. (5) Disconnect the device from the PC safely. a) Left-click the icon at the right bottom corner of the computer desktop. b) Click the pop-up mini-window message of “Stop the USB Mass Storage Device –Drive (X).” c) Disconnect the device from the computer.
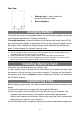
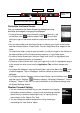
WiFi connection Return Display menu options Go to Home Screen Drag the top bar downwards to display the notification message Battery level Time Customize the Home Screen You can customize the Home Screen by adding/removing shortcuts and widgets, changing the wallpaper. To add a Home Screen item (shortcuts, widgets, folders etc.), tap on the Menu icon and then select “Add” . You can also hold your finger on the screen and then choose an item from the list.
Display all Applications The device has many useful applications pre-installed. You can tap the Application Tab to display them. Unlocking the Screen The screen will lock itself after standing by for a few seconds. You need to unlock the screen by dragging the lock icon to the arrow direction before you continue to use the device. Note: Dragging the icon to the arrow direction will mute the sound.
scroll the file list up and down. In some browsers (File, Music, Video, Photo, Web etc.), you may hold your finger on an item to display options. Accessing Internet Your NextBook features built-in Wi-Fi technology so that you can access the internet over Wi-Fi network. First of all, you need to configure a Wi-Fi network. For the Wi-Fi configuration procedure to work, you need to be in a Wi-Fi zone that will allow you to connect to it.
the screen, then tap “Add a Wi-Fi network.”Enter the required information, and then tap “Save.” To set up IP address manually, tap the Menu icon , tap “Advanced”and then input all required network parameters (“Regulatory domain,”“IP address,”etc). You can obtain these parameters from the network administrator. Launching the Web browser Tap the Applications icon to display all applications, and then tap the Browser icon to launch the Web browser.
To display the available menu items, tap the Menu icon . To go back directly to the Home screen, tap the Home icon . Depending on where you are in the web browser, holding down on an item will give you access to more options. To fill in a text field, tap in the field, then use the virtual keyboard to type in the required text. Web Browser Menu Items When you are viewing a page, you can tap the menu icon items. to display the menu New window Allows you to open new windows.
Download E-books with Adobe Digital Editions The Adobe Digital Edition application allows you download e-books protected by DRM to your NextBook. (1) Access the website http://www.adobe.com/products/digitaleditions/, and then install the Adobe Digital Editions software following the instructions. (2) Authorize your computer with your Adobe ID and Password. (3) Activate your NextBook. Connect your NextBook to computer with the USB cable and start up the Adobe Digital Editions.
(6) Connect your NextBook to the computer with the USB cable, and the Adobe Digital Editions should recognize your NextBook. (7) Click “Purchase”to see your downloaded e-book and then drag it to your NextBook. Start Reading (1) (2) (3) In the Home Screen, tap the E-book Reader shortcut to enter the e-book reader mode. Tap on the Left Arrow or Right Arrow to scroll left or right though e-books. Tap an e-book to start reading immediately.
View e-book Information In the history or e-book library, you can view information about an e-book before you start reading it. Tap an e-book, and the book name; author or publication year of the e-book should display at the top screen. Sort e-books In the history or e-book library, you can sort e-books by title, author or file size by tapping on Title, Author or Size. Start Reading To start reading an e-book, tap “Continue Read”.
Increase Font Size (1) When you are reading, tap the Menu icon to display e-book settings. (2) Tap “Font Size”to adjust the font size. (3) Tap a size that you want, and then tap “OK”to confirm. Jump to a Page You can directly go to a page that you have specified. (1) When you are reading, tap the Menu icon to display e-book settings. (2) Tap “Go to”. (3) Tap the page number input field to display the virtual keyboard. (4) Tap the numbers to input the page number.
Purchase e-books from Borders (1) In the Home Screen, tap the EbookReader icon. (2) Tap on the “Borders” icon to access Borders. (3) Tap “SIGN IN”to log in with your account, and then input your account information. (4) Go to the book store and search for e-books. Tap the e-book that you want to buy. (5) Tap on BUY NOW button to start the purchase process. Check your credit card information and the price. (6) Input your payment account information to checkout. Tap Buy Now to download the e-book.
(2) Tap an e-book and tap “Start Reading”to read the e-book. (1) Tap to enter the Borders library and you should see all of your purchased e-books. (3) During reading, you can: Turn over pages by sliding your finger left and right. Tap on the screen to display the control bar. By sliding the control bar, you can go to any page in the e-book. Tap the Menu icon to display menu options.
information tags, they will be classified as (Unknown) in the Music Library. When new music is copied to the device, the Music Library will be updated automatically. You can drag your finger up and down on the file list to scroll through the list. Tap a track to play a track. To return to the Home Screen, tap / / . Music Library Menu Once you enter the music library, you should see the toolbar at the bottom of the screen. Tap and hold your finger on the icon and you should see its name.
(3) Tap the Sort icon (by file size) / (by file type) / (by leading letter)/ (by creation time) to sort the tracks/folders stored in the selected memory device. Set EQ Mode Manually When you are listening to the music, tap the Menu icon which allows you to customize your equalizer setting. This device features a 7-band equalizer. (1) Select a band and then drag your finger up/ down on the band to change the gain level for the frequency range. (2) Tap “Save Effect”to confirm or tap to return.
To go back to the music library, tap on . To go back directly to the Home screen, tap on the Home icon icon . or Return Playlist A playlist is a list of audio tracks that the music player will automatically play one after the other. On this device, you can play, create and edit as many playlists as you want. Create a Playlist (1) While you are in the music library, tap the Playlist icon “ ,” a playlist panel will open. You can now start modifying the playlist.
Playing Video In the Home Screen, tap the Video Player icon to enter the video player mode. Optionally, you can tap the Applications shortcut to display all applications and then tap the Video Player icon to enter the video mode. Navigate through Video Files You should see the video list when you enter the video player. You can drag your finger up and down on the video list to scroll the video list up and down. Tap a video to start playing.
Tap on Tap on Tap on / to play the previous or next video. to change the aspect ratio of screen. to stop playing and return the video list. Note: Some video files may not be played correctly with the device. Refer to the Technical Specifications at the end of the manual, and make sure the video resolution, encoding format or file type is supported. Video Playback Settings Tap on the icon to display the video settings.
※ Box View Style To view a photo, tap a thumbnail in the gallery. You can delete a photo by 1) holding your finger on the picture that you want to delete until a menu appears; 2) selecting “Delete”; 3) selecting “OK”. ※ Nonlinear View Style In the Nonlinear View Style, you can pick up a photo from a pile of photos. To view a photo, hold your finger on the photo until it opens. You can group, align, hide or adjust these photos. (1) Tap “Menu”to display menu options.
Display the Toolbar When you are viewing the picture, you can tap on the screen to show a floating toolbar at the top right of the screen. With the toolbar, you can start an automatic slideshow, rotate or crop the picture. Photo55.jpg Slide show Crop Image info. Rotate Set as wall paper options Return Slide Show To start an automatic slideshow, tap the Slideshow icon select a transition effect. To stop the slideshow, tap on the screen.
You can slide your finger horizontally or vertically depending on the slip orientation that you set to display the previous/next picture. To set the orientation, tap the Menu icon and then select “Horizontal Slip”or “Vertical Slip”. File Explorer In the Home Screen, tap the Applications shortcut to display all applications and then tap the Explorer icon to enter the file explorer mode. Navigate through Files and Folders You can drag your finger up and down to scroll the file list up and down.
Copy/Move Files and Folders (1) (2) (3) (4) (5) In the file list, scroll up and down by sliding your finger to select the file/folder that you want to copy or move. Hold the selected file/folder until a pop-up menu appears. Select “Copy”or “Move”from the pop-up menu. Navigate to the location where you wish to copy or move the file/folder to. Select the Editor icon from the toolbar and then choose “Paste.
Setup Email Account First you need to setup an E-mail account for receiving or sending emails. (1) Start up the email application by tapping the Email application icon and you are prompted to setup an account. (2) Input your email address and login password. You can set the account as default by selecting the option “Send email from this account by default”. (3) Tap “Manual Setup”to set the email server information. (4) Choose the server type from POP3, IMAP or Exchange for incoming emails.
Check the Account Setting (1) When you are in the email box, tap on the Menu icon to display the menu items. (2) Tap on “Accounts”to display all email accounts. (3) Hold your tap on the account that you want to check until a menu pop up. (4) Tap “Account settings” and then you should see all setting information about the account. You can edit these settings as you want. View Emails You should enter your mailbox when you start up the email application.
(4) Disconnect your NextBook form the computer. (5) Turn on your NextBook and enter the file explorer mode with the Explorer. (6) Locate the installation file and open it. (7) Follow the on-screen instructions to install the application. (8) Once the application is installed successfully, you can find it in the application tab. Uninstall Applications (1) Tap the Settings shortcut in the Home Screen to display all system settings. (2) Select “Applications”. (3) Select “Manage Applications”.
this option. When it is possible, you can use your finger to scroll the screen up and down to reveal settings that you don’ t initially see. When you have finished adjusting your settings, tap the Back icon to go back to the list of settings, or tap the Home icon to go directly to the Home screen. Your settings are saved instantly. Wireless & Wi-Fi –tap on this line to enable or disable the Wi-Fi connection. networks Wi-Fi settings –allows you to set up and manage your Wi-Fi networks.
Troubleshooting Reset this device In the event that the device freezes, you can force the device to shut down by holding the Power button for 15 seconds. If the Power button does not reset your device, use the “pinhole reset”button, located on the back the device.
APE Version 3.95,3.97,3.98,3.99,normal and fast AAC(ADIF, ATDS Header AAC-LC and AAC-HE): File Format : 8 8 48KHZ 48KHZ AVI, 3GP, MP4, RM, RMVB, FLV, MKV, MOV, WMV 1280*720/25FPS Max AVI MPEG4 ASP/XVID/DIVX3/4/5 Audio Codec 3GP/MP4(H.264/H.263/M PEG4/XVID/DIVX3/4/5) MP1/MP2/MP3/AC3/AAC MPEG4/XVID/DIVX3/4/5:1280*720/25FPS Max H.264:1280*720/25FPS Max H.263:640*480/25FPS Max RM/RMVB(Real 8/9/10) Video Coding Format FLV(Sorenson H.
FCC Statement FCC Caution: This equipment has been tested and found to comply with the limits for Class B digital device, pursuant to part 15 of the FCC Rules. These limits are designed to provide reasonable protection against harmful interference in a residential installation. This equipment generates uses and can radiate radio frequency energy and, if not installed and used in accordance with the instructions, may cause harmful interference to radio communications.
Other names of systems and products mentioned in these instructions are usually the registered trademarks or trademarks of the manufacturers who developed the system or product concerned. The TM and marks are not used to identify registered trademarks and trademarks in these instructions. This manual was correct and complete at the time of printing. However, new specifications and updates can occur at any time without prior notice.