Safety Precautions Do not subject the device to severe impact or drop it from heights. Do not use the device in extreme hot or cold, dusty or damp conditions. Do not expose it to direct sunlight. Avoid using the device near strong magnetic fields. Keep the device away from water and other liquids. In the event that water or other liquids enter the device, power off the product immediately and clean the device.
operable as long as the battery has sufficient charge. The power adaptor is a CLASS II apparatus with double insulation, and no external ground is provided. Safety symbol explanation: - - - The lightning flash with arrowhead symbol within an equilateral triangle is intended to alert the user to the presence of non-insulated “dangerous voltage”within the product’ s enclosure that may be of sufficient magnitude to constitute a risk of electric shock.
Listening Cautions Do not listen to your earphones or headphones at a high volume. Hearing expert advice against continuous extended play. Excessive volume through earphones and headphones can cause hearing loss. If you experience a ringing in your ears, reduce volume or discontinue use. Do not use while operating a motorized vehicle. It may create a traffic hazard and is illegal in many areas.
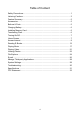
Table of Content Safety Precautions............................................................................................ 1 Listening Cautions ............................................................................................ 3 Feature Summary ............................................................................................. 5 Accessories ...................................................................................................... 5 Buttons & Ports........................
Feature Summary Wi-Fi Connectivity With the latest Wi-Fi technology, this device can connect you to the Internet wherever you are. 8.4”Touch Screen Touch or slide your finger on the screen, the screen responds instantly. Third-party Application Support With the built-in Android TM OS, you can install a large number of third-party applications in this device. Built-in G-sensor The screen changes to landscape or portrait automatically when the device rotates.
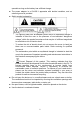
Rear View j i. Reset pin hole – reset your device if the device freezes. j. Built-in Speakers j i Charging Battery The device has a built-in rechargeable battery. No extra battery installation is required. Just charge the device when it indicates low battery. To charge the battery, connect the device to any standard wall outlet via the DC-IN port using the power adaptor. It takes about 5 hours to fully charge the battery. Note: a. You can operate the device even when it is being charged.
USB notification message as shown. Drag downwards (4) Choose “Turn off USB Storage”and then tap “Turn Off”to disconnect the device from computer. (5) Disconnect the device from the PC safely. a) Left-click the icon at the right bottom corner of the computer desktop. b) Click the pop-up mini-window message of “Stop the USB Mass Storage Device –Drive (X).” c) Disconnect the device from the computer.
a. b. c. d. e. f. g. h. Home: Go back to the Home Screen wherever you are in the interface. Memory Card/USB connection indicator WiFi Connection Battery Level Current Time Return: Return to the previous directory. Menu: Tap to display an overlay setting menu. Quick Internet Search - You can input anything you wish you search on the searching Bar ( required WIFI connection) i. Weather forecast - Worldwide Cities (required Wi-Fi connection) j.
To change the wallpaper, from the Home Screen, tap on the Menu icon , a list of options appears. Tap on “Wallpaper”and then choose a picture as the desktop wallpaper. To change the System Settings, from the Home Screen, tap on the Menu icon , and then tap on “Settings” . Choose a category: “Wireless & Networks”, “Sound & Display”, “Date & Time”, etc. For more information on the different settings, see the System Settings section.
configured once, it will attempt to make a connection. Making WIFI Connection (1) In the Home screen, tap on the WiFi icon. (2) Tap on the “Wi-Fi”setting to turn on the Wi-Fi. (3) Tap the “Wi-Fi settings”, your NextBook will scan automatically for available WiFi networks and display them. The list of available networks shows all the wireless networks in range of your device. Note: a) The available network list is constantly refreshed automatically.
to launch the Web browser. If you are already connected to a network, the Web browser will simply open and you can start browsing the Web. To access a new website, tap the Menu icon to display the menu, and then select “Go”to input another address. Note: Not all wireless networks offer access to the Internet. Some Wi-Fi networks only link several computers together, without any Internet connection. Using the Virtual Keyboard Tapping on any text input field can open the virtual board.
New window Allows you to open new windows. Bookmarks Will open the “Bookmarks” manager. You will see three tabs: “Bookmarks,”“Most visited,”and “History.” “Bookmarks”shows you a list of bookmarks. Just tap one of them to open it in the current window. Holding down a bookmark will give you access to several options (you will be able to edit it, rename it, delete it, etc.). You can also use the Menu icon which will allow you to bookmark the last-viewed page.
Note: a. Make sure your e-books are in format of PDF, EPUB, TXT, FB2, RTF or PDB supported by the device. b. E-book cover will show as defaulted cover by the device if the e-book has no cover data. That’ s why you see some e-book covers are the same. History and My Library You can tap “History”to view your reading history or tap “My Library”to enter the e-book library. “History”shows all of the e-books that you have read by date. “My Library”shows all of e-books stored in the device.
right OR press the PREVIOUS/NEXT buttons on the device to page up or down. Increase Font Size (1) When you are reading, tap the Menu icon to display e-book settings. (2) Tap “Font Size”to adjust the font size. (3) Tap a size that you want, and then tap “OK”to confirm. Jump to a Page You can directly go to a page that you have specified. (1) When you are reading, tap the Menu icon to display e-book settings. (2) Tap “Go to”. (3) Tap the page number input field to display the virtual keyboard.
configure the WiFi network, and then enter the Ebook Reader mode. Once you enter the Ebook Reader, tap the Borders icon to access it. (1) In the Home Screen, tap the (2) Tap on the “Borders”icon to EbookReader icon. access Borders. (3) Log in with your Adobe ID and password. (4) Choose the e-book that you want to buy. (5) Tap on BUY NOW button to start the purchase process. (6) Input your payment account information to checkout.
(7) Check your credit information and the price. card (8) Tap Buy Now to download, and the e-books will appear in your e-book library. Download ebooks with the Adobe Digital Edition Once you have purchased ebooks online, you need to transfer them to your NextBook using the Adobe Digital Editions software which allows you to view and manage e-books protected by DRM license. To transfer DRM-protected e-books, 1. Access the website http://www.adobe.
4. Download DRM-protected PDF files to your computer. Access the Internet and search for e-books, choose your favorite e-books and download them. If the e-book is protected by DRM, you should be prompted by DRM license information. Click “Open”to start downloading the DRM-protected e-book. 5. Click “Purchase”, and then you should see your downloaded e-book at the right panel of the Adobe Digital Editions user interface. 6.
Music Library You should enter the music library once you start the music player. The Music Library shows your music files sorted by categories (Artist, Album, Genre, etc.) if your music files contain these song information tags. If some of your music files do not contain information tags, they will be classified as (Unknown) in the Music Library. When new music is copied to the device, the Music Library will be updated automatically.
Search for Tracks You can search for tracks in the internal memory or memory card by inputting a few key words. (1) In the music library, tap the Directory Browsing icon in the menu. (2) Choose the memory where you want to search for tracks. (3) Tap the Search icon , and then input a few key words of the track. (4) Tap to start searching. The track should be listed if found.
the song. You can also drag the cursor in the progression bar to another location in the song. Tap on / to adjust the volume. To change the EQ mode, tap on “EQ”. To play the specified section from A to B, tap on “A-B”. To change the repeat mode, tap on . To add current track to playlist, tap on . To display lyric/ID3 information, tap on . To define the equalizer mode manually, tap on .
Delete a Playlist To delete an existing playlist, (1) In the Music Library, tap the Playlist icon to display the playlists. (2) Tap the icon beside the playlist that you want to delete, and then the playlist will be deleted. Playing a Playlist (1) In the Music Library, tap the Playlist icon to display the playlists. (2) Tap a playlist to open it. A panel showing the contents of the playlist will open. (3) Tap the first item in the playlist to start playing from the first track.
Playback Screen a d c b e f g h i j k a. b. c. d. e. f. g. h. i. j. k. Decrease volume Progression bar Increase volume Add Bookmark Brightness Previous video Play/Pause icon Next video Change View Mode Return Video settings Tap on the / icon to pause/resume the video, Tap on “ ”to display the menu items. Tap on the progression bar to go directly to a different location in the video. You can also use your finger to drag the cursor in the progression bar to another location in the video.
Help Play Mode Return Get instructions on playing video. Single –plays the current video and then stops after playing. Repeat One –Repeat the current video. Repeat All –Repeat all videos. Exit from the menu. Viewing Photos In the Home Screen, tap the Photo Browser icon to enter the photo viewer mode. Optionally, you can tap the Applications shortcut to display all applications and then tap the Photo Browser icon to enter the photo mode.
Viewing Photo When you are viewing picture, you can tap on the screen to show a floating toolbar at the bottom of the screen. To start/pause a slideshow, tap on the Slideshow icon . To display the previous/next picture, tap on the left / right arrow beside the picture. To rotate the picture 90°counterclockwise, tap on the Rotate Left icon . To rotate the picture 90°clockwise, tap on the Rotate Right icon . To magnify the current picture, tap on the Zoom In icon .
Tap the menu icon , you can manage the applications (see details in the “Manage Application”section). You can go back or forward one level in the interface by tapping on the Back icon or Next icon . You can go back one level in the directory by tapping on the LevelUp button . Wherever you are in the interface, you can go back directly to the Home screen by tapping on the Return icon or Home icon . Tap the Home icon to go to the root directory.
to quit. Rename Files and Folders (1) (2) (3) (4) (5) In the file list, scroll up and down the list by sliding finger to select the file/folder that you want to rename. Hold the selected file/folder until a pop-up menu appears. Select “Rename”from the pop-up menu. Tap the input field to display the virtual keyboard, and then choose letters from the virtual keyboard to rename the file/folders. Tap “OK”to confirm the new name. Select Multiple Items You can select more than one file or folder together.
default by selecting the option “Send email from this account by default”. Then tap on “Next”to continue. (3) Type in required information for setting up the PO3/IMAP server. You can get the information from the service provider, network administrator or the Internet. (4) Tap on “Next”to continue after you set up the POP3 server. Your NextBook will check the server settings and will proceed to the IMAP server setting if the setting is correct. Setup the IMAP server as you do to POP3 server.
(3) Hold your tap on the account that you want to check until a menu pop up. (4) Tap “Account settings”,and then you should see all setting information about the account. You can edit these settings as you want. View Emails You should enter your mailbox when you start up the email application. In the mailbox, you can slide your finger up and down to scroll through the email list. Tap on an email to open it. Holding your tap on the email can display a menu.
tab. Uninstall Applications (1) Tap the Settings shortcut in the Home Screen to display all system settings. (2) Select “Applications”. (3) Select “Manage Applications”. (4) Tab on the application that you want to uninstall. (5) Tab on “Uninstall”to uninstall the application. Note: You cannot uninstall the pre-installed applications. Some of the applications developed for Android mobile might not run properly in the NextBook. Please consult the respective software developer for further information.
Location Security & Applications Privacy SD card & device Storage Language & keyboard Date & Time Touch Panel calibration Update Media Library Erase activation record About Device Animation –enables/disables the display of animations when opening and closing applications. Brightness –allows you to adjust the brightness of the screen. Screen timeout –allows you to adjust the delay before the screen automatically turns off and locks itself.
Specifications Item CPU DDR Built-in operating system Description Based on ARM926EJ (CPU+DPS) Main CPU frequency: 600MHz Auxiliary CPU Frequency(DSP digital command control): 560MHz 2X128MB Android OS 2.1 Memory Card type IBM PC or compatible PC, Note-book or Macintosh with USB port 2GB(256MB for apps installation, 1.2GB for internal system use) or above SD card: 1GB, 2GB, 4GB (SDHC), 8GB (SDHC) Operation System USB Interface Windows2000/XP/Vista/windows 7and MAC OS 10.4 or above USB2.
FLAC(Q1- Q10): 8~48KHZ APE ( Version 3.95,3.97,3.98,3.99,normal and fast ) : 8 ~ 48KHZ AAC(ADIF, ATDS Header AAC-LC and AAC-HE): 8~48KHZ File Format AVI, 3GP, MP4, RM, RMVB, FLV, MKV, MOV, WMV AVI(MPEG4 ASP/XVID/DIVX3/4/5) 3GP/MP4(H.264/H.26 3/MPEG4/XVID/DIVX 3/4/5) Video Coding Format RM/RMVB(Real video 8/9/10) FLV(Sorenson H.263, H.264) MKV(H.264/MPEG4 ASP/XVID/DIVX3/4/5) MOV(MPEG4, H.264, H.263) 1280*720/25FPS(Max) Audio Codec: MP1/MP2/MP3/AC3/AAC MPEG4/XVID/DIVX3/4/5:1280*720/ 25FPS(Max) H.
SNR Frequency Response Range 90dB above 20Hz— 20KHz Power Supply Rechargeable lithium-ion polymer battery; AC Adapter: AC Input 100-240V~50/60Hz, DC Output 5V/2A Storage Temp. Ambient Temp. -20℃ ~ +65℃ 0℃ ~ +50℃ Operation Relative Humidity 20% ~ 90%(40℃) Storage Relative Humidity 20% ~ 93%(40℃) FCC Statement FCC Caution: This equipment has been tested and found to comply with the limits for Class B digital device, pursuant to part 15 of the FCC Rules.
This product may receive radio interference caused by mobile telephones or other products during operation. If such interference is apparent, please increase separation between the product and the mobile telephone or other product. Industry Canada Requirement: This Class B apparatus complies with Canadian ICES-003. Cet appareil numérique de la classe B est conforme á la norme NMB-003 du Canada.