Android instruction (Picture for reference only) Content Content.............................................................................................................................. 1 [Customer]........................................................................................................................ 4 [Instructions for use]....................................................................................................... 4 1.Tips and warnings.......................................
[Volume setting]................................................................................................ 19 [Brightness]......................................................................................................... 20 [Navigation]........................................................................................................ 21 [Steering wheel learning]................................................................................. 22 [Logo setting]...............................
7>The product smoke has proved that the internal circuit has been burned and change the insurance FUSE can not solve the problem................ 44 8>How to adjust the sound, where is the equalizer set, the sound can not be adjusted............................................................................................................. 44 9>Support no image of reversing camera......................................................
[Customer] Dear Customer: Thanks for buy our car player, it is our honor and pleasure to server you to using our product. Before using this product, please read this manual very carefully and keep it properly. Your kindly feedback and support will prompt us to do the better. Thank you. [Instructions for use] For the sake of your safety, please don't watch the video while driving and operating a machine; Please dispatch the volume to clearly while driving to the voice to the outside world.
installation of the LCD screen is in the air conditioner near the air duct, please keep cool and hot air blows directly to the machine, otherwise it may damage the machine, even on the bus or personal injury. 8.Please do not use some sharp objects painted screen, don't use hard objects to press the screen, otherwise will cause damage to display or touch screen. 9.
avoid fire caused by electric shock or other unnecessary damage. Note: To prevent short circuit, please remember to turn off the car and disconnect the ACC connected to B+ before installation. [Installation] 1.
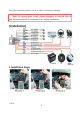
1>How to find the power cord of the car ? First turn the car key to the ACC state. Then regulate the Universal Watch to the 20V gear. Connect the black stylus to the power ground (the outer ironclad of the cigar lighter) and use the red stylus to test each wire of the car. Normally a car has two wires about 12V(some cars only have one). That is the positive pole line. How to distinguish the ACC and memory line? Pull out the car key after you find the two positive pole lines.
search for the user name of the unit. Click the connect button and the phone will show it is connected. If you want to play music with Bluetooth, press the function transition button to switch to Bluetooth mode and then click songs on your phone. You can also dial numbers on your phone to make a phone call with Bluetooth. 6>How to fix the unit ? Since each car has a different way of fixing the unit and the location of the screws are different, there is no defined way to fix the unit.
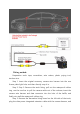
Wiring method: Preparation tools: tape, screwdriver, wire cutters, plastic prying tool, traction wire . Step 1: Insert the original accessory camera wire harness into the rear license plate light hole, and then directly snap it in. Step 2: Step 2: Remove the trunk lining, pull out the waterproof rubber ring, use the tow line to pull the camera cable out of the suitcase, insert the camera wire harness and data connector into the hole of the baffle, and finally rein stall the waterproof rubber ring.
lead out from the rear trim panel along the original car harness. Step 4: Peel off the sealing strip on the left side door of the rear seat, route the cable into the rear cockpit, and pull out the data power integrated plug and the remaining extension cords. Step 5: Recover the trunk, and insert the extension cord into the gap of the plastic panel along the rubber strip on the door side, all the way to the cockpit door.
[Main interface] The above are the interface diagrams of four different styles. The specific product interface is subject to the actual product you receive. 2.On-screen - Main menu operation • Touch the icon on the desired mode on screen and the unit will then enter into the mode that selected for operation. • Hold & slide the operation icon on screen to shift to other MAIN MENU that shows the hidden input or operation icons.
1.Touch to shift screen to MAIN MENU. 2.Touch to hide the shortcut menu button area. Touch the top and pulldown of the screen and wake up the shortcut menu button. 3.Touch to display all the programs running in the background, where you can choose to close the programs running in the background. 4.Touch to shift screen to return to the previous interface. 5.Touch to screen to start various System Settings of the unit.
6.Touch to shift screen to the Icon Desktop of the installed app. 7.Touch to shift screen to navigation. 8.Touch to shift screen to Music Play Operation. 9.Touch to shift screen to Blue Tooth Operation. 10. Touch to shift screen to Radio Operation. 11. Touch to screen to start various System Settings of the unit. 12. Touch to shift screen to Video Play Operation. 3.
1.Touch to shift screen to MAIN MENU. 2.Touch to hide the shortcut menu button area. Touch the top and pulldown of the screen and wake up the shortcut menu button. 3.Touch to display all the programs running in the background, where you can choose to close the programs running in the background. 4.Touch to shift screen to return to the previous interface. 5.Touch to shift screen to SPEAKER MENU. 6.The user can select different system preset EQ modes and set different values. 8.
of setting the speaker. [Factory settings] 1.Enter the password to enter the Factory Settings. The password is: 8888.(Different products, the password may be different) 2.The Factory Setting interface is an option for important data of the system. Please set it carefully.
1.Touch to shift screen to MAIN MENU. 2.Touch to hide the shortcut menu button area. Touch the top and pulldown of the screen and wake up the shortcut menu button. 3.Touch to display all the programs running in the background, where you can choose to close the programs running in the background. 4.Touch to shift screen to return to the previous interface. 5.WIFI: Touch to open the WIFI connection interface, search for the WIFI name you need, then click on the connection. 6.
the total capacity and usage of built-in memory and the expanded memory 12.Location: Touch to get the current location information. 13.Security: Touch to set up security options for the system 14.Accounts: Touch to view or add user information. 15.Google: Touch to setting Google server information. 16.Language & input: Touch to set up language for the system, how many more the 40 languages to choose from. and you can also set up the system's input method on this page. 17.
3>Large text: Turn on this switch to make the font displayed on the screen larger. 4>High contrast text: Users can turn on or turn off this operation. 5>Touch & hold delay: Users can choose three modes: Short, Medium, Long. 6>Quick boot: Users can turn on or turn off this operation. 7>Color inversion: If turn on this switch, the background of the screen will turn black. 8>Color correction: Users can turn on or turn off this operation. 20.
[Volume setting] 1.Touch to shift screen to MAIN MENU. 2.Touch to hide the shortcut menu button area. Touch the top and pulldown of the screen and wake up the shortcut menu button. 3.Touch to display all the programs running in the background, where you can choose to close the programs running in the background. 4.Touch to shift screen to return to the previous interface. 5.After touching the hook, the machine will silence all the sounds output. 6.
[Brightness] 1.Touch to shift screen to MAIN MENU. 2.Touch to hide the shortcut menu button area. Touch the top and pulldown of the screen and wake up the shortcut menu button. 3.Touch to display all the programs running in the background, where you can choose to close the programs running in the background. 4.Touch to shift screen to return to the previous interface. 5.Connect the ILL line of the tail line of the machine to the positive pole of the headlamp of the car.
[Navigation] 1.Touch to shift screen to MAIN MENU. 2.Touch to hide the shortcut menu button area. Touch the top and pulldown of the screen and wake up the shortcut menu button. 3.Touch to display all the programs running in the background, where you can choose to close the programs running in the background 4.Touch to shift screen to return to the previous interface. 5.After touching the hook, boot automatically run navigation. 6.
[Steering wheel learning] 1.Touch to shift screen to MAIN MENU. 2.Touch to hide the shortcut menu button area. Touch the top and pulldown of the screen and wake up the shortcut menu button. 3.Touch to display all the programs running in the background, where you can choose to close the programs running in the background. 4.Touch to shift screen to return to the previous interface. 5.Touch to clear all learned steering wheel buttons. 6.List of steering wheel keys that can be used for learning.
[Logo setting] 1.Logo Set: The user can set the car logo displayed when the machine is turned on. The user can select from the pictures preset by the system, or select from user uploaded pictures. 2.Animation: The user can set the animation when the machine is turned on. The user can select from the animation preset by the system, or select from user uploaded animation.
1.Touch to shift screen to MAIN MENU. 2.Touch to hide the shortcut menu button area. Touch the top and pulldown of the screen and wake up the shortcut menu button. 3.Touch to display all the programs running in the background, where you can choose to close the programs running in the background. 4.Touch to shift screen to return to the previous interface. 5.Float Bar: After touching the hook, Float Bar(Page) will appear on the screen, you can click Float Bar to open the shortcut button. 6.
1.Touch to shift screen to MAIN MENU. 2.Touch to hide the shortcut menu button area. Touch the top and pulldown of the screen and wake up the shortcut menu button. 3.Touch to display all the programs running in the background, where you can choose to close the programs running in the background. 4.Touch to shift screen to return to the previous interface. 5.Touch to shift screen to BT CALL MEUN. 6.Touch to shift screen to BT PHONEBOOK MEUN. 7.Touch to shift screen to BT HISTORY MEUN. 8.
11.Phone number display area, number display area entered by numeric keypad. 12.Touch to dial the phone number of the current input area. 13.Touch to re-drawing the last dialed number. 14.Keyboard area for incoming telephone numbers. 15.Search contacts in the current address book. 16.List of downloaded address book displays. 17.Select a contact from the contact list and touch the button to dial the contact number. 18.Touch to download the address book of the currently connected cell phone. 19.
37.Device PIN: Touch to change the default Bluetooth device PIN. The default Bluetooth device name is: 0000/1234. 38.Auto answer: Touch to turn on or turn off the Auto answer operation. When this operation is turn on, and the phone calls in, the phone will be automatically answered 39.Auto connect: Touch to turn on or turn off the Auto connect operation.
4.Touch and drag the progress bar to adjust the volume. 5.Detailed information display area of the currently playing song. 6.The progress bar of the currently playing song, touch and drag the progress bar to change the playback progress. 7.Touch to shift screen to MUSICLIST MENU. 8.Touch to switch the play mode: Random / Repeat all / Repeat one. 9.Touch to switch to the previous track . 10.Touch to start, pause or resume playback. 11.Touch to switch to the next track . 12.Touch up page song list.
4.Touch to switch screens to return to the previous interface. 5.Touch to switch the screen to the main menu. 6.Touch to start scanning full band radio stations and store the scanned effective radio stations in the radio station list, and automatically play the stored first radio station after the scan is completed. 7.Touch forward to scan for valid broadcast stations. After scanning to a valid station, it will stop playing the station and will not continue scanning. 8.Touch to pause the broadcast. 9.
[Video] 1.Touch to shift screen to MAIN MENU. 2.Touch to hide the shortcut menu button area. Touch the top and pulldown of the screen and wake up the shortcut menu button. 3.Touch to display all the programs running in the background, where you can choose to close the programs running in the background.
4.Touch to shift screen to return to the previous interface. 5.Touch to shift screen to Sound Settings. 6.Touch to shift to previous track playback. 7.Touch to start, pause or resume playback. 8.Touch to shift to next track playback. 9.Repeated touch can switch the screen display mode: Auto, Full Screen, 4:3, 16:9. 10.The progress bar of the currently playing video, touch and drag the progress bar to change the playback progress. 11.Video list display area.
[TIMA] 1.Touch to exit the program. 2.Touch to switch the screen to the Android USB mobile phone interconnection interface 3.Touch to switch the screen to the Android wireless mobile phone interconnection interface. 4.Touch to switch the screen to the Apple wireless mobile phone interconnection interface. 5.Touch to display information about the software. 6.Click to enter the file transfer interface. 7.Tap to open the QR code, and then scan the QR code on the phone to download the TIMA APP.
Open the TIMA application and follow the prompts on the phone to complete the connection. Note: If you do not find the developer option in the phone settings, please go to About phone and click the version number 7 times in a row. The system will prompt you: You are already in developer mode. [IPHONELINK menu] 1.Open mobile phone hot spot and select your hot spot in the list. 2.Slide up your iPhone, click the Air Play mirror. 3.Scan QR code and Download TIMAAPP, install TIMAAPP.
to the positive wire. 5.Offline Map In order to use the offline function of the device, please follow below steps for setup. 1.Power on the unit and connect the device to internet by Wifi. 2.Find the APP named Here in the main menu.
3.Follow the tips of the app to the main map page and find the option menu.
4.Click"Use app offline" and download your preferred map data in the country list.
6.
The basic version of the intelligent voice system has basic offline functions, that is to say, you can use the basic offline functions without connecting to the network, without waking up the intelligent voice system Nex, just say the command, Nex. Complete the following tasks for you: play, pause and close music, open and close navigation, play and close video, channel search, answer and hang up calls, turn on and off Bluetooth, adjust volume, etc.
DSP is a digital audio processor, which is a digital audio signal processing device.
a digital signal, and then performs a series of tunable algorithm processing on the digital signal to meet the application requirements of improving sound quality, matrix mixing, noise cancellation, echo cancellation, and feedback cancellation. Then output multi-channel analog signals through digital-to-analog conversion. Thank you again for using our products. If you have other questions, please contact our customer service staff.
[Simple Trouble shooting] PROBLEMS,CAUSE&SOLUTIONS 1> Unable to boot normally -Reason for not booting 1."Yellow" "Red" "Black" this 3 lines only connected 2 line of them, so it will not start, it should be that the yellow line is connected to the positive pole, red line to the key control line, black to the negative pole, less connection or wrong connection does not boot. 2.
-Automatic shutdown usually has these following conditions 1.The cable error connect:If the blue cable (automatic antenna power supply) is connected to the power cable of the unit, an automatic shutdown will occur. Please follow the correct wiring method to solve the problem. 2.The voltage is unstable: please find a 12V-5A which one is the power supply and re-tested to see if it will automatically shut down or no. If it does not automatically shut down after the test, please replace the power supply.
- Check the phone to see if you can search for the unit code or no. Operation steps: turn on the unit, use the phone Bluetooth search, search for CAR-MP5,then click the connection, after connecting, you can answer the phone or Bluetooth to play the song. PIN Code: 0000 /1234. 7>The product smoke has proved that the internal circuit has been burned and change the insurance FUSE can not solve the problem - In this case, the unit needs to be repaired.
video cable, the red wire of the power cable and the wire of the video cable are screwed together on the positive pole of the reverse lamp, and the black wire of the power cable is not used, connected, the other end of the video cable is connected to the CAME video input interface on the back of the unit. The red line coming out of the video line is connected to the reversing control line of the power line. 2. The camera is broken.
find a screwdriver or a metal strip to insert it instead of the antenna. 12>How to install This depends on your personal hands-on skill. Most people can install it themselves. That is so good. No worry about it, I will tell you how to do it. [Installation method]: Remove the original car radio, the new unit can be installed back according to the installation method of the original car radio (that is, how the original car unit is installed, you will install it back, you will do).
16> After a while there is no sound - Disconnect all the speaker cable from the unit (do not remove all of them), and then find an external speaker to receive the gray and purple of the tail line of the unit. Green any group, and then try to see if there is any sound. If there is a sound, it is proved that the car's speaker line is shortcircuited with iron or the speaker is damaged. If there is no sound, the unit is broken. 17>Machine reset 1.