
Installation Guide


WARNING
Do not place toilet bowl cleaner tablets in toilet tank. The use of these tablets in this manner may cause
leakage and void warranty.
INSTALLATION INSTRUCTIONS (cont.)
Possible Cause:
Corrective Action:
Possible Cause:
Corrective Action:
Possible Cause:
Corrective Action:
Possible Cause:
Corrective Action:
Possible Cause:
Corrective Action:
Possible Cause:
Corrective Action:
Possible Cause:
Corrective Action:
Possible Cause:
Corrective Action:
Water supply is blocked.
Shut off water supply, disconnect supply and check water supply valve opening. (Valve is located on wall or floor).
Water level is too low in tank.
Adjust water level in tank to water level mark by turning adjustment screw on Fluidmaster
TM
valve. Refer to
installation instructions (Step 9) to adjust the water level.
Water supply valve is partially closed.
Open supply valve.
Partially clogged trapway or drain.
Clear passage with an auger. If you are unable to clear blockage, please contact a plumber.
Outlet is partially blocked by wax gasket.
Lift toilet (if your toilet is a back outlet, pull from wall) and replace wax ring gasket.
Water level in tank is set too high.
Refer to installation instructions (Step 9) to adjust the water level.
Debris lodged in the valve.
Shut off water supply valve; remove front cap from the Fluidmaster
TM
valve by turning counterclockwise; turn water
supply on very slowly and flush out the line.
Fill valve seal may need to be replaced.
Shut off water supply; remove the front cap from the Fluidmaster
TM
valve and replace the rubber seal disk.
PROBLEM: POOR OR SLUGGISH FLUSH
PROBLEM: FILL VALVE DOES NOT SHUT OFF
NEED HELP? Visit: niagaracorp.com/troubleshooting
TROUBLESHOOTING GUIDE
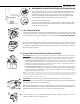
TOILET SEAT INSTALLATION INSTRUCTIONS (Seat included in All-In-One units only)
1. Place the seat on the toilet, aligning the holes of the seat with the holes in the back of
the toilet bowl.
2. Insert the screw through the holes to secure it with the nut from the bottom of the toilet,
with the nut’s tapered end on top.
3. Adjust seat position for best fit on toilet bowl.
4. Secure nut from the bottom of the toilet, use a regular screwdriver to tighten the fit.
(See picture)
5. Push the decorative cap down.
8.