
Installation Guide
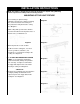

1) Remove the Acrylic lens from the fixture and place aside on a flat surface to avoid damage
to the lens. To remove the lens, carefully slide the lens to one end of the fixture. Gently grab
the lens and pull it out.
2) Squeeze wireway cover at both ends on both sides to release from the fixture housing.
Remove the cover and place aside on a flat surface for later use.
3) Carefully turn the fixture housing over and locate the center knockout on the housing. Make
sure the fixture housing is supported on the underside and then by placing a screwdriver
on the edge of the knockout ( SAFETY GLOVES AND GLASSES SHOULD BE WORN WHEN
REMOVING ANY KNOCKOUTS ).
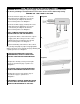
4) Determine mounting position in the room. Power supply wires will extend from the
" JUNCTION BOX " located in the ceiling. If you not have a " JUCTION BOX " in the ceiling,
consult a qualified professional electrician.
Check both the fixture and house for loose or damaged
wiring. If the wiring is loose or
damaged, it must be repaired prior to the fixture installation. DO NOT PROCEED UNTIL THE
WIRING HAS BEEN FIXED OR REPLACED WITH NEW WIRES.
PREPARATION OF LIGHT FIXTURE FOR INSTALLATION
CAUTION
INSTALLATION INSTRUCTIONS
WARNING:
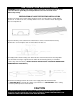
Before wiring to the power supply, turn off the electricity at fuse or circuit
b
reaker box. Ensure grounding to avoid potential electrical shock and to ensure
reliable lamp starting.