
Installation Guide

NICOR, Inc. 2200 Midtown Place NE, Albuquerque, NM 87107 P: 800.821.6283 F: 800.892.8393 www.nicorlighting.com July 15, 2020 5:06 PM rev 1.0
Installation
3
4
5
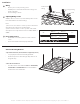
Wiring
• Remove j-box cover by removing screw.
• Carefully remove desired knockouts for line voltage and
0-10V control wires.
• Connect wiring as shown.
Adjusting Wattage or CCT
With the driver cover removed, set the switch positions on the
back of the xture to the desired settings.
Note:
1) Power selection switch is a three-position switch that
will adjust light output: low/medium/high.
2) CCT selection switch is a three-position switch that
will adjust Color Temperature between 3500K, 4000K, or
5000K.
Reassembly and Test
• Reattach the cover of the junction box and secure the
screw.
• Power on the xture and test for proper function.
Alternate Mounting Methods
Suspended Installation (cables/hardware supplied by others)
• Use properly rated and sized mounting hardware.
• Attached suspension cables through safety wire holes of
the grid tie clips.
Surface Mount Installation
• The T6CS is able to be installed in NICOR kits SK14M10WH,
SK22M10WH or SK24M10WH. Reference kit installation
instructions for more information.
LINE
Black (line)
Ground
White (neutral)
Purple (dim +)
Grey (dim -)
Black (line)
Green (ground)
White (neutral)
Purple (dim +)
Grey (dim -)
T6CS
Line Voltage Wiring
0-10V Control
Wiring
Screw