
Installation Guide


NICOR, Inc. 2200 Midtown Place NE, Albuquerque, NM 87107 P: 800.821.6283 F: 800.892.8393 www.nicorlighting.com August 11, 2020 3:48 PM rev 1.0
TAR SELECT LED TROFFER RETROFIT KIT
INSTALLATION INSTRUCTIONS
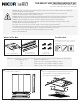
Carefully unpack the xture from its packaging. Inspect product
for defects due to shipping.
Prior to installation, disconnect all incoming power to xture.
Remove existing hardware (lens/lens frame, parabolic louver,
reectors/ballast covers, brackets, lamps/lamp holders).
Leave supply and grounding leads.
1
2
What’s In The Box
One (1) TAR LED Troer
Tools Needed
This LED Troer Retrot Kitrequires very few tools
for installation. A drill or a screwdriver and a pair
of wirecutters.
WARNING - Risk of re or electric shock. The electrical rating of these products are 120-277 Vac, the installer must determine whether they
have 120-277V at the luminaire before installation.
WARNING - Risk of re or electric shock. LED Retrot Kit installation requires knowledge of luminaires electrical systems. If not
qualied, do not attempt installation. Contact a qualied electrician.
WARNING - Risk of re or electric shock. Install this kit only in the luminaires that have the construction features and dimensions shown in the
photographs and/or drawings and where the input rating of the retrot kit does not exceed the input rating of the luminaire.
WARNING - To prevent wiring damage or abrasion, do not expose wiring to edges of sheet metal or other sharp objects.
WARNING - Risk of re or electric shock. Luminaire wiring and electrical parts may be damaged when drilling for installation of LED
retrot kit. Check for enclosed wiring and components.
Do not make or alter any open holes in an enclosure of wiring or electrical components during kit installation
The installation must only be performed by a licensed electrician. To prevent death, injury or damage to property, this product must be installed in
accordance to National Electrical Code (NFPA70) in the US or Canadian Electrical Code (CSA 22.1) in Canada.
Disconnect power and wait until xture has cooled before installing the product or servicing it.
MIN. 90°C SUPPLY CONDUCTORS
Two (2) End Brackets
Two (2) Side Brackets
Four (4) Self-
Tapping Screws
NOTE: The existing uorescent luminaires housing shall be larger than dimensions described in the below table:
Housing Designation Overall Inner Dimensions
2'x2' 24.0in x 23.9in x 3.1in (610mm x 608mm x 78mm)
2'x4' 48.0in x 23.9in x 3.1in (1220mm x 608mm x 78mm)
1'x4' 48.0in x 12.0in x 3.1in (1220mm x 305mm x 78mm)
Model(s): TARS114U, TARS122U, TARS124U