
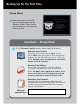
Installation Guide


2
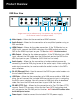
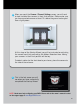
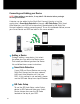
DVR Rear View
Video Inputs – Allows for the connection of BNC cameras.
Audio Output – Allows for the connection of an amplified speaker using an
RCA connector.
HDMI Output – Allows for the video connection. If the TV/Monitor has an
HDMI input, connect the HDMI cable from the HDMI output port on the
DVR to the HDMI input port on your TV/Monitor. NOTE: Preferred method.
VGA Output – Allows for the video connection. If the TV/Monitor has a VGA
input, connect the VGA cable from the VGA output port on the DVR to the
VGA input port on your TV/Monitor (VGA Cable not included).
Audio Inputs – Allows for the connection of audio enabled cameras by
connecting the white RCA plug to one of the audio inputs. After making the
audio input connection, be sure to enable the audio function in the DVR’s
menu interface.
RJ-45 (Ethernet) Port – Used to connect the DVR to your router/modem via
the included Ethernet cable.
USB Ports – Allows for the connections of a USB mouse and/or a USB flash
drive. You will connect the included USB mouse to assist you in navigating
the DVRs menu interface. You will connect a USB flash drive to download
video files from the DVR and save them to your USB flash drive.
RS-485 (PTZ) Port – Allows for the connection of a Pan-Tilt-Zoom (PTZ)
camera. Some PTZ cameras utilize Up-the-Coax (UTC) technology and
will not require the RS-485 port to function. NOTE: Not all PTZ cameras utilize
the RS-485 port to function.
Power Input – Used to connect the included 12V DC power supply.
Images used are for reference only. Your product may vary slightly.
An 8 channel model is displayed above.
1
2
3
4
5
6
7
8
9
LAN / USB RS485
POWER
12 V
AUDIO INAUDIO OUTVIDEO IN HDMI
VGA
1
2
5
7
6
983 4
Product Overview