DS00134A/VCS-2D-HP 2/4/99 4:10 PM Page 12 M O D E L VCS-2D-HP VCS-2D-HP HIGH POWER STEREO VOLUME CONTROL NILES INSTALLATION & OPERATION GUIDE
DS00134A/VCS-2D-HP H 2/4/99 4:10 PM P I G H O W E R S Page 1 T E R E O V O L U M E C O N T R O L VCS-2D-HP High Power Stereo Volume Control TABLE OF CONTENTS Introduction 1 Features and Benefits 1 Installation Considerations 3 Installation Operation 8 10 Specifications 10 Introduction The VCS-2D-HP is a wall-mount, Decora® style speaker volume control. It connects between the speaker-level output of an amplifier, speaker selector, etc. and a pair of speakers.
DS00134A/VCS-2D-HP H I G H 2/4/99 4:10 PM P O W E R S Page 4 T E R E O V O L U M E C O N T R O L of attenuation instead of 8. Steps 11-6 attenuate -3 dB per step; steps 5-2 are -6 dB per step. Step 12 is “full-on” and step 1 is “full-off”. The VCS-2D-HP delivers “POP-FREE” switching between all steps.
DS00134A/VCS-2D-HP H I G H 2/4/99 4:10 PM P O W E R S Page 5 T E R E O V O L U M E C O N T R O L ● Isolated left and right channel grounds make it safe for use with any amplifier. ● May be used with 4, 6, or 8 ohm speaker systems. ● Ideal for both home and commercial sound installations. ● Available colors: White, Bone, Almond, or Black. TOOLS REQUIRED ● Proudly made in the USA • No. 2 Phillips Screwdriver ● Ten year parts and labor warranty.
DS00134A/VCS-2D-HP H I G H 2/4/99 4:10 PM P O W E R S Page 8 T E R E O V O L U M E of the wall. In some instances, the use of a p-ring may be inappropriate, such as in a retro-fit (existing) installation, or when building codes require that wall devices be enclosed in electrical boxes. Contact your local building code and inspection department if unsure.
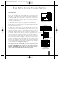
DS00134A/VCS-2D-HP H I G H 2/4/99 4:10 PM P O W E R S Page 9 T E R E O V O L U M E C O N T R O L VCS-2D-HP Mounting Location Convenient mounting locations for the VCS-2D-HP are: ● Near entryways or exits ● Near a desk ● At your bedside ● Close to a telephone ● Near other wall controls (see caution next page) DO NOT INSTALL THE VCS-2D-HP INTO ELECTRICAL BOXES WITH 110 VOLT DEVICES Some states or municipalities allow devices such as the VCS2D-HP to be installed into the same electrical box as 110
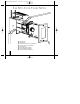
DS00134A/VCS-2D-HP H I G H 2/4/99 4:10 PM P O W E R S Page 10 T E R E O V O L U M E C O N T R O L 1. Obtain the VCS-2D-HP knob and Decora-style insert in the desired color from your Niles dealer. 2. Holding the VCS-2D-HP control as shown in (Figure 1), make sure that the knob is turned completely counterclockwise, to the off position. Note the current position of the knob; this will ensure that you install the new knob in the same position as the old one.
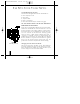
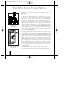
DS00134A/VCS-2D-HP H I G H 2/4/99 4:10 PM P O W E R S Page 7 T E R E O V O L U M E C O N T R O L a b e c d f g (a) Electrical Box (b) Speaker Wire (c) VCS-2D-HP Volume Control (supplied) (d) Snap-on Color Insert (supplied) (e) Knob (supplied) (f) Device Screws (2 supplied) (g) Decora Wallplate (supplied) (h) Faceplate Screws (2 supplied) 7 h
DS00134A/VCS-2D-HP H I G H 2/4/99 4:10 PM P O W E R S Page 6 T E R E O V O L U M E C O N T R O L Installation If you are installing the VCS-2D-HP into an existing wall, take time to consider any possible obstructions which may be hidden inside the wall, such as wood and metal studs; electrical, telephone or other types of wiring; plumbing; conduit; old wall safes; etc. 1. Install the electrical box or p-ring in the usual manner. Figure 3 Wiring the Connectors 2.
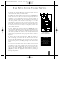
DS00134A/VCS-2D-HP H I G H 2/4/99 4:10 PM P O W E R S Page 3 T E R E O V O L U M E C O N T R O L 4. Plug the connectors into the VCS-2D-HP as shown in (Figure 5) Figure 5 Installing the Connectors Figure 6 Loosening the Screws for a Flush Fit 5. Secure the VCS-2D-HP to the electrical box or p-ring. Insert the 11/4” long device screws into the oblong-shaped screw holes on the top and bottom of the VCS-2D-HP.
DS00134A/VCS-2D-HP H I G H 2/4/99 4:10 PM P O W E R S Page 2 T E R E O V O L U M E Operation 1. Make sure the amplifier or receiver power is OFF and set the volume to minimum. 2. Set the VCS-2D-HP volume to maximum (fully clockwise). 3. If you are using a Niles speaker selection system, locate the ON/OFF button which corresponds to the speaker pair you wish to play. Set it to the ON position. 4. Turn on the amplifier or receiver and select a source, such as the tuner or CD player. 5.
DS00134A/VCS-2D-HP 2/4/99 4:10 PM Page 11 NILES ® Niles Audio Corporation www.nilesaudio.com 12331 S.W. 130 Street Miami, Florida, 33186 Tel: (305) 238-4373 Fax: (305) 238-0185 ©1999 Niles Audio Corporation. Niles and the Niles logo are registered trademarks of Niles Audio Corporation. Decora® is a registered trademark of Leviton Manufacturing Company.