
Owner's Manual

14
TOLL FREE: 1-800-798 -7398
www.ninjakitchen.com
15
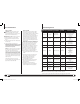
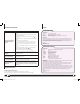
FUNCTION CONTAINER ATTACHMENT
SPEED
BUTTON
TYPE OF FOOD
Whipping Pitcher
Whipping
Attachment
1
Whipped cream
Thin pancake batter
Scrambled eggs
Mousse
Meringue*
Mincing Bowl Blade Assembly Pulse
Onion
Garlic
Herbs
Kneading Bowl Dough Blade
1
(DOUGH)
Bread dough
Pie dough
Pizza dough
Pretzel dough
Dough Mixing Bowl Dough Paddle
1
(DOUGH)
Cookie dough
Blending Bowl Blade Assembly
2
(BLEND)
Pâtés
Stewed fruits
Dips
Apple sauce
Spreads
Soups
Baby food
Grinding Bowl Blade Assembly 2 Meat
Grating Bowl Blade Assembly 3 or Pulse
Grated cheese
Bread crumbs
Chopping
Pitcher or
Bowl
Blade Assembly Pulse
Salsa
Vegetables
Nuts
Mixing
Pitcher or
Bowl
Blade Assembly
2
(BLEND)
Light cake mixes
Batters
Ice Crushing
Pitcher or
Bowl
Blade Assembly
3
(ICE CRUSH)
Ice
Pureeing
Pitcher or
Bowl
Blade Assembly 3
Smoothies
Smooth soups
Milkshakes
Speed Setting & Uses
IMPORTANT: Use the suction lever to secure the unit to the counter or table top when
using the dough blade or dough paddle on SPEED 1/DOUGH.
* Open the pouring spout cap after 30 seconds to allow egg mixture to aerate.
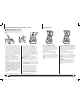
HOW TO STORE
1 Store the Ninja
®
Kitchen System 1200
™
upright with the pitcher on the motor
base, 6-Blade assembly inside the pitcher
and lid on the pitcher. Do not place
anything on top. Store the bowl with the
4-Blade assembly inside and the lid on
top. Keep the bowl and the rest of the
attachments along side the appliance
where it will not be damaged and won’t
cause hazard.
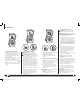
RESETTING THE MOTOR THERMOSTAT
The Ninja
®
Kitchen System 1200
™
features
a unique safety system which prevents
damage to the unit’s motor and drive
system should you inadvertently overload
your appliance. If the appliance is being
overloaded, the motor will stop and the
power light will remain lit and speeds 1,
2 and 3 will flash. To reset the appliance,
follow the resetting procedure below:
1 Unplug the appliance from the electrical
outlet.
2 Remove and empty the container and
ensure that no food is jamming the
cutting blades or attachments.
3 Allow the appliance to cool for
approximately 15 minutes.
4 Re-install the container onto the base
and re-plug the appliance into the
electrical outlet.
5 Proceed to use the appliance as
before making sure not to exceed the
recommended maximum capacities..
HOW TO CLEAN
CAUTION: Make sure that the motor
base is unplugged from the power
source before inserting or removing any
attachment and before cleaning.
CAUTION: DO NOT immerse the motor
base into water or any other liquid.
1 Separate/remove all parts from each
other.
2 Clean the motor base with a damp cloth
and wipe dry.
3 Place the pitcher and bowl in the
dishwasher. Place the lids and
attachments on the top rack. Use caution
when handling the blade assemblies as
the blades are very sharp.
NOTE: You may also wash the containers
by filling ¾ of the container with warm
water and a drop of dish washing
detergent, placing the corresponding lid
on the container and pressing the pulse
button a few times. Once clean, remove
the container from the motor base. Rinse
the container, attachment and lid under
running water. Allow all the parts to dry
before storing.
Please call customer service if any
servicing needs to be performed on the
appliance at 1-800-798-7398.
Care & Maintenance
BL700_30_SERIES_IB_ENG_110222_1.indd 14-15 11-02-22 2:50 PM